EDIUS 7 Online Help
Reference ManualHardware Setup Guide
Installation Manual
User Guide
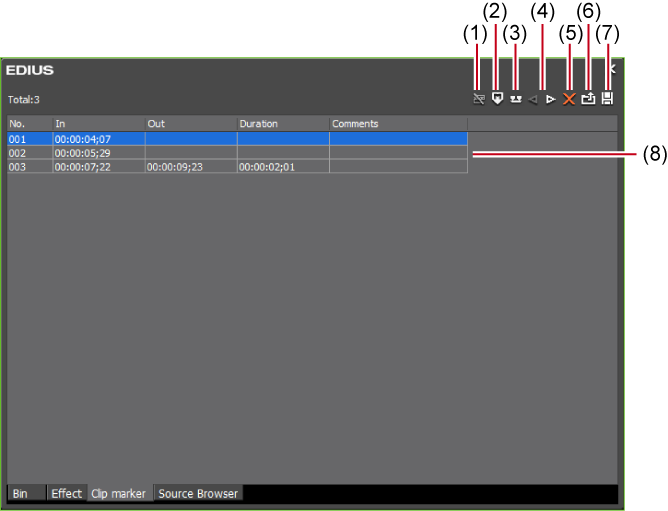
Display the [Clip Marker] list in the [Marker] palette.

 Alternative
Click [View] on the menu bar, and click [Palette] → [Marker].
The [Effect], [Information] and [Marker] palettes can be shown/hidden together by clicking [View] on the menu bar and clicking [Show All] or [Hide All].
Showing/hiding palette: [H]

If you switch the show/hide setting for the [Marker] palette, the setting for the bin window, source browser window, and palette tab associated to the [Marker] palette is also switched. To switch the show/hide setting individually, release the association of the window and the palette.
Each click switches between the [Clip Marker] list and the [Sequence Marker] list.
Displaying the [Sequence Marker] List
|
(1)
|
[Toggle Sequence Marker/Clip Marker]
|
Switch between the [Clip Marker] list and the [Sequence Marker]list. |
|
(2)
|
[Set Marker]
|
Add the clip marker to the position the slider on the Player. |
|
(3)
|
[Set Mark In/Out]
|
Add the clip marker with range to between In and Out points of the clip currently displayed on the Player. |
|
(4)
|
[Go to Previous Marker]/[Go to Next marker]
|
Move to the previous/next clip marker. |
|
(5)
|
[Clear Marker]
|
Select and delete a clip marker from the clip marker list. |
|
(6)
|
[Import Marker List]
|
Import a clip marker list. |
|
(7)
|
[Export Marker List]
|
Export the clip marker list as a CSV file. |
|
(8)
|
Clip marker list
|
Display the timecode or comment of the set clip marker. |
 Note
NoteThe [Clip Marker] list displays the clip marker information of clips currently displayed on the Player when the focus is on the Player and the clip marker information of clips currently displayed on the timeline when the focus is on the Recorder.
You can set markers to source clips while sources are being captured.
Importing Sources from DV Tape (Capture)
Importing Sources All Together (Batch Capture)
The list of set markers is displayed. Enter a comment, if necessary.
Multiple clip markers can be added by shortcut keys by the following operation. At the scene to add the clip marker to, press [V] on the keyboard, and enter the comment as required. To continue to add clip markers in scenes, press [Ctrl] + [M] on the keyboard, and enter the comment as required.
You can set clip markers to source clips registered to the bin and to the source currently displayed on the Player.
Displaying Clips on the Player
Playing Back with Shuttle/Slider

The clip marker is displayed for slider on the Player, and the timecode of the clip marker is displayed in the [Clip Marker] list.
 Alternative
Click [Marker] on the menu bar, and click [Add Mark].
Right-click the clip marker list, and click [Set Mark].
Right-click the slider on the Player, and click [Set clip marker/Clear clip marker (Toggle)].
Setting clip markers: [V]
You can move marker positions by the following operation.
Click the timecode at [In] in the [Clip Marker] list, and enter the desired numerical value.
Drag the clip marker on the slider with [Ctrl] on the keyboard held down.
You can enter comments at the same time you are setting clip markers.
Click [Marker] on the menu bar, and click [Edit Mark] to enter the comment.
NoteWhen the focus is on the Recorder, clip markers cannot be set.
Additions, deletions and edits made to clip markers are automatically reflected on clips in the bin. To leave behind the information of a clip before it is edited, register that clip to the bin as a different clip in advance.
Registering between In and Out Points to the Bin As a Separate Clip (Subclip)
When you add, delete, and edit the clip marker with a clip on the timeline displayed on the Player, register it to the bin as another clip, if necessary.
Clip markers cannot be set in the [Sequence Marker] list.
You can set clip markers with range to source clips registered to the bin and to the source currently displayed on the Player.
Displaying Clips on the Player
The clip marker with range is set to the slider on the Player, and the timecode and duration of the In and Out points of the clip marker are displayed on the [Clip Marker] list.
 Alternative
Right-click the clip marker list, and click [Set Mark In/Out].
Right-click the slider on the Player, and click [Set Clip Mark In/Out].
Click [Marker] on the menu bar, and click [Add Mark to In/Out Point].
In step 1, the clip marker with range is set with the start of the clip as the In point when the In point has not been set and with the end of the clip as the Out point when the Out point has not been set.
You can change the range of the clip marker by clicking [In], [Out] in the [Clip Marker] list or the timecode in [Duration] and entering the numerical value.
You can move the marker position by dragging the clip marker with range on the slider with [Ctrl] on the keyboard held down.
Only the clip marker of the In point is displayed as the clip marker with range when that clip marker is not focused.
NoteClip markers with range cannot be set when the position of the In points of video and audio differ or when the position of the Out points of video and audio differ.
When the focus is on the Recorder, clip markers cannot be set.
Additions, deletions and edits made to clip markers are automatically reflected on clips in the bin. To leave behind the information of a clip before it is edited, register that clip to the bin as a different clip in advance.
Registering between In and Out Points to the Bin As a Separate Clip (Subclip)
When you add, delete, and edit the clip marker with a clip on the timeline displayed on the Player, register it to the bin as another clip, if necessary.
Clip markers cannot be set in the [Sequence Marker] list.
You can delete set clip markers.
Displaying Clips on the Player
AlternativeDrag the clip marker to delete from the clip marker list, and drop it outside the [Clip Marker] list.
Drag the clip marker to delete from the clip marker list, and drop it on [Clear Marker].

Right-click a clip marker to delete from the clip marker list, and click [Clear marker].
Right-click the clip marker on the slider on the Player, and click [Clear clip marker].
Move the slider on the Player to the clip marker to delete, right-click the slider, and click [Set clip marker/Clear clip marker (Toggle)].
Move the slider on the Player to the clip marker to delete, click [Marker] on the menu bar, and click [Clear Mark] → [Cursor].
Click [Delete] in the [Marker Comments] dialog box for the clip marker.
Deleting clip markers: [Delete]
You can also delete all clip markers in the clip marker list in a single operation by the following operation.
Click [Marker] on the menu bar, and click [Clear Mark] → [All].
Deleting all markers: [Shift] + [Alt] + [V]
NoteWhen the focus is on the Recorder, clip markers cannot be deleted.
You can switch the show/hide setting for set clip markers for both the display on the Player and the display on the timeline.
When this item is checked, the clip marker or comment is displayed. This is no longer displayed when this item is unchecked.

Also, the clip marker is displayed on clips on the timeline when [Timeline] is clicked to check it. This is no longer displayed when this item is unchecked.

Only comments for clip markers can also be hidden. Uncheck [Marker] in [Overlay].
Only the clip marker of the In point is displayed as the clip marker with range when that clip marker is not focused.
