EDIUS 7 Online Help
Reference ManualHardware Setup Guide
Installation Manual
User Guide
In the multicam mode, you can play back and edit up to 16 screens of multiple clips simultaneously.
The preview window switches from the standard mode to the multicam mode.
When the preview window is displayed in the dual mode, the left side is the divided screen corresponding to the number of cameras, and the right side is the master (selected camera).
When the preview window is displayed in the single mode, the screen is the divided screen corresponding to the number of cameras. The screen can also be set to display only the master.
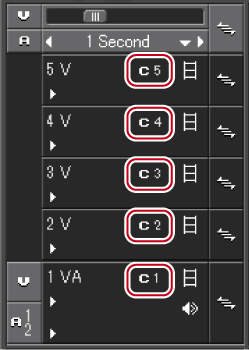
[Camera mapping] is displayed on the track panel of the timeline window.
 Alternative
Switching to the multicam mode: [F8]

When the mode is switched to the multicam mode with clips placed on the timeline, the camera switch point is automatically set to the In and Out points of each clip. To change the camera switch point, overwrite it.
When the preview window is displayed in the single mode, the display can be switched between the selected camera only display and the divided screen. Click [Mode] on the menu bar, and click [View Multicam] → [Show Only the Selected Camera in Single Monitor Mode].
The multicam mode can be switched to the standard mode by the following operation.
Click [Mode] on the menu bar, and click [Normal Mode] or [Multicam Mode].
Press [F8] on the keyboard again.
Switching to standard mode: [F5]
Operations on clips or tracks in the multicam mode are the same as in the standard mode, however, shortcut keys differ from those in the standard mode.
 Note
NoteThe multicam mode ends and the mode changes to the standard mode when the following operations are performed during multicam editing.
Switching to the Player during editing in the single mode
Displaying clips on the Player during editing in the dual mode
Opening the effect or layouter setting dialog box
You can switch the number of multicamera screens on the Recorder.
Select a sync point as the reference point for placing multiple clips in the multicam mode to place clips at.
|
[Asynchronous]
|
Place clips from the timeline cursor position of the track where video source channel is connected in the sorting order of the bin. |
|
[Timecode]
|
Place a clip onto individual tracks referenced to the start timecode of each clip. When the clip has no start timecode, the start timecode is assumed to be “00:00:00;00”. |
|
[Rec Time]
|
Place a clip onto individual tracks referenced to the recording time of each clip. When the clip has no start time, the recording time is assumed to be “00:00:00”. (The recording time is taken as the reference regardless of the recording date.) |
|
[Clip In]
|
Place a clip onto individual tracks referenced to the In point timecode of the clip. If the clip has no start In point timecode, the top of the clip is taken as the reference. |
|
[Clip Out]
|
Place a clip onto individual tracks referenced to the Out point timecode of the clip. If the clip has no start Out point timecode, the end of the clip is taken as the reference. |
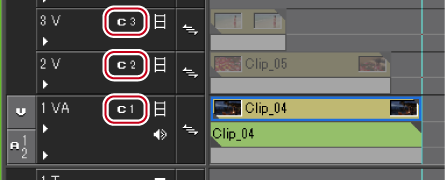
Map video source channels to the track where clips are placed. When [Asynchronous] is selected in step 1, clips are placed on the track where video source channels are mapped; however, when another sync point is selected, clips are placed above the track where video source channels are mapped. If there is no space to place a clip on the track, V track is automatically added.

The clips are placed in accordance with the sync point selected in step 1.
The camera switch point is automatically set to the In and Out points of each clip. To change the camera switch point, overwrite it.
Setting the Camera Switch Point during Playback
Clips placed on the timeline are displayed on the Recorder in the multicam screen.
AlternativeDrag and drop a clip in the bin onto the timeline.
NoteA track is automatically added when there are insufficient tracks for adding clips. At this time, only V tracks are automatically added. Add VA tracks in advance when they are needed.
You can change the camera assigned to each track.
When clips have been placed on the timeline in the multicam mode, cameras are assigned in the track number order of V/VA tracks containing clips.
Click [Unmap] to release the assignment set to the selected track.
Click [Default] to initialize all camera assignments set to tracks. Cameras are reassigned in order of track numbers of the V/VA track.
[Camera mapping] is displayed only in the multicam mode.
Tracks not assigned a camera are not displayed in the multicam mode.
You can change camera assignments during editing.
You can switch the display/hide setting for the track name at the upper left of each screen of the multicam mode. Click [Mode] on the menu bar, and click [View Multicam] → [Display Track Name] to uncheck the item.
Set the preview display during editing in the multicam mode.
On items are checked.
|
[Skipped Frames]
|
Increase the skipped frames to reduce the load on the system during playback. |
|
[Apply Video Filter]
|
Batch-switch the disabled (on)/enabled (off) setting of the video filter applied to clips. Temporarily disabling the video filter can reduce the load on the system during playback. |
|
[Display Track Name]
|
Switch the show/hide setting for track names assigned to the divided screen. |
|
[Display Only the Selected Camera on Full Screen Preview (Auto)]
|
When this item is on, only the video of the selected camera (master) is displayed in displays whose full screen view setting is set to [Auto]. When this item is off, the divided screen is displayed. |
|
[Output the Selected Camera to External Monitor]
|
When this item is on, only the video of the selected camera (master) is displayed on the external monitor. When this item is off, the divided screen is displayed. |
|
[Show Only the Selected Camera in Single Monitor Mode]
|
This item is enabled when the preview window is in the single mode. When this item is on, only the video of the selected camera (master) is displayed. |
