EDIUS 7 Online Help
User GuideReference Manual
Hardware Setup Guide
Installation Manual
Before creating a project, set a project format according to the input format of camera and output format of the destination, and register it as a project preset in advance.
Set the project format according to the format of sources to be used and the final export format. In EDIUS, you can register formats that you frequently use as project presets, and start a project quickly.
Registration of project presets can be easily performed by simply selecting preset formats of video and audio.
Creating Project Preset at the First Startup
Creating Project Using Project Preset
You can also create projects in any formats that are not registered as project presets.
Creating Project with Different Settings from Project Preset
|
Resolution |
Frame rate |
Typical use |
|---|---|---|
|
4086x2160 (DCI 4K) |
24p etc. |
Digital cinema, video for events, etc. |
|
3840x2160 (4K UHDTV, QFHD) |
60p etc. |
|
|
2432x1366 (2.5K) |
30p etc. |
|
|
2048x1080 (2K) |
60p etc. |
|
|
1920x1080 (Full HD) |
60p, 59.94i, etc. |
Blu-ray, HDCAM-SR, etc. |
|
1600x1200 (UXGA) |
30p etc. |
PC monitor etc. |
|
1440x1080 (HD) |
59.94i etc. |
Terrestrial digital broadcasting, HDV, etc. |
|
1280x1080 (HD) |
59.94i etc. |
DVCPRO HD etc. |
|
1280x720 (HD) |
30p etc. |
HDV etc. |
|
1024x768 (XGA) |
30p etc. |
PC monitor etc. |
|
800x600 (SVGA) |
30p etc. |
PC monitor etc. |
|
720x576 (PAL, SECAM, SD) |
50p etc. |
DVD, analog broadcasting, DV, DVCPRO, etc. |
|
720x480 (NTSC, SD) |
59.94i etc. |
DVD, analog broadcasting, DV, DVCPRO, etc. |
|
640x480 (VGA) |
30p etc. |
PC monitor etc. |
When you start up EDIUS for the first time after installation, you need to register a project preset. Set up the preset format of project to be created and register it.

The [Create Project Presets] wizard will start up.
Configure the video size, frame rate, and video quantization for the format of the project to be created with EDIUS. Multiple check boxes can be selected for each item.

A list of presets corresponding to the setting configured in step 2 is displayed. Projects with the checked presets will be created. Uncheck the presets you do not use as necessary.
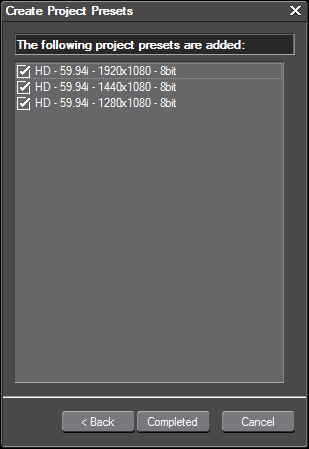

Click [Back] to undo the settings.
The [Project Settings] (Simple Settings) dialog box appears, showing the created project preset as an icon in [Presets List].
Proceed to step 2 in Creating Project Using Project Preset.
Creating Project Using Project Preset
For details on adding or deleting presets, see the Reference Manual.
Select an existing project preset and create a new project.
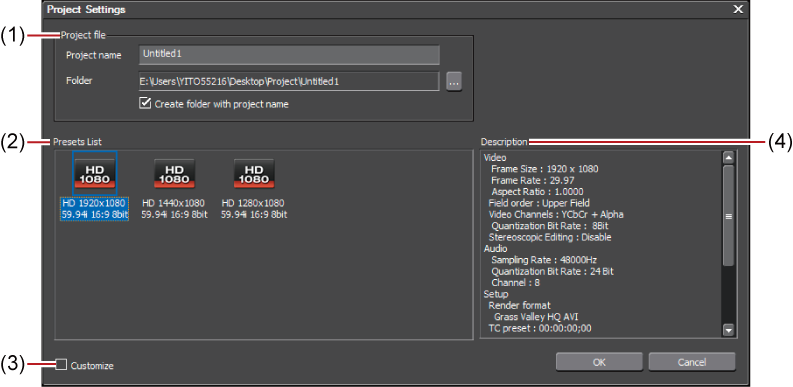
The [Project Settings] (Simple Settings) dialog box appears.
|
(1)
|
[Project file]
|
[Project name]
Click the input field to enter a project name. [Folder]
Set the destination to save projects. |
|
(2)
|
[Presets List]
|
Display registered project presets in a list. |
|
(3)
|
[Customize]
|
Check this item to change the detailed project preset settings (rendering format, the number of tracks, etc.) and create a new project file. Creating Project with Different Settings from Project Preset |
|
(4)
|
[Description]
|
Display the settings of the project preset selected in [Presets List]. |
At the first startup, the [Create Project Presets] wizard will start up.
EDIUS will start up.
[Recent Project] in the [Start Project] dialog box shows recently used project files. You can simply select the file that has been edited halfway.
You can create projects with different settings from that set in detail as a project preset (rendering formats, track numbers, etc.)
 Note
NoteThis section describes how to customize project preset settings to create a project. This procedure does not change the original project preset. For how to create new project presets and how to change the project preset settings, see the Reference Manual.
Creating Project Using Project Preset
The [Project Settings] (Detailed Settings) dialog box appears.
For details on the settings, see the Reference Manual.

|
(1)
|
[Video Preset]
|
Display a list of commonly used video formats. From this list, select a video format that suits the export environment. |
|
(2)
|
[Audio Preset]
|
Display a list of commonly used audio formats. From this list, select an audio format that suits the export environment. |
|
(3)
|
Expand button
|
Click this button for detailed settings of [Frame Size], [Aspect Ratio], [Frame Rate], etc. |
|
(4)
|
[Setup]
|
Set [Render format], [Audio reference level], etc. |
|
(5)
|
[Sequence setup (Default)]
|
Make the settings for creating a new sequence. |
|
(6)
|
[Track (Default)]
|
Make the settings of the number of default tracks and channel map for creating a new project or sequence. |
When you create a project in a format with resolution of other than 4K and video format (such as resolution for square shape), select the following codecs for [Render format] in [Setup].
[Grass Valley HQX SuperFine]
[Grass Valley HQX Fine]
[Grass Valley HQX Standard]
[Grass Valley HQX Offline]
Set the final output channels for the output from the tracks. Click [Channel map] in [Track (Default)] in the [Project Settings] (Detailed Settings) dialog box to display the [Audio Channel Map] dialog box.
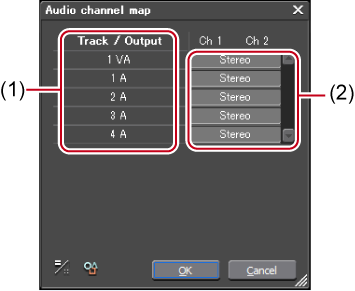
Click the channel part to be set for every track, and set the channel to which the track is to be output.
Every click switches between [Stereo], [Mono], and [No Output folder].
For stereo output, use a combination of an odd number channel and an even number channel, and set this option to [Stereo]. For monaural output, select [Mono], and not to output, set [No Output folder]. If the setting is invalid, “—” is displayed.
A new project can be created even while editing.

If the project has not been saved, a dialog box appears to confirm whether to save the project file.
The [Project Settings] (Simple Settings) dialog box appears.
When a new project is created, the clips in the bin are initialized (all deleted).
