EDIUS 7 Online Help
User GuideReference Manual
Hardware Setup Guide
Installation Manual
Trimming function allows fine adjustments of In and Out points of a clip placed on the timeline while viewing the video on a window. You can also move the boundary between clips and In and Out points of video/audio separately.
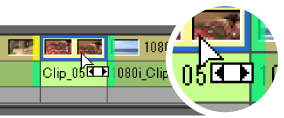
Trimming operation is performed by cut points. Clicking on a point near the In or Out point of a clip shows yellow and green lines. The yellow line appears at the currently selected point, and the green line appears on a point to be changed by the trimming operation.
There are 3 major methods of trimming. Dragging a cut point in the standard mode, switching to the trim mode and operating on the dedicated window that appears, and using shortcut keys.
See the Reference Manual for more details.
Depending on the editing mode settings, the trimmed video appears different.
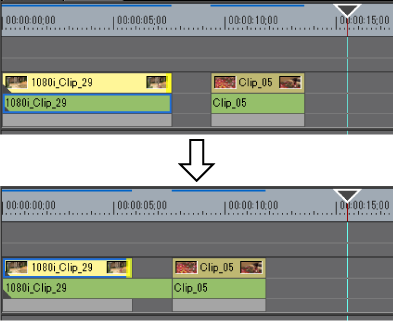
Change the In and Out points of clips placed on the timeline. The edit result is dependent on the edit mode.
When trimming the Out point side of the clip (ripple mode off)

Change the In and Out points with the positional relationship with other clips maintained. Perform the trimming operation with the ripple mode on. Even if the ripple mode is off, ripple trimming is possible by using combinations of shortcut keys and keyboard operation.
When trimming the Out point side of the clip
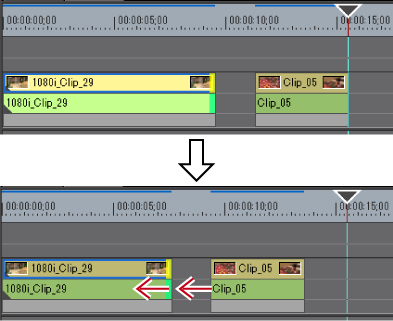
You can trim only the video part or audio part of video clips with audio.

When the ripple mode is on, you cannot perform trimming if there is no gap between the clip to be trimmed and the subsequent clip. Also, if the gap is shorter than the clip to be trimmed, trimming can be performed by the length of the gap.
When trimming the video part (Out point side) of a video clip with audio (ripple mode on)
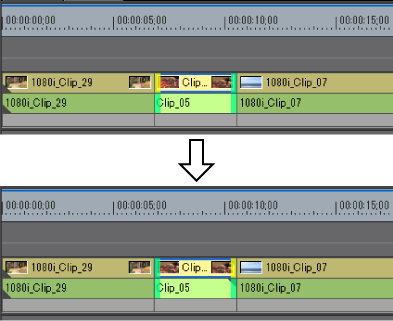
Shift the start and end points of the adjacent clips forward and backward. The total length of the previous and subsequent clips remains unchanged.
You cannot perform trimming if there is no margin between the clip to be trimmed and the adjacent clips. When trimming clips with margins, trimming can be performed by the length of the margin of the clip.

You can change the part of the clip to be used without changing the length or position of the clip. The length or position of the adjacent clips remain unchanged.
Shift the start and end points of the previous and subsequent clips without changing the length of specific clips.
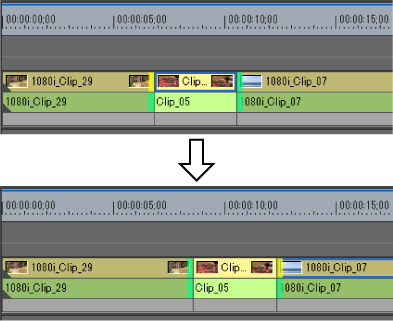
Adjust the range to be used while checking the video displayed on the preview window.
You cannot perform trimming if the adjacent clip has no margin. When trimming clips with margins, trimming can be performed by the length of the margin of the clip.
Depending on the trimming type, the selected point or the shape of mouse cursor differ. Perform editing operations according to the following chart.
The cut point for each trimming type can be selected as follows:
|
In point trim
|
Click the In point of the clip. |
|
Out point trim
|
Click the Out point of the clip. |
|
Ripple trim
|
Click [Shift] + In point or Out point. |
|
Slide trim
|
Click [Ctrl] + [Shift] + In point or Out point. |
|
Split trim
|
Click [Alt] + In point or Out point. |
|
Slip trim
|
Click [Ctrl] + [Alt] + center of the clip. |
|
Rolling trim
|
Click [Ctrl] + [Shift] + center of the clip. |
Ripple trimming is also possible when the ripple mode is off.
Adjust the range to be used while checking the video displayed on the preview window.
The mouse cursor changes the shape according to the trim mode.
|
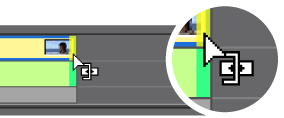
In point trim/out point trim
|
 |
|
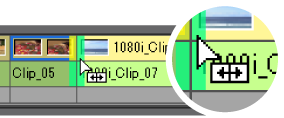
Ripple trim
|
 |
|
Slide trim
|
 |
|
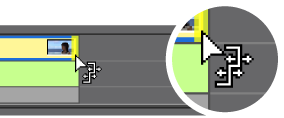
Split trim
|
 |
|
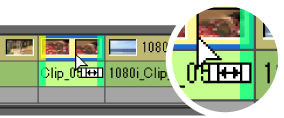
Slip trim
|
 |
|
Rolling trim
|
 |
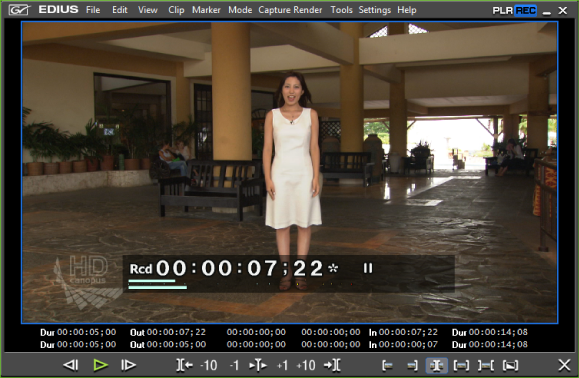
When switched to the trim mode, the preview window changes to the trim window. In the trim window, 1-frame or 10-frame unit fine adjustment can be performed by button operations.
The preview window switches from the standard mode to the trim mode.
The current trimming type is displayed on the status bar of the timeline window.
 Alternative
Double-click the In or Out point of the clip.
Switching to the trim mode: [F6]
The trim mode can be switched to the standard mode by the following operation.
Press [F6] on the keyboard again.
Switching to standard mode: [F5]
Buttons exclusively for trimming operations and the preview image are displayed in this window. When the button is clicked, the cut point according to the trim mode is automatically selected. Trimming can also be performed more accurately by entering numerical values to the timecode for trimming.
See the Reference Manual for more details.

|
(1)
|
Preview window
|
Switch the display to 1/2/4 screens depending on the trimming operation. |
|
(2)
|
Timecode
|
Display the timecode of the In or Out point of the clip to be edited. You can also change the trimming position by directly entering numerical values. |
|
(3)
|
[Previous Frame]
|
Move to the previous frame. [←]
|
|
(4)
|
[Play]
|
Play the timeline in the forward direction. When this button is clicked during playback, playback pauses. [Enter]
|
|
(5)
|
[Next Frame]
|
Move to the next frame. [→]
|
|
(6)
|
[Move to Previous Edit Point (Trim)]
|
Move the focus and timeline cursor to the edit point (cut point) on the left of the current cut point position. When a cut point has not been selected, the focus and timeline cursor move to the edit point of the selected tracks on the left of the timeline cursor position. [Page up]
|
|
(7)
|
[Trim (-10 frames)]
|
Adjust the trimming position in −10-frame units. [Shift] + [,]
|
|
(8)
|
[Trim (-1 frame)]
|
Adjust the trimming position in −1-frame units. [,]
|
|
(9)
|
[Play the Event Area]
|
Repeated playback the area around the focused cut point. Click it again to stop. [/]
|
|
(10)
|
[Trim (1 frame)]
|
Adjust the trimming position in +1-frame units. [.]
|
|
(11)
|
[Trim (10 frames)]
|
Adjust the trimming position in +10-frame units. [Shift] + [.]
|
|
(12)
|
[Move to Next Edit Point (Trim)]
|
Move the focus and timeline cursor to the edit point (cut point) on the right of the current cut point position. When a cut point has not been selected, the focus and timeline cursor move to the edit point of the selected tracks on the right of the timeline cursor position. [Page down]
|
|
(13)
|
[Trimming Mode]
|
Switch to the trim mode. Click it to select the cut point according to the trimming type. |
|
(14)
|
[Switch to Normal Mode]
|
Switch the trim mode to the standard mode. [F5]
|
*For some operation buttons, if there are no cut point that can be moved to the selected track, the operation may be invalid.
The basic rules to perform trimming with shortcut keys are to select the clip to be trimmed and to move the timeline cursor to the position to be trimmed. By using shortcut keys, you can perform ripple trimming even when ripple mode is not set.
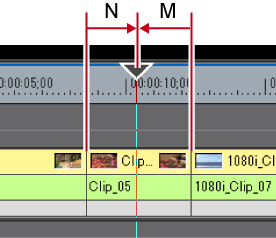
The In and Out point sides of the timeline cursor can be trimmed by shortcut keys. You can perform trimming from the In point up to the timeline cursor by [N] on the keyboard and from the timeline cursor up to the Out point by [M]. The trimming type changes according to the key combination.
|
Trimming type |
In point side |
Out point side |
|---|---|---|
|
In point trim
|
[N] |
- |
|
Out point trim
|
- |
[M] |
|
Ripple trim
|
[Alt] + [N] |
[Alt] + [M] |
|
Slide trim
|
[Ctrl] + [Alt] + [N] |
[Ctrl] + [Alt] + [M] |
|
Split trim
|
[Shift] + [N] |
[Shift] + [M] |
Ripple trimming is also possible when the ripple mode is off.
