Registers and manages hardware as preview device when editing while viewing an external monitor connected to the PC.

Setting other than EDIUS may be required for hardware of other company. For details, visit our website.
Before setting preview devices, connect the external device (e.g. monitor) used for preview to the PC, and turn on the power.
For more information on settings when using a Grass Valley product as a preview device, see the user manual included with the product.
1) Click [Settings] on the menu bar, and click [System Settings].
|
|
|---|
|
2) Click the [Hardware] tree, and click [Preview Device].
3) Set each item.
|
Preview device list |
Displays a list of preview devices. Click the preview device to use, and the device name will be prefixed with a check mark. When connecting a DV device, for example, to the IEEE1394 terminal provided as standard on a PC for video output during editing, select [Generic OHCI - Output]. You can set the details of each device by clicking [Settings]. For more information on settings when using a Grass Valley product, see the user manual included with the product. |
|
[Use Pulldown Format when Available] |
Check this item to give priority to pulldown operation (2-3-2-3) regardless of the [Pulldown Type] setting in the current project settings. Try this setting when using a monitor that does not support 23.98p/29.97p/25p display. |
|
[Display a warning message when the selected device does not support the current format] |
When a preview device is not compatible with the video format in the current project settings, an alarm message will be displayed. When this item is unchecked, an alarm message will not be displayed. |
|
|
|---|
|
4) Click [OK].
You can continue to set other items by clicking [Apply].
|
|
|---|
|
|
Output preview |
Displays the color bar. The color bar is displayed in the same way on preview device monitors. |
|
[DV Format] |
Select the encode format ([DV]/[DVCAM]) for DV output. |
|
[Enable Real Time DV Output] |
Select whether to perform DV Encode processing. When this item is checked, EDIUS always performs DV Encode processing. To mute audio during processing, check [Mute DV Audio Output]. |
|
[Setup Level] |
Set the setup level (black level). 0 IRE is used in Japan, and 7.5 IRE is used in North America. |
|
[Default] |
Return the settings of items marked with * to their defaults. |
The conversion status of output video can be checked with the icon indicated on the status bar of the timeline.
Moving the mouse cursor onto the icon will show the tooltip indicating the preview device in use and output format.
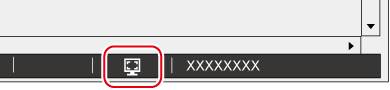
The tooltip that appears when the mouse cursor is placed on the icon indicates the output format [None].

While a video is being converted and output, the preview device in use and output format are indicated over the icon.
The synchronization setting between the monitor output device used during editing and the Grass Valley hardware.
[Sync Settings] (STORM 3G Elite/STORM 3G)
The setting for a monitor output device used during editing.
[Video Output Settings] (STORM 3G Elite/STORM 3G)
The setting for a monitor output device used during editing.
[Analog Output Settings] (STORM Pro)
The setting for a monitor output device used during editing.
[Audio Output Settings] (STORM 3G Elite/STORM 3G)
The setting for a monitor output device used during editing.
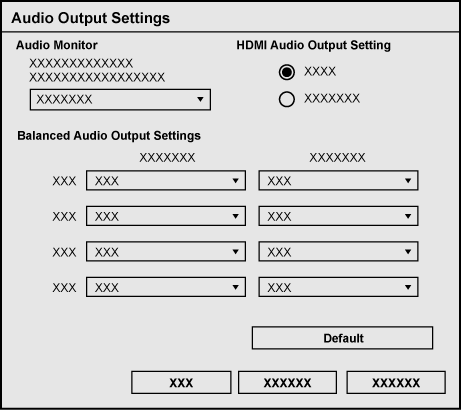
|
[Audio Monitor] |
Selects the audio channel to monitor. |
|
[HDMI Audio Output Setting] |
Sets the output from the HDMI connector. Select whether to output the signals as 8 channels or to output them according to the channel settings specified for the analog 2 channels. |
|
[Balanced Audio Output Settings] |
Not available. |
|
[Default] |
Restores to the default setting. |
The setting for a monitor output device used during editing.
[System Settings] (STORM Pro/STORM Mobile)
The setting for a monitor output device used during editing.
[Downconvert Settings] (STORM 3G Elite)
The setting for a monitor output device used during editing.
[Stereoscopic Settings] (STORM 3G Elite/STORM 3G)
The setting for a monitor output device used during editing.
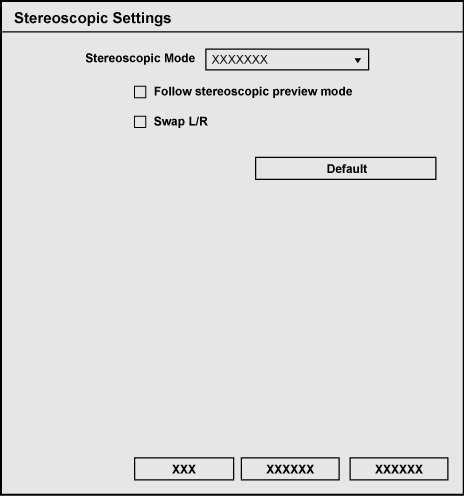
|
[Stereoscopic Mode] |
Selects the stereoscopic processing format when the video for L side and R side in the project created with the stereoscopic edit mode is output. The video for L side only or the R side only is output when [L Only]/[R Only] is selected. The videos of L side and R side are combined and output when [Side by Side]/[Top and Bottom]/[Line Interleave]/[Blend]/[Anaglyph]/[Difference]/[Split Grid] is selected. |
|
[Follow stereoscopic preview mode] |
Outputs in the same format as the preview window display in the stereoscopic edit mode. |
|
[Swap L/R] |
Check this to output with L side and R side inversed. |
|
[Default] |
Restores to the default setting. |

