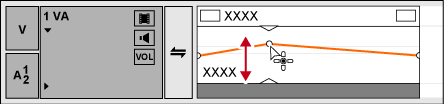
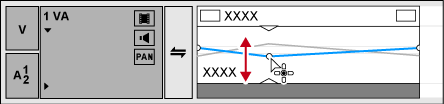
Two rubber bands are displayed on audio clips placed on the timeline; a volume rubber band (orange line) used to adjust volume and a pan rubber band (blue line) used to change the L/R stereo balance. Rubber band points can be added to adjust the shape of the rubber band.
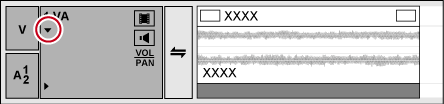
1) Click the expand button for the audio on the track panel.
The track expands and the rubber band and the waveform are displayed. For stereo audio, a waveform is displayed in each channel.
 Alternative
Expanded display of audio: [Alt] + [S]
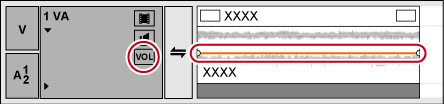
2) Click [Volume/Pan].
Clicking it switches between Volume, Pan and Lock.
3) Click on a rubber band in the position where you want to apply a change.
A point is added that is used to adjust the volume or pan.
Alternative
Right-click a rubber band in the position you want to add a point, then click [Add/Delete].

You can adjust the volume and pan of a clip. You can also adjust the volume and the pan along to the time axis by adjusting the shape of the relevant rubber band.
1) Display the volume rubber band or the pan rubber band, and add a rubber band point.
2) Drag the point vertically or horizontally.
Fine adjustments can be made by dragging the point with [Ctrl] on the keyboard held down.
You can adjust the whole rubber band by dragging the point with [Alt] on the keyboard held down.
Drag a point upwards to increase the volume, and downwards to decrease the volume.
Drag a point upwards or downloads to adjust the L/R balance of the stereo. Drag the point upward to spread the sound to the left side, and downward to spread the sound to the right side.
1) Display the volume rubber band or the pan rubber band, and add a rubber band point.
2) Drag the rubber band between 2 points up or down with [Shift] on the keyboard held down.
The pointer shape will change to shift the rubber band up or down between the 2 points.
Fine adjustments can be made by dragging with [Shift] + [Ctrl] on the keyboard held down.
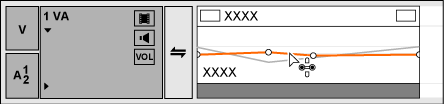
Also, by dragging with [Alt] on the keyboard held down, you can automatically add a new point between the 2 other points and move it in parallel. You can set how many frames within 2 points at either end an automatically added point is placed using [Source] in [User Settings] → [Duration].
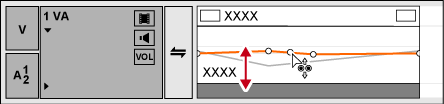
1) Display the volume rubber band or the pan rubber band.
2) Drag a rubber band or rubber band point up or down with [Shift] + [Alt] on the keyboard held down.
The pointer shape will change and the whole rubber band can be adjusted.
All other other points will move proportionately according to the amount the selected rubber band or point is varied.
Fine adjustments can be made by dragging with [Ctrl] on the keyboard held down.
You can adjust a rubber band by entering values.
1) Display the volume rubber band or the pan rubber band.
2) Right-click a rubber band point, and click a method by which to adjust.
|
[Go] |
Adjust the volume or timecode of a selected point. |
|
[Move two aligning points] |
Move the rubber band that is between a selected point and the next point to the right of the selected point horizontally and in proportion according to the amount the selected point is varied. |
|
[Add points and move] |
Add 2 new points between the selected point and the next point to the right, and move the rubber band between the 2 added points horizontally and in proportion according to the amount the 2 added points are varied. |
|
[Move All] |
Move other points in proportion according to the amount the selected point is varied. |
|
[Move All On Scale] |
Adjust the volume of all points proportionally. [Shift] + [Alt] + [Y] |
The value input dialog box appears.
3) Enter values.
4) Click [OK].
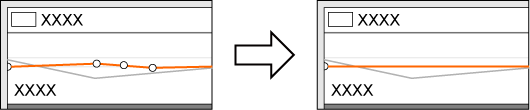
The sound level can be adjusted to make L/R equal.
1) Display the pan rubber band.
2) Right-click the pan rubber band, and click [Center].
All rubber band points are deleted and the rubber band is centered.
Clicking [L] or [R] will delete all rubber band points and adjust the rubber band to L or R.
You can delete or initialize a specific rubber band.
1) Display the volume rubber band or the pan rubber band.
2) Right-click the rubber band, and click [Delete All].
All points are deleted and the entire rubber band is initialized.
For [Volume]
 Alternative
Right-click a clip, and click [Delete Parts] → [Audio Rubber Band] → [Volume] or [Pan].
Select a clip, click [Edit] on the menu bar, and click [Delete Parts] → [Audio Rubber Band] → [Volume] or [Pan].
Deleting a volume rubber band: [Shift] + [Alt] + [H]
Deleting a pan rubber band: [Ctrl] + [Alt] + [H]

The following procedures initialize only the position of a rubber band, leaving rubber band points in place on the rubber band.
Right-click a rubber band, and click [Initialize All].
Initializing rubber band: [Shift] + [Ctrl] + [U] (Perform procedure after selecting the desired rubber band.)
1) Display the volume rubber band or the pan rubber band.
2) Right-click a rubber band point, and click [Add/Delete].
Alternative
Select a rubber band point and press [Delete] on the keyboard.
