Setting a Schedule for an Alarm Inversion
Schedule an alarm inversion action to automate an alarm inversion or the restoration of an inverted alarm to its normal mode. You can create or edit an alarm inversion schedule entry in either iC Navigator or iC Web.
IMPORTANT: If your network is configured to report alarms to multiple GSMs, it is recommended that you configure the same Grace period duration for manual inversions among all GSMs. Similarly, it is recommended that you configure the same Grace period duration for scheduled inversions among all GSMs. |
REQUIREMENTS: |
Make sure you meet the following conditions before beginning this procedure: |
• If you are working in iC Web, make sure you have opened the appropriate iControl Web page ( click HERE). |
• If you are working in iC Navigator, make sure you have opened iC Navigator ( click HERE). |
1. If you would like to edit the configured Grace period (scheduled or manual), perform the following steps.
IMPORTANT: System behavior |
Configuring the grace period for a scheduled inversion changes the grace period for all scheduled alarm inversions. Configuring the grace period for a manual inversion changes the grace period for all manual alarm inversions. |
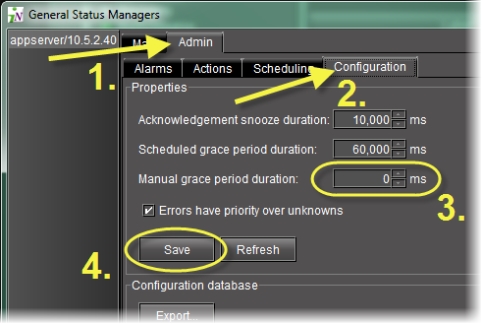
b) In the GSM Alarm Browser, click the Admin tab, and then click the Configuration tab.
[ Graphic ]
c) In the Properties area, type the desired grace period for scheduled alarm inversions in the Scheduled grace period duration field.
d) Type the desired grace period for manual alarm inversions in the Manual grace period duration field.
e) Click Save.
2. In either the iC Web page, iC Navigator, the GSM Alarm Browser, or Incident Log Viewer, right-click the alarm, device, or incident for which you would like to create a scheduled event.
3. Click Create schedule.
System Response: The Schedule Entry Details window appears.
4. Type in a schedule entry name in the Name field.
5. To configure the inversion to begin immediately after the schedule entry is complete, select Immediately in the Occurrence details area.
6. To configure the inversion to occur at a future time, perform the following steps:
a) Select On in the Occurrence details area.
b) Select a date and time for the event to occur (
click HERE).
7. To configure the inversion to recur, perform the following steps:
a) Select Recurring on selected days in the Occurrence details area.
b) Select the days on which you would like the inversion to recur.
c) If you would like the recurrence to end after a specified date, select
Stop after, and then use the calendar function to select the date (
click HERE).
8. In the Action details area, click Set Inverse mode in the Action list.
9. If you would like to configure this inversion to have a set duration, select Has a duration, and then type the duration period in hours, minutes, and seconds.
10. In the Available alarms list, select one or more alarms you would like to invert with this schedule entry by performing the following steps:
NOTE: If you would like to invert only one alarm with this schedule entry, simply click the alarm to select it. |
a) Click the first alarm you would like to invert.
b) Hold down the Ctrl key and individually click the remaining alarms.
c) Release the Ctrl key.
11. Click the Down arrow button ().
System Response: The selected alarms appear in the Selected alarms list.
NOTE: If you would like to remove an alarm from the Selected alarms list, select the alarm, and then click the ‘up’ arrow button (). |
12. Click OK.
System Response: The Schedule Entry Details window closes.
13. Verify the schedule entry is correctly configured by performing the following steps:
b) In the left pane of the GSM Alarm Browser, select the appropriate GSM.
c) Click the Admin tab then click the Scheduling tab.
System Response: In the Schedule entries area, the schedule entry you created should be listed.
d) Select the schedule entry you would like to verify, and then click Edit.
System Response: The Schedule Entry Details window appears.
e) In the Schedule Entry Details window, verify the alarms affected by this schedule entry (in the Selected alarms list) are the desired alarms.
f) Click OK.
System Response: The Schedule Entry Details window closes.
g) In the GSM Alarm Browser, click the Configuration tab.
h) In the Properties area, verify the scheduled and manual grace period settings are correct.
NOTE: You can also verify whether an inversion (or reversion from an inversion) has occurred in Incident Log Viewer. |
IMPORTANT: System behavior |
Event Log Viewer records inversion events only for the duration of the Grace period during which the alarm is offline, but does not display the Inverted mode (Off or On). |