Importing Profile Data from a File to Selected Devices
REQUIREMENT: |
Before beginning this procedure, make sure you have opened Device Profile Manager ( click HERE). |
1. In Device Profile Manager, click the Import tab near to the top of Device Profile Manager.
System Response: The Import tab displays listings of discovered or preset Source devices and Target devices.
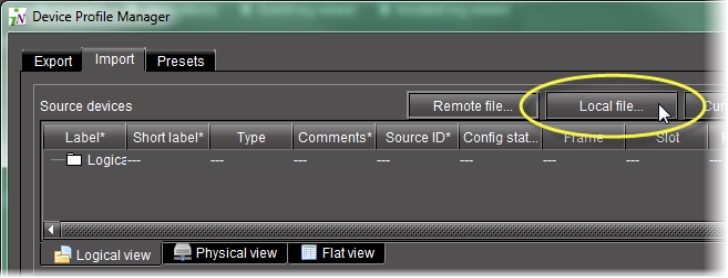
2. If your profile file is on your local PC, perform the following steps:
a) Click Local file.
[ Graphic ]
System Response: The Open window appears.
b) Use the file browser to browse for the profile file from which you would like to import (
click HERE).
c) Click Select.
System Response: The file is added to the Source devices list in Device Profile Manager and the Open window closes.
3. If your source device is on a remote Application Server, perform the following steps:
a) In Device Profile Manager, click Remote file.
System Response: The Profile File Browser appears and automatically searches for available profile files on the current Application Server.
b) Select the desired Application Server, and then click Go.
System Response: The list is updated to reflect available files on the selected Application Server.
c) Select the desired file from the list.
d) Click OK.
System Response: The selected file’s profile data is added to the Source devices list in Device Profile Manager and the Profile File Browser closes.
4. In the Source devices area of Device Profile Manager, select the check box in the Allow column for the newly added source device,
OR,
Right-click the newly added source devices in the list, point to Allow, and then click Check.
NOTE: Use the shortcut method if you would like to apply a check mark to multiple selections at a time. To do this, first select the desired rows in Device Profile Manager, and then right-click one of them. |
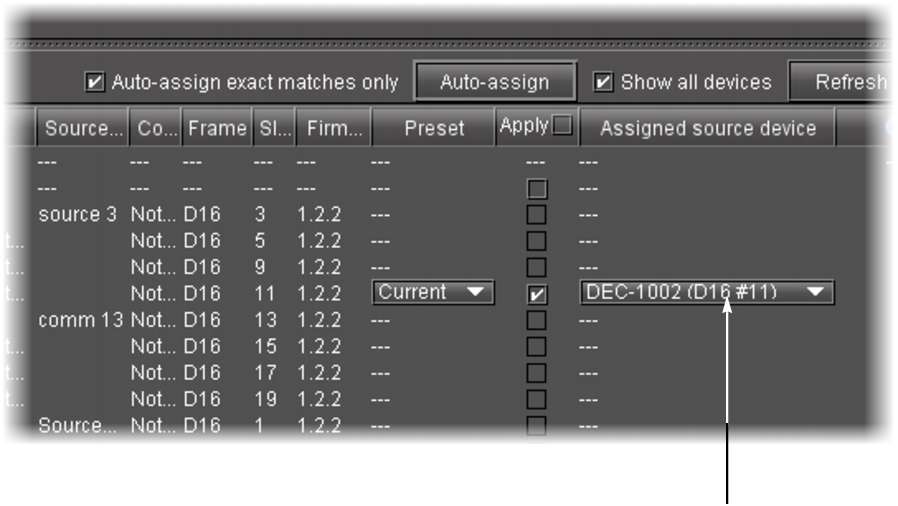
5. In the Target devices area of Device Profile Manager, if the desired target devices are not listed in the list of preset devices, click Show all devices.
System Response: The Target devices list refreshes with a complete list of discovered devices.
[ Graphic ]
NOTE: By default, the Auto-assign exact matches only check box is selected. For those targets with exact matches to any listed source devices, assigned sources appear in the Assigned source device column. |
6. In the Target devices area, perform the following steps:
a) Select all devices to which you would like to download imported profile data.
b) If you would like to perform exact matching of sources to targets, select Auto-assign exact matches only, otherwise the system performs lenient matching.
NOTE: Exact matching allows users to quickly finish the task when they only need to import onto identical devices and are not concerned with extraneous devices. Lenient matching is for advanced users who would like to import onto non-identical but compatible devices. |
c) Select the check boxes in the Apply column for all devices to which you would like to attempt to import profile data.
NOTE: If you want to select check boxes for all listed devices, select the Apply check box in the header row. |
d) Click Auto-assign to discover matches between the listed source and target devices.
System Response: For each selected target with at least one matching source, possible source devices are listed in the Assigned source device column.
e) In the Assigned source device column, select the desired source device match for each selected target.
f) Click Import.
System Response: A progress window displays the import progress.
NOTE: To cancel the operation before this process is complete, click Cancel. |
System Response: When the process is complete, the Import confirmation window appears.
g) Click OK in the Import confirmation window.
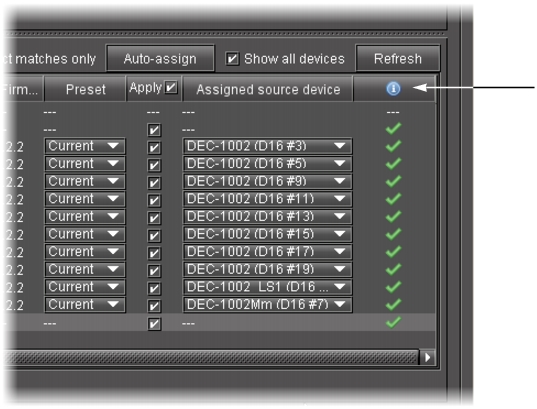
System Response: In the Result column (the column with the in the header) of the Target devices area, either a check mark or an ‘X’ is displayed for selected devices.
NOTE: A check mark indicates that the last operation for this device succeeded. An ‘X’ indicates that the last operation for this device failed. |
[ Graphic ]