Creating an Alarm with a MIB Element Shortcut Menu
REQUIREMENTS: |
Make sure you meet the following conditions before beginning this procedure: |
• You have opened SNMP Driver Creator ( click HERE). |
• You have loaded a MIB module into SNMP Driver Creator ( click HERE). |
• You have configured your driver settings ( click HERE). |
• [RECOMMENDED]: You are performing this procedure as a task within the context of an approved workflow ( click HERE). |
1. In SNMP Driver Creator, click on the SNMP driver configuration tab in the main pane.
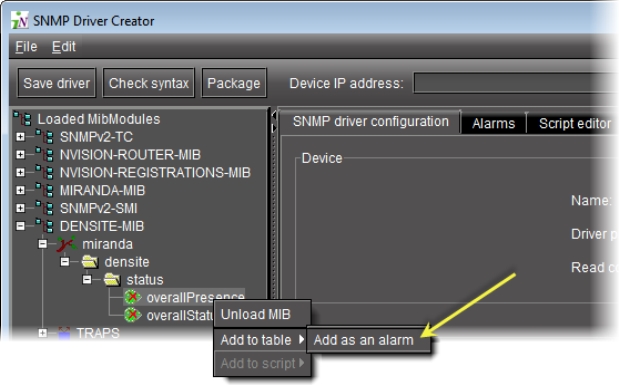
2. In the MIB Browser pane, right-click the desired MIB node from the loaded MIB modules, point to Add to table, and then click Add as an Alarm.
[ Graphic ]
System Response: The Add Alarm window appears, displaying relevant information about the MIB node.
[ Graphic ]
3. Modify the alarm parameters as required.
The parameters are as follows:
[ Table ]
Parameter | Description |
MIB | The MIB where the OID was retrieved from |
MIB variable name | The label of the MIB node |
OID | The object identifier (OID) value of the MIB node |
GSM name | The name to be shown on the GSM for this alarm |
Type | The type of alarm (status, text, or both). For more information about alarm types, click HERE. |
Mode | The mode of the alarm |
Alarm subpath | The path in the Alarm Browser tree where the alarm is created |
Alarm map | The associated alarm map for this alarm |
Trap map | The associated trap map for this alarm |
Poller profile | The associated poller for this alarm |
4. Click OK.
System Response: A new alarm is created and listed in the Alarms table.
[ Graphic ]
|
For more information about editing an existing alarm any time after it has been created, click HERE. |