EDIUS 7 Online Help
Hardware Setup GuideReference Manual
Installation Manual
User Guide
This section describes the device presets and the detailed setting of preview devices. The setting items differ depending on the hardware products you use. The following explains the items that can be set with the Grass Valley hardware products.
Configuring Sync Settings synchronizes the monitor output device used for capturing with Grass Valley hardware products.
|
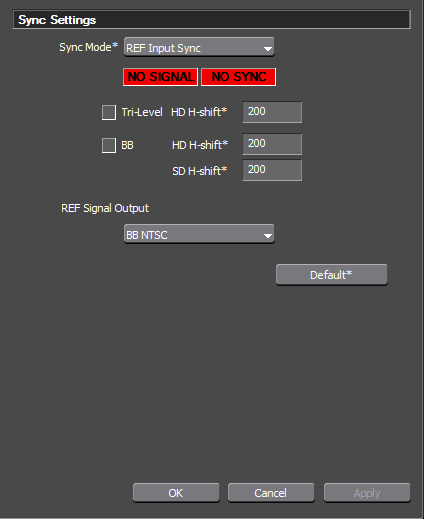
[Sync Mode]
|
Select a sync signal from [REF Input Sync] and [Input Sync]. [NO SIGNAL]/[SIGNAL OK] indicates whether a reference signal which can be synchronized with the current output video format is detected. If the reference signal is not detected ([NO SIGNAL]), the sync system will be automatically switched to internal sync. When [REF Input Sync] is selected, if the output format is HD, STORM 3G ELITE/STORM 3G can be synchronized via the signals of both [Tri-Level] (tri-level sync) and [BB] (Black Burst). If one of the signals is detected, the box for the corresponding signal ([Tri-Level] or [BB]) will light in green. If the output format is SD, only [BB] is available. [Tri-Level HD H-shift]
Input a horizontal-shift adjustment value for the tri-level sync signal during HD output. [BB HD H-shift]
Input a horizontal-shift adjustment value for the BB signal during HD output. [SD H-shift]
Input a horizontal-shift adjustment value for the BB signal during SD output. |
|
[REF Signal Output]
|
Select a format to output the REF signals from [BB NTSC], [BB PAL], [Tri-Level 1080/59.94i], [Tri-Level 1080/50i], [Tri-Level 1080/23.98PsF],and [Tri-Level 1080/24PsF]. For STORM 3G ELITE, when [BB NTSC] or [BB PAL] is selected, the [Ref Out SD] indicator on the front panel of STORM 3G ELITE lights, and when [Tri-Level 1080/50i], [Tri-Level 1080/23.98PsF], or [Tri-Level 1080/24PsF] is selected, the [Ref Out HD] indicator on the front panel of STORM 3G ELITE lights. |
|
[Default]
|
Restore the default settings. |
The settings of a monitor output device used for capturing.

|
[Audio Monitor]
|
Select the audio channel to monitor. |
|
[HDMI Audio Output Setting]
|
Specify the output from the HDMI connector. Select if 8 audio channels are to be output or the 2 channels specified as analog audio channels are to be output. |
|
[Analog Output Settings]
|
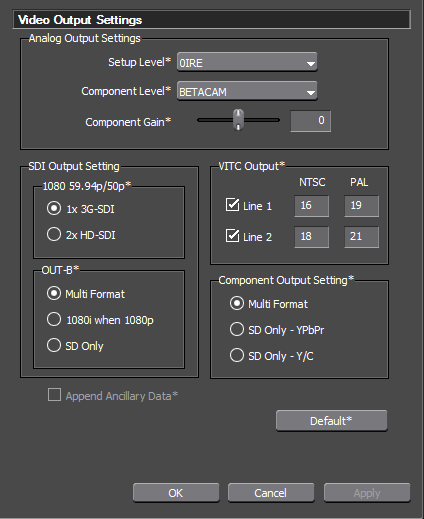
[Setup Level]
Set the setup level (black level) of NTSC from [0IRE] and [7.5IRE]. 0IRE is used in Japan, and 7.5IRE is used in North America. [Component Level]
Select the component level from [SMPTE] and [BETACAM]. |
|
[Component Output Setting]
|
[Multi Format]
HD/SD is switched automatically according to the input format. [SD Only - YPbPr]
Output downconverted video (component YPbPr). [SD Only - Y/C]
Output downconverted video (S-Video). |
|
[HDMI Input]
|
[Disable FIR filter at RGB/YUV444 to YUV422 conversion.]
Check this option to disable the FIR filter when converting to YUV422 which is the color space used for digital TV. |
|
[Default]
|
Restore the default settings. |
The settings of a monitor output device used for capturing.
|
[Analog Output Settings]
|
[Setup Level]
Set the setup level (black level) of NTSC from [0IRE] and [7.5IRE]. 0IRE is used in Japan, and 7.5IRE is used in North America. [Component Level]
Select the component level from [SMPTE] and [BETACAM]. [Component Gain]
Adjust the output gain of the SD component. |
|
[SDI Output Setting]:[1080 59.94p/50p]
|
Settings used when 1080 59.94p or 1080 50p signals are output from the SDI OUT terminal of STORM 3G ELITE. [1x 3G-SDI]
Output signals from the SDI OUT (A) terminal and the SDI OUT (B) terminal as 3G-SDI. [2x HD-SDI]
Output signals as HD-SDI×2 using the SDI OUT (A) terminal and the SDI OUT (B) terminal. |
|
[SDI Output Setting]:[OUT-B]
|
Output settings for the SDI OUT (B) terminal of STORM 3G ELITE. [Multi Format]
HD/SD is switched automatically according to the input format. [1080i when 1080p]
When the output format is 1080p, the video is output in 1080i format. [SD Only]
Output downconverted video. |
|
[VITC Output]
|
[Line 1]/[Line 2]
Set the number of VITC output lines in the input field of adopted video standard (NTSC/PAL). |
|
[Component Output Setting]
|
[Multi Format]
HD/SD is switched automatically according to the input format. [SD Only - YPbPr]
Output downconverted video (component YPbPr). [SD Only - Y/C]
Output downconverted video (S-Video). |
|
[Append Ancillary Data]
|
Check this option to output video appended with ancillary data such as closed captions. |
|
[Default]
|
Restore the default settings. |
The settings of a monitor output device used for capturing.
[Audio Output Settings] (STORM 3G ELITE/STORM 3G)
The settings of a monitor output device used for capturing.
|
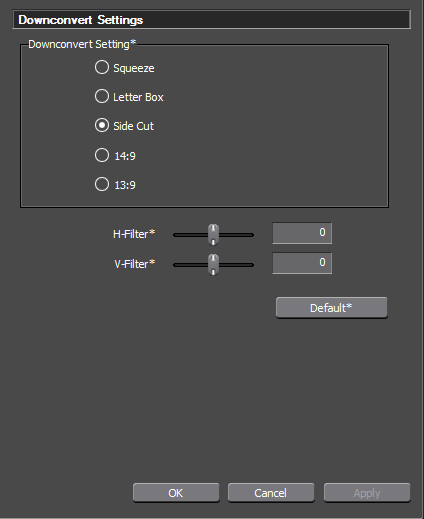
[Downconvert Setting]
|
Select the downconvert format from HD to SD. The default value is [Side Cut]. [Squeeze]
Compress 16:9 video horizontally and output as 4:3 video.  [Letter Box]
Mask the upper and bottom part of the 4:3 screen and output 16:9 video in the center of the screen.  [Side Cut]
Cut the side edges of 16:9 video and output as 4:3 video.  [14:9]
Cut the side edges of 16:9 video and output as 14:9 video.  [13:9]
Cut the side edges of 16:9 video and output as 13:9 video.  |
|
[H-Filter]
|
Emphasize the horizontal outline and contrast of images. Set the value between -32 and 32. |
|
[V-Filter]
|
Emphasize the vertical outline and contrast of images. Set the value between -32 and 32. |
|
[Default]
|
Restore the default settings. |
The settings of an input device used for capturing.
|
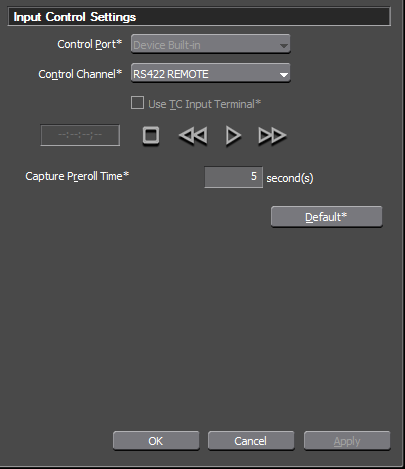
[Control Port]
|
Not available. |
|
[Control Channel]
|
Select whether to use RS-422 remote control. For STORM 3G ELITE, when [RS422 REMOTE A] or [RS422 REMOTE B] is selected, the [Remote A]or [Remote B] indicator on the front panel of STORM 3G ELITE lights. [Use TC Input Terminal]
Apply the priority to TC input terminal to get timecode. [Check Deck Control]
Check if the deck connected to REMOTE terminal can be controlled by EDIUS when using RS-422 remote control. |
|
[Capture Preroll Time]
|
Set the preliminary operation time (preroll) before capturing begins. |
|
[Default]
|
Restore the default settings. |
The settings of an input signal adjustment used for capturing.
The settings are available only for the Component, S-Video, or Composite input.

|
[Brightness]
|
Adjust the brightness of video. Set the value smaller to make the video darker, and set the value larger to make the video brighter. |
|
[Contrast]
|
Adjust the contrast of images. Set the value smaller to make the contrast lower, and set the value larger to make the contrast higher. |
|
[Hue]
|
Adjust the hue of video. When yellow is set as a standard, set the value smaller to make red stronger, and set the value larger to make green stronger.
|
|
[Saturation]
|
Adjust the lightness of color. Set the value smaller to make the color lighter, and set the value larger to make the color deeper. Set the value to 0 (minimum value) to make images grayscale. |
|
[Setup Level]
|
Set the setup level (black level) of NTSC. |
|
[Component]
|
Select the component level of NTSC. |
|
[Gain Control]
|
Configure the video luminance. Select [Manual] to configure the luminance manually. Select [Automatic] to set the optimal luminance automatically. |
|
[Sustain Ancillary Data]
|
Check this option to append ancillary data such as closed captions when capturing. |
|
[Default]
|
Restore the default settings. |
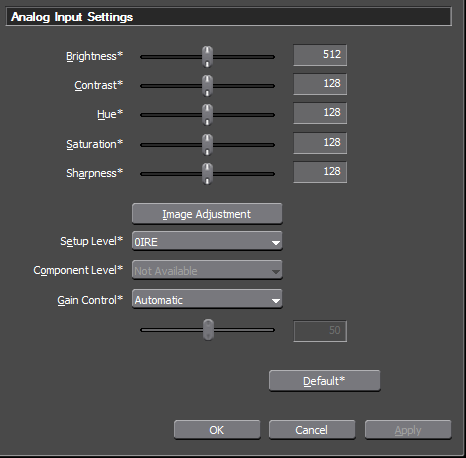
The settings of an input signal adjustment used for capturing.
The settings are available only for the Component, S-Video, or Composite input.
|
[Brightness]
|
Adjust the brightness of video. Set the value smaller to make the video darker, and set the value larger to make the video brighter. |
|
[Contrast]
|
Adjust the contrast of images. Set the value smaller to make the contrast lower, and set the value larger to make the contrast higher. |
|
[Hue]
|
Adjust the hue of video. When yellow is set as a standard, set the value smaller to make red stronger, and set the value larger to make green stronger.
|
|
[Saturation]
|
Adjust the lightness of color. Set the value smaller to make the color lighter, and set the value larger to make the color deeper. Set the value to 0 (minimum value) to make images grayscale. |
|
[Sharpness]
|
Adjust the sharpness of the outline in video. Set the value smaller to make the outline blurrier, and set the value larger to make the outline sharper. |
|
[Image Adjustment]
|
Display the [Image Adjustment Settings] dialog box. |
|
[Setup Level]
|
Set the setup level (black level) of NTSC. |
|
[Component Level]
|
Select the component level of NTSC. |
|
[Gain Control]
|
Configure the video luminance. Select [Manual] to configure the luminance manually. Select [Automatic] to set the optimal luminance automatically. |
|
[Default]
|
Restore the default settings. |

|
[3D]
|
Configure the effects of the 3D noise reduction and the 3D visual processing (only for the composite input). |
|
[2D]
|
Remove the noise by nonlinear noise reduction filter. You can configure this option separately from the 3D processing. [Luminance NR]
Configure the effect of the noise reduction in luminance (Y). [Chroma NR]
Configure the effect of the noise reduction in chroma (C). |
|
[Default]
|
Restore the default settings. |

|
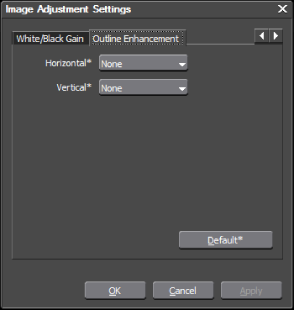
[Black Gain]
|
Strengthen the gain in the low luminance areas of the luminance signal. Set a higher value to emphasize black. If you select [None], [Adaptation Level] and [Threshold] become disabled. |
|
[Adaptation Level]
|
Configure the adjustment level of the black expansion. Set the higher level to emphasize black. |
|
[Threshold]
|
Configure the luminance level (brightness) to emphasize black. Move the cursor to the right to set a higher level. |
|
[White Gain]
|
Weaken the gain in the high luminance areas of the luminance signal. Improve the tone reproduction of a part which is whitened out due to the high luminance. If you select [None], [Adaptation Level] and [Threshold] become disabled. |
|
[Adaptation Level]
|
Configure the adjustment level of the limit for the white gain. Set a higher level to make adjustment level lower. |
|
[Threshold]
|
Configure the luminance level (brightness) to adjust the less white gain. Move the cursor to the left to set a lower level. |
|
[Default]
|
Restore the default settings. |
|
[Horizontal]
|
Configure the outline enhancement in the horizontal direction (the edges of the horizontal lines). |
|
[Vertical]
|
Configure the outline enhancement in the vertical direction (the edges of the vertical lines). |
|
[Default]
|
Restore the default settings. |
The settings of a monitor output device used for capturing.
[Analog Output Settings](STORM Pro/HDSTORM)
The settings of an input device used for capturing.
|
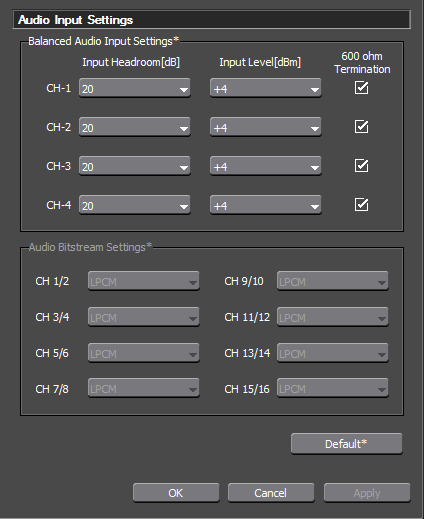
[Balanced Audio Input Settings]
|
[Input Headroom[dB]]
Specify the headroom of the standard input level from [20], [18], [16], and [12]. [Input Level[dBm]]
Specify the input level from [+4], [0], [-3], and [-6]. [600 ohm Termination]
Check this option to enable 600 Ω terminator of the balanced audio input terminal. Set this option by channel. |
|
[Audio Bitstream Settings]
|
Set how to handle digital audio signals when inputting SDI embedded audio. Select [LPCM] to save digital audio signals as linear PCM data and handle as normal audio signals when editing. Select [AC-3] to save digital audio signals as AC-3 audio bitstream. Select [Dolby-E] to save digital audio signals as Dolby-E audio stream |
|
[Default]
|
Restore the default settings. |
The settings of an input device used for capturing.
[Stereoscopic Settings] (STORM 3G ELITE/STORM 3G)
Configuring Sync Settings synchronizes the output device used for printing to tape with Grass Valley hardware products.
[Sync Settings] (STORM 3G ELITE/STORM 3G)
The settings of an output device used for printing to tape.
[Video Output Settings] (STORM 3G ELITE/STORM 3G)
The settings of an output device used for printing to tape.
[Audio Output Settings] (STORM 3G ELITE/STORM 3G)
The settings of an output device used for printing to tape.
[Downconvert Settings] (STORM 3G ELITE)
The settings of an output device used for printing to tape.
|
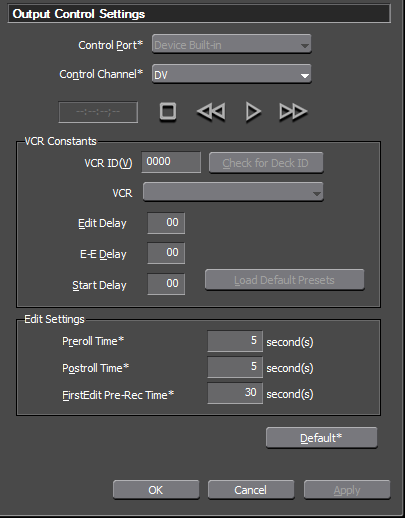
[Control Port]
|
Not available. |
|
[Control Channel]
|
Select whether to use RS-422 remote control. For STORM 3G ELITE, when [RS422 REMOTE A] or [RS422 REMOTE B] is selected, the [Remote A] or [Remote B] indicator on the front panel of STORM 3G ELITE lights. [Check Deck Control]
Check if the deck connected to REMOTE terminal can be controlled by EDIUS when using RS-422 remote control. |
|
[VCR Constants]
|
[VCR ID(V)]
VCR Constant 1 byte1 and byte2 are displayed. For SONY decks, the deck ID (including model/mode) is displayed. [Check for Deck ID]
Click it to load VCR ID (deck ID) from the connected deck. [VCR]
Display the deck name corresponding to the VCR ID (only ID and deck names which are set as preset). If there are multiple decks with the same ID, all the decks are displayed. [Edit Delay]
VCR Constant 1 Byte 6 is displayed. If the deck is not in the preset, enter manually. [E-E Delay]
VCR Constant 1 Byte 5 is displayed. If the deck is not in the preset, enter manually. [Start Delay]
VCR Constant 2 Byte 2 (Data 10 depending on the VCR) is displayed. If the deck is not in the preset, enter manually. [Load Default Presets]
Initialize the edit delay, E-E delay, and start delay with the preset values. |
|
[Edit Settings]
|
[Preroll Time]
Set the preliminary operation time (preroll). [Postroll Time]
Set the post operation time (postroll). [FirstEdit Pre-Rec Time]
Set the draft (margin) length at FirstEdit (storing the control signals as the standard point for editing at the top of the tape automatically). |
|
[Default]
|
Restore the default settings. |
The settings of an output device used for printing to tape.
|
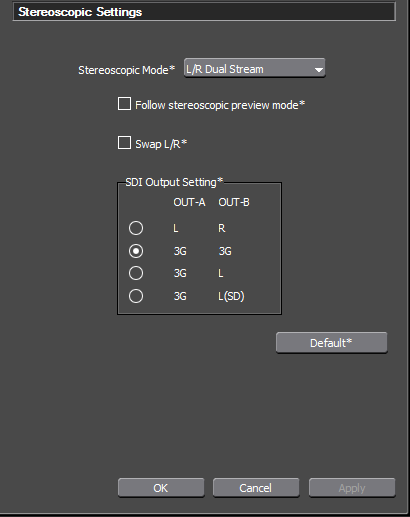
[Stereoscopic Mode]
|
Select a stereoscopic processing format when outputting the video of the L side and the R side in the project created in the stereoscopic edit mode. When [L/R Dual Stream] is selected, output the video of the L side and the R side with 2 streams maintained. When [L Only]/[R Only] is selected, export the video of either the L side or the R side. When [Side by Side]/[Top and Bottom]/[Line Interleave]/[Blend]/[Anaglyph]/[Difference]/[Split Grid] is selected, export the composite video of the L side and the R side. |
|
[Follow stereoscopic preview mode]
|
Output the video in the same format as the preview window display in the stereoscopic edit mode. |
|
[Swap L/R]
|
Check this option to display video with the L side (for left eye) and R side (for right eye) swapped. |
|
[SDI Output Setting]
|
Set how to output 2 streams from the SDI OUT terminal when [L/R Dual Stream] is selected in STORM 3G ELITE. [OUT-A]:[L], [OUT-B]:[R]
Output the L side video from the SDI OUT (A) terminal, and output the R side video from the SDI OUT (B) terminal. [OUT-A]:[3G], [OUT-B]:[3G]
Output the L+R (3G-SDI) video from the SDI OUT (A) terminal, and output the L+R (3G-SDI) video from the SDI OUT (B) terminal. [OUT-A]:[3G], [OUT-B]:[L]
Output the L+R (3G-SDI) video from the SDI OUT (A) terminal, and output the L side video from the SDI OUT (B) terminal. [OUT-A]:[3G], [OUT-B]:[L(SD)]
Output the L+R (3G-SDI) video from the SDI OUT (A) terminal, and downconvert the L side video from the SDI OUT (B) terminal to SD and output the video. |
|
[Default]
|
Restore the default settings. |
Configuring Sync Settings synchronizes the monitor output device used for editing with Grass Valley hardware products.
[Sync Settings] (STORM 3G ELITE/STORM 3G)
The settings of a monitor output device used for editing.
[Video Output Settings] (STORM 3G ELITE/STORM 3G)
The settings of a monitor output device used for editing.

|
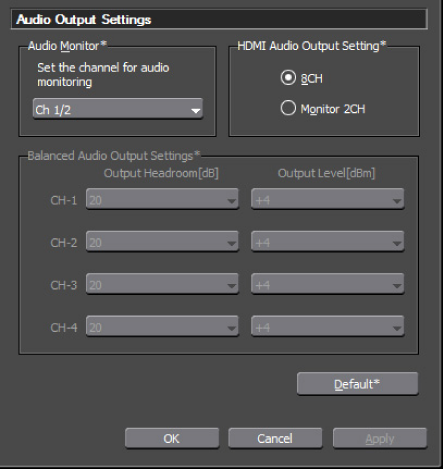
[Audio Monitor]
|
Select the audio channel to monitor. |
|
[HDMI Audio Output Setting]
|
Specify the output from the HDMI connector. Select if 8 audio channels are to be output or the 2 channels specified as analog audio channels are to be output. |
|
[Balanced Audio Output Settings]
|
[Output Headroom[dB]]
Specify the headroom of the standard output level from [20], [18], [16], and [12]. [Output Level[dBm]]
Specify the output level from [+4], [0], [-3], [-6], and [-20]. |
|
[Audio Bitstream Settings]
|
Set how to handle digital audio signals when outputting SDI embedded audio. When [Auto] is selected, audio bitstream is output if playback data contains audio bitstream, and linear PCM data is output if it does not contain audio bitstream. When [LPCM] is selected, linear PCM data is output. When [AC-3] is selected, AC-3 audio bitstream is output. When [Dolby-E] is selected, Dolby-E audio stream is output. |
|
[Default]
|
Restore the default settings. |
The settings of a monitor output device used for editing.

|
[Balanced Audio Output Settings]
|
[Output Headroom[dB]]
Specify the headroom of the standard output level from [20], [18], [16], and [12]. [Output Level[dBm]]
Specify the standard output level from [+4], [0], [-3], [-6], and [-20]. |
|
[MON 1/2 Output Setting]
|
Specify the output from the MON 1 and MON 2 terminals. Select whether to output from 2ch of the audio monitor set for [Audio Monitor] in [System Settings], or from Ch5/Ch6 of the balanced audio. |
|
[Analog Video Output &Gain]
|
Specify the output gain for the analog video output terminal. Set the value between -64 and 64. |
|
[Default]
|
Restore the default settings. |
The settings of a monitor output device used for editing.
|
[Audio Monitor]
|
Select the audio channel to monitor. |
|
[HDMI Audio Output Setting]
|
Specify the output from the HDMI connector. Select if 8 audio channels are to be output or the 2 channels specified as analog audio channels are to be output. |
|
[Balanced Audio Output Settings]
|
Not available for HDSPARK Pro/HDSPARK. |
|
[Default]
|
Restore the default settings. |
The settings of a monitor output device used for editing.
[System Settings] (STORM MOBILE/STORM Pro/HDSTORM)
The settings of a monitor output device used for editing.
[Downconvert Settings] (STORM 3G ELITE)
The settings of a monitor output device used for editing.
[Stereoscopic Settings] (STORM 3G ELITE/STORM 3G)
The settings of a monitor output device used for editing.

|
[Stereoscopic Mode]
|
Select a stereoscopic processing format when outputting the video of the L side and the R side in the project created in the stereoscopic edit mode. When [L Only]/[R Only] is selected, export the video of either the L side or the R side. When [Side by Side]/[Top and Bottom]/[Line Interleave]/[Blend]/[Anaglyph]/[Difference]/[Split Grid] is selected, export the composite video of the L side and the R side. |
|
[Follow stereoscopic preview mode]
|
Output the video in the same format as the preview window display in the stereoscopic edit mode. |
|
[Swap L/R]
|
Check this option to display video with the L side (for left eye) and R side (for right eye) swapped. |
|
[Default]
|
Restore the default settings. |
