EDIUS 7 Online Help
Reference ManualHardware Setup Guide
Installation Manual
User Guide
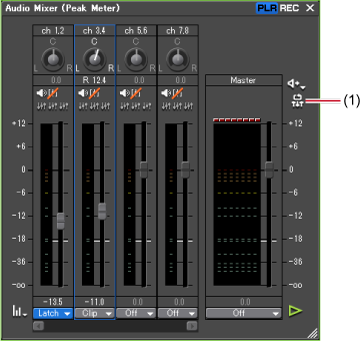
The audio mixer can be used to adjust the volume and pan of a track/clip on the timeline or a clip being played back on the preview window, while the track or clip is being played back. The level meter display can be switched between a peak meter or VU meter.
When the fader is operated with learning, after a point is added to the rubber band the point can be edited.

The [Audio Mixer] dialog box appears. The meter displayed (peak meter or VU meter) is the meter used in the [Audio Mixer] dialog box the last time it was closed.
 Alternative
Click [View] on the menu bar, and click [Audio Mixer].
Display the peak meter to adjust momentary sounds and other sounds difficult for humans to hear, and display the VU meter to adjust sounds as they are heard by humans.
To adjust the volume of an entire track click the master operation setting and click [Master].
To adjust the volume on individual tracks click the operation setting for each track and select what is to be adjusted ([TrackNo] or [Clip]).
To adjust using the learning function, select the learning mode from [Latch], [Touch] and [Write].
When operating in learning mode points are added to the rubber band of a clip. To redo an adjustment, either overwrite in [Write] mode or delete an entire rubber band.
Deleting All Rubber Band Points in a Clip
AlternativeVolume adjustment (1 dB increments): [↑]/[↓]
Volume adjustment (0.1 dB increments): [Shift] + [↑] /[Shift] + [↓]

An optional fader controller can be used to operate the fader. See the manual included with the product for instructions on use.

|
(1)
|
Pan control
|
Control the pan. |
|
(2)
|
[Mute]/[Solo]
|
Toggle mute on a track. |
|
(3)
|
[Gang]
|
Connect to a fader. |
|
(4)
|
Level meter
|
Displays a level meter. |
|
(5)
|
[Settings]
|
[Peak meter]
Check momentary changes in the audio signal visually. The gradation is displayed as a full scale. [VU meter]
Displays the average volume of an audio signal. The audio signal can be checked in a display that shows what is close to what is heard by the human ear. The gradation is displayed as an audio reference scale. [Keep operation setting]
Even if playback is stopped during learning, learning mode (operation setting) is maintained and the operation setting does not return to off. Closing the [Audio Mixer] dialog box returns the [Keep operation setting] setting to off. |
|
(6)
|
Operation setting
|
Switch the volume adjustment learning mode (operation setting) or the subject of volume/pan adjustment from the list. Setting to any of [Latch], [Touch] or [Write] sets the learning mode so points are added to the rubber band. Pan cannot be adjusted in learning mode. The master operation setting can be only [Master] or [Off]. [Master]
Adjust the volume of a whole track. [Track]
Update individual tracks with pan control and fader operations. Learning is not implemented. [Clip]
The clip where the timeline cursor is positioned is updated with pan control and fader operations. The rubber band is updated with operations. If a rubber band point is set, pan updates as “Move All” and volume updates as “Move All On Scale”. However, if the value is -∞ at the beginning of the operation, the setting will be updated as “Move All”. Learning is not implemented. [Off]
Lock the pan control and fader. [Latch]
Implement learning from the time point where the fader starts to be dragged up to where playback is ended. [Touch]
Implement learning from the position where you start dragging the fader until it is released. Release the mouse to return the fader to the original volume automatically. [Write]
Implement learning through the entire playback. Differing from [Latch] or [Touch], all the previously used volume values are overwritten regardless of dragging/releasing the fader. |
|
(7)
|
Level over indicator
|
Illuminate when the level is over. Click to turn the light off. |
|
(8)
|
Fader
|
Drag up and down to adjust the volume. |
|
(9)
|
[Play]
|
Play the timeline from the timeline cursor position. |
|
(10)
|
[Audio monitoring mode]
|
Make audio export settings for monitoring on the Player or Recorder. [Monaural] Output the audio as monaural for monitoring. [Stereo] Output the audio as stereo for monitoring. [Off] Set the audio output settings in the audio monitoring mode to off. For the Player, audio is output according to the audio settings made in the [System Settings], and for the Recorder, audio is output according to the audio settings made for the sequence. [Custom] Output audio in the mode set in [Custom Setting] for monitoring. [Custom Setting] Customize the audio monitoring mode. The customized settings can be saved and loaded as presets. |
|
(11)
|
[Change to Player]/[Change to Recorder]
|
Specify the window on which the source with the audio to be adjusted is placed. |
|
(1)
|
Reset audio level
|
Reset the adjusted audio level. |
The [Audio Mixer] dialog box appears.
AlternativeClick [View] on the menu bar, and click [Audio Mixer].
Click [Track] to adjust pan on each track and click [Clip] to adjust pan for each clip at the timeline cursor position.
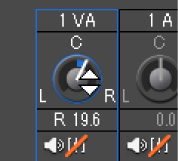
Dragging up or to the right adjusts to the right side, and dragging down or to the left adjusts to the left side.
AlternativePan adjustment (1 dB increments): [←]/[→]
Pan adjustment (0.1 dB increments): [Shift] + [←] /[Shift] + [→]
When you right-click the [Audio Mixer] dialog box of an individual track and click [Reset], the volume and pan settings, connection settings, mute/solo settings and operation mode of the track are reset. To reset the settings of all tracks, right-click the [Audio Mixer] dialog box and click [Reset All].
Performing [Reset] or [Reset All] does not reset the volume or pan settings for clips.
The [Audio Mixer] dialog box size can be adjusted. Move the cursor to the left or right edge of the [Audio Mixer] dialog box and when the cursor shape changes, drag to adjust the size. After adjusting the size, the [Audio Mixer] dialog box will display at the same size upon reopening.
The controllers for fader and pan adjustment can be linked across multiple tracks.
Three link patterns can be set: [Gang1] (yellow), [Gang2] (red) and [Gang3] (blue).
The fader color changes according to the color of each [Gang].
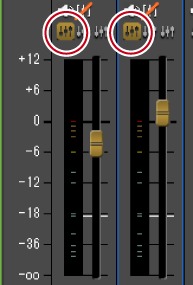
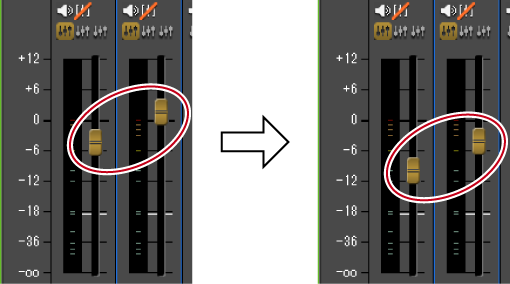
Tracks with faders in the same color are adjusted while maintaining the differences between each volume.
Before operating the fader (controller), from among the linked tracks, set [Operation] for the tracks you want to link to other than [Off].
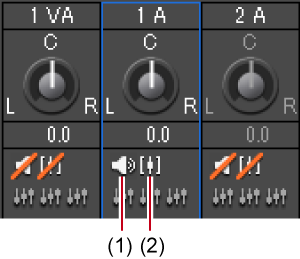
Audio playback can be restricted to a specific track. Specific tracks can also be muted.
Clicking [Mute] will mute selected tracks. Click [Solo] to play back audio of the selected track only.
|
(1) Mute
|
|
(2) Solo
|
