EDIUS 7 Online Help
Reference ManualHardware Setup Guide
Installation Manual
This section explains how to import project files edited with EDIUS, how to consolidate a project, and how to export to an AAF or EDL file.
Select a project to import when EDIUS starts up.
In [Recent Project], previously worked project files from the latest are displayed.
 Alternative
Click [Open Project], specify a file and click [Open].
Select a project file from the [Recent Project] list, and click [Open].

If you open a project file that is currently open for editing from another PC, the project file opens as a read-only file.
When you open a project with a large number of clips, “the number of imported files/number of all files” is displayed.
You can open a new project file after EDIUS starts up.

A confirmation dialog box appears to ask if you want to save the current project file.
AlternativeClick the [Open Project] list button, and select a file from the list of recent files.
Click [File] on the menu bar, and select a file from [Recent Project] → the recent files.
Click [File] on the menu bar, and click [Open Project] to select a project.
Opening project file after start-up: [Ctrl] + [O]
If you edit a project file using multiple PCs over the network, while one PC can open and edit the project file, other PCs can open the same project file as a read-only file.
You can import the sequence created in other project.

The [Import Sequence] dialog box appears.
AlternativeClick [File] on the menu bar, and click [Import Sequence].
|
[Import Project]
|
Select a recent file from the list. Click [Browse] to select a file using the [Open] dialog box. When you select a project file, detailed information including the project names and updated date. The information is displayed in red when the frame size or the aspect ratio differs. |
|
[Import Bin]
|
Check this item to merge the bin contents. To [Folder name], enter a folder name to manage the imported bin clips. The folder will be created under the [root] folder in the bin. When imported with the folder name “album1”, the following be displayed.  Uncheck this item to import only the sequence. |
|
[Copy Files]
|
[Copy clips in project folder]
Copy the files in the source project folder. [Copy rendered files]
Copy the rendered files. [Folder name]
Enter a folder name to manage the copied files. The folder is created under the project folder. |
 Note
NoteYou cannot copy files if the project folder is same as the source.
If the frame rates are different, the merge process fails.
If you merge projects with different project settings, the original project and video may be changed due to the differences of the frame size, aspect ratio, and overscan size. In addition, the rendered files cannot be copied.
You can remove unnecessary clips from the project folder, and extract a portion to use.

The [Consolidate Project] dialog box appears.
[Consolidate Project] Dialog Box
AlternativeClick [File] on the menu bar, and click [Consolidate Project].
When you delete unnecessary files, a confirmation message is displayed, and click [Yes].
When a message indicating there is not enough disc space for consolidating is displayed, change the destination.
|
[Project File Location]
|
[Current Project Location]
Overwrite and save the current project. [Save Project to Folder]
Specify a folder to save the project. [Drive Space]/[Required Space]
Display the available disc space of the selected drive and the whole file size to be created (copied) by consolidating. They are displayed in red when the required space is larger than the available disc space. |
|
[Settings]
|
Select the operation to be performed at execution of consolidation, and select [Trim margin] or options as required. Select execution options from the following. [Cleanup]
Select this item to delete unnecessary files in the project. Release clips that are registered to the bin but not used in the timeline and delete them from the hard disk. [Backup]
Select this item to create a backup of the portion used in the project. You need to specify a trim margin. Only the clip portion used in the timeline is saved as a separate file, and all the clips used in the project is copied to the project folder. However, if the clip used in the timeline is registered, the entire file is copied. [Backup(no trimming)]
Select this item to back up the entire project. Copy all the clips used in the project to the project folder. [Backup Cleanup]
Perform an operation of both [Cleanup] and [Backup] together. You need to specify a trim margin. [Backup Cleanup(no trimming)]
Perform an operation of both [Cleanup] and [Backup(no trimming)] together. [Custom]
Configure the consolidation settings manually.
Release the clips not used in the timeline from the bin.
Save the areas used in the timeline as another file, and then switch the file in the timeline with the new file. You need to specify a trim margin. The new files are saved in the created folder in the project folder.
Copy all the clips used in the project to the project folder.
Delete the unnecessary files from the project folder when consolidating. You can set this option only when any of the other optional items is selected. |
|
[Proxy clip]
|
If any proxy clip is used, select the data type to be consolidated from the list. |
|
[Output log]
|
Check this item to export a log file containing the result of consolidation. Click [Browse] to specify a destination and a file name. |
If you select a back up option and if there is any clip that cannot be copied, a confirmation message is displayed to ask if you want to continue the process before consolidation.
If you select a cut option and if there is any clip that cannot be copied, a confirmation message is displayed to ask if you want to continue the process before consolidation.
NoteEven if an option to delete unnecessary files is selected, some files may not be deleted due to the access right to the folder or file. In that case, no message appears. Check the user authorization when logging in.
If an option to delete unnecessary files is selected, the deleted files cannot be restored after consolidation.
The name of the copied file is changed.
You can export a project file that you edited with EDIUS as an AAF file.
NoteOnly active sequences will be exported.
The following information will not be exported.
Tracks with no clip
Audio tracks with no channel map setting
Title track
Tracks with mute setting
All effects (As for the pan and volume settings, source files that reflect their settings will be exported.)
Transition/cross fade sections will be exported as clips.
You cannot add an In point side margin to a clip that is positioned at the top of the timeline.
You cannot specify network drives as export destination. However, you can mount network drives to use as export destination.
When you select an exporter which does not support the export of the timecode, the file is not exported properly.
Clips that are grouped, share a same clip name, and reference the same source are exported as a grouped clips.
The [AAF Export Detail Settings] dialog box appears.
[Project Exporter (AAF)] Dialog Box
AlternativeClick [File] on the menu bar, and click [Export Project] → [AAF].
The export of the AAF file is started.
If you want to check the preset settings or change export settings, click [Detail].
The [AAF Export Detail Settings] dialog box appears.
[AAF Export Detail Settings] Dialog Box
|
[Preset]
|
[Type : 1] Pro Tools Preset *1
The information of the video and audio clips is written in an AAF file. The source that the video clip is referring to is exported as QuickTime (H.264) in the NTSC format. The source that the audio clip is referring to is exported as an AIFF file. Select type 1 when you import the AAF file with audio editing software. [Type : 2] After Effects Preset *1
The video clip information is written in an AAF file, and the source that the video clip is referring to is not copied or exported. The audio information of the audio corresponding to the range that is exported to an AAF file is exported as an AIFF file, and the information is written in an AAF file as a single clip. Select type 2 when you import the AAF file with composition software. [Type : 3] for other NLE
The information of the video and audio clips is written in an AAF file by frame unit. The source that the clips are referring to is not copied or exported. [Type : 4] DaVinci Resolve Preset *1
The information of the video and audio clips is written in an AAF file. The source that the clips are referring to is exported in the QuickTime (Grass Valley HQX) format. [Type : 5] Media Composer preset *1*2
The information of the video and audio clips is written in an AAF file. The source that the clips are referring to is exported in the MXF (DNxHD, 1080p/i, or 720p) format. |
|
[Export between In and Out]
|
Check this item to export only between In and Out points of the timeline. |
|
[Detail]
|
The [AAF Export Detail Settings] dialog box appears. |
*1Visit our website for the latest information on supported formats.
*2EDIUS Elite or DNxHD optional license is required.
NoteIf you export a project using [Type : 1] in [Preset], you must import the video manually depending on the version of Pro Tools.
If you use Pro Tools 7.3 or older to import the file exported using [Type : 1] in [Preset], you must change [File path] to [RFC1738] in the [AAF Export Detail Settings] dialog box.
|
[Legacy]
|
Check this item to export in a format that supports applications such as Pro Tools and After Effects. Uncheck this item to export in a format that supports applications such as DaVinci Resolve. |
|
[Separate video and audio]
|
Check this item to export the video and audio parts of the source separately. Uncheck this item to export as a video source that includes audio. |
|
[File path]
|
Select [RFC1738], [RFC2396], or [Unicode] to specify the description method for the source file path to which the clip refers. |
|
[Video Clip]
|
Specify how video clips will be handled. [Output AAF]
Check this item to add video clip information to AAF files. [Clips]
Copy (or export) the source used for the clips so that the copied source will be referenced.
Handle the video clips of the timeline as one clip. The clip and file names of the first clip with the smallest track number will be used as the clip and file names of the exported files.
Reference the original source directly without copying. |
|
[Audio clip]
|
Specify how audio clips will be handled. [Output AAF]
Check this item to add video clip information to AAF files. [Clips]
Copy (or export) the source used for the clips so that the copied source will be referenced.
Handle the audio clips of the timeline as one clip. The clip and file names of the first clip with the smallest track number will be used as the clip and file names of the exported files. If both the VA and A tracks have audio, the first clip and file names of the A track will be used.
Reference the original source directly without copying.
Check this item to export the stereo tracks as monaural tracks of individual channels. If unchecked, the stereo tracks will be downmixed and exported as monaural clips. For the channel map, if the track number is an odd number, 1ch (L side) of the track will be used, and if the track number is an even number, 2ch (R side) of the track will be used. The clip names will be “clip name + .L” for odd number tracks and “clip name + .R” for even number tracks. |
|
[Copy option]
|
Specify how the source will be copied when you select [Copy clips] in [Video Clip] and/or [Audio clip]. [Copy used clips]
Copy source files that are used by the clips on the timeline. [Export the used area to a file]
Export only the ranges that are used by the clips on the timeline. In this case, the setting of [Margin] is enabled to export the file adding the specified time margins at In/Out points. If you select [Copy clips] in [Audio clip], the source will be downmixed and exported as a monaural clip. [Output folder]
Select a source file export destination. If you select [Create a folder], a folder with the same name of the AAF file folder in the destination to which the AAF file is exported, and the source files will be exported to that folder. If you select [Same folder], the source files will be exported to the destination of the AAF file. [Exporter]
Select the exporter to export video files.
Check this item to display the timeline timecode in the exported video.
Select the exporter to export audio files.
Check this item to convert the source to the 16-bit format audio, regardless the project settings. |
|
[Save preset]
|
Register the current settings as a new preset. Enter a preset name, and click [OK]. |
|
[Delete]
|
Delete the currently selected preset. [Type : 1], [Type : 2], and [Type : 3] cannot be deleted. |
|
[OK]
|
Click this button to change the settings for the selected AAF export preset temporarily. Click [Save preset] and save the changed settings to register the preset, as the changes are not saved by this operation. |
|
[Cancel]
|
Cancel the settings and return to the [Project Exporter (AAF)] dialog box. |
You can export a project file that you edited with EDIUS as an EDL file.
Export the following tracks. The clips placed on other tracks not mentioned below are not exported.
1 - 2VA (1 - 2V) tracks
1 - 4A tracks
T tracks (All tracks)
Audio clips in 1 - 2VA track are not exported. Export channel range for 1 - 4A tracks is different depending on EDL type.
|
EDL types |
Tracks |
|---|---|
|
BVE5000 BVE9100 CMX340 CMX3600 |
1 - 2A 1 - 4A 1 - 2A 1 - 4A |
AlternativeClick [File] on the menu bar, and click [Export Project] → [EDL].
The [EDL Exporter Detailed Settings] dialog box appears.
[EDL Exporter Detailed Settings] Dialog Box
|
[EDL Type]
|
Select the EDL format to export. |
|
[Export Format]
|
[Mode1]
Comment lines are not added. [Mode2]
Comment lines are added. Select this format when you cannot correctly import EDL files by third-party products. |
|
[Handle empty clips as black clips]
|
Handle the empty spaces on timeline are as black clips. Check [Use longest clip as reference] to handle Out point at the end edge of the timeline as the end edge of the timeline; the empty spaces between them are handled as black clips. |
|
[Link clips with sequential time codes]
|
Handle a series of multiple clips as one clip when their timecodes are sequential. However, they are not linked when transition is set between them. |
|
[Export EDL for each track]
|
Export the project file for each track. The following characters are added to the end of each file name.
The audio of both 1VA, 2VA, and A tracks is output together to a “file name_A.edl” file. When 2VA (2V) track has a transition, it will be replaced with a center cut. |
|
[Replace transitions with center cuts]
|
Replace all places with transitions or audio cross fade configured with the center cuts. |
|
[No split information]
|
Release the grouping of video and audio, and handle the video clips and audio clips separately. Check this item when you cannot correctly import EDL files by third-party products. If you check this item, [Handle split clips separately] cannot be set. |
|
[Handle split clips separately]
|
Divide the split part of the clip with split to eliminate the split. Note that when the speed of clips is changed, the split part is not fragmented. This item cannot be set if you check [No split information]. |
|
[When in reverse play, reverse player In/Out timecodes]
|
Display the reverse playback in the direction from the Out point to In point. The reverse playback is normally displayed from the In point to Out point. This item is available when you set CMX type for EDL type. |
|
[When in reverse play, move one frame in the In direction]
|
Add a frame to the Player In point at reverse playback. Check this item when you cannot correctly import EDL files by third-party products. It prevents the original timecode from slipping off 1 frame forward. Normally, 1 frame is added to Out point of the Player at reverse playback. |
|
[Combine Insert Tracks]
|
Check this item to overwrite a VA1 (or V1) track with images of a VA2 (or V2) track and to export both tracks as a VA1 (or V1) track together. |
|
[Create Reel List]
|
Create the list of reel numbers. |
|
[Add Reel No. to clip name in comment]
|
This item can be changed only when [Mode2] (output format to add comment lines) is selected in [Export Format]. Check this item to add a reel name to the clip name output to the comment lines. |
|
[Master reel number]
|
Set the master reel number used in BVE9100. The value range is between “0” and “9999”. |
|
[Block number]
|
Set the block number used in BVE5000 or BVE9100. The value range is between “0” and “999”. |
|
[Adjusted Data Settings]
|
[Master reel number]
When A/A roll (transition among the clips with the same reel number) exists, this reel number is to use the location in the replaced file. When the original clips have the same reel number, decrease the number one by one to avoid the number duplication. [Block number]
Set the block number used in BVE5000 or BVE9100. The value range is between “0” and “999”. [Preroll area]
Specify the margin added to In/Out points of the clips. [Offset time code]
Enter the start timecode (optional). [Regenerate setting]
Set the start timecode to the In point of the first clip. [Jam sync setting]
Set the In/Out points of the clip to the In/Out points of the timeline. |
When clips placed on different tracks are grouped and the clips have a gap within 3 seconds between the clips, they are split when exporting the EDL file.
When the clips have split information, the export result of EDL files differs depending on the settings in the [EDL Exporter Detailed Settings] dialog box. Here explains an example when the clips placed in 3 different tracks are grouped.
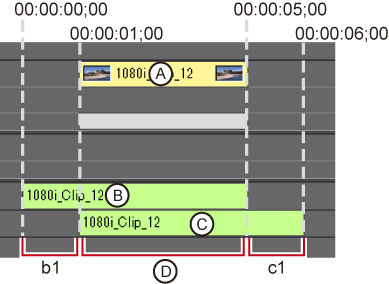
The grouping of the clips is released to handle each clip separately. They are fragmented in 3 periods of time (A, B, and C in the figure above).
Gaps between the clips are split. Areas of b1 and c1 in the figure are split, and the information is fragmented into 1 period of time as range D.
The gap between tracks is fragmented to eliminate the split. The information is fragmented in 3 periods of time (b1, c1, and D in the figure above).
NoteThe clips with the speed changed are not split or handled separately, because their grouping becomes released.
