EDIUS 7 Online Help
Reference ManualHardware Setup Guide
Installation Manual
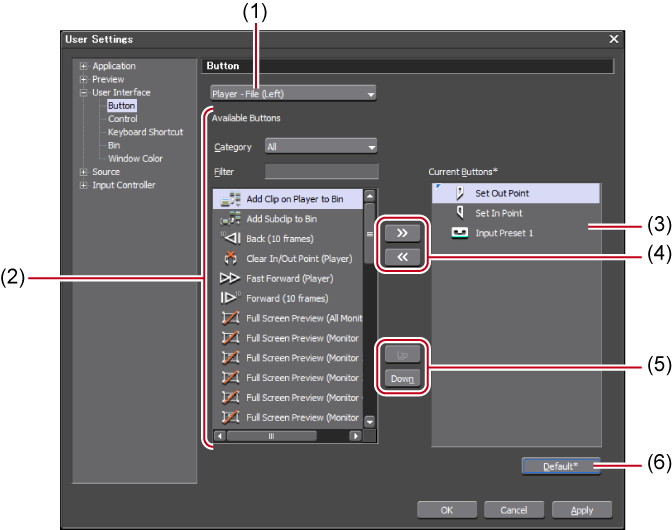
Add, delete and change the placement order of operation buttons that are displayed on screens.
The [Button] screen appears.
The selected button is added to the [Current Buttons] list. When [Space] has been added, a space is added between the two buttons.
To delete a button, select the button to delete from the [Current Buttons] list and click [<<]. When [Space] has been deleted, the space between the two buttons is deleted.
To change the position of a button, select the button to move from the [Current Buttons] list and click [Up] or [Down]. Each click of these buttons moves the selected button one place up or down.
You can continue to set other items by clicking [Apply].
 Alternative
To add a button, select the button one place under the insertion position in the [Current Buttons] list, and double-click the button to add from the [Available Buttons] list.
To add a button, drag and drop the button to add from the [Available Buttons] list onto the [Current Buttons] list.
To delete a button, double-click the button to delete from the [Current Buttons] list.
To delete a button, drag and drop the button to delete from the [Current Buttons] list onto the [Available Buttons] list.
To change the position of a button, drag and drop the button in the [Current Buttons] list.
 Note
NoteIf too many buttons are added to the center area of the Player and Recorder, only the buttons that can be shown within the area are displayed from the top of the list.
|
(1)
|
Area
|
 A: [Player - File (Left)] B: [Player - File (Center - Left)] C: [Player - File (Center - Right)] D: [Player - File (Right)]
[Bin]: Bin window operation buttons [Timeline]: Timeline window operation buttons [Effect]: [Effect] palette operation buttons [Source Browser]: Source browser window operation buttons [Mode Bar]: Mode bar operation buttons |
|
(2)
|
[Available Buttons]
|
[Category]
Select a category to narrow down [Available Buttons]. [Filter]
Enter a keyword to narrow down [Available Buttons]. |
|
(3)
|
[Current Buttons]
|
Displays the buttons to display. |
|
(4)
|
[>>]/[<<]
|
Add/delete buttons to be displayed. |
|
(5)
|
[Up]/[Down]
|
Change the position of buttons. |
|
(6)
|
[Default]
|
Return settings to their defaults. |
You can improve operation efficiency by adding and displaying operation buttons that are not displayed by default.
|
Button |
Function |
|---|---|
 |
[Clear In/Out Point (Player)] |
 |
[Set In Point] |
 |
[Set Out Point] |
 |
[Eject]*1 |
 |
[Audio Capture]*1 |
 |
[Capture]*1 |
 |
[Set Gang Mode]*2 |
 |
[Set clip marker/Clear clip marker (Toggle)]*2 |
 |
[StandBy Off]*1 |
 |
[Add Subclip to Bin] |
 |
[Toggle Status] |
 |
[Toggle Safe Area Display] |
 |
[Toggle Zebra Display On/Off] |
 |
[Overwrite to Timeline] |
 |
[Insert to Timeline] |
 |
[Add to Batch Capture List]*1 |
 |
[Video Capture]*1 |
 |
[Pre-roll Edit (Preview)]*2 |
 |
[Pre-roll Edit (Rec)]*2 |
 |
[Full Screen Preview (All Monitors)] |
 |
[Full Screen Preview (Monitor 1)] - [Full Screen Preview (Monitor 8)] |
 |
[Toggle Rotate Preview] |
 |
[Add Clip on Player to Bin]*2 |
 |
[Match Frame (Player to Recorder)] |
 |
[Loop]*2 |
 |
[Reel No. Settings]*1 |
 |
[Pause]*1 |
 |
[Stop] |
 |
[Move to Start]*2 |
 |
[Input Preset 1] - [Input Preset 8] |
 |
[Play] |
 |
[1 Frame Back] |
 |
[Review] |
 |
[Fast Forward] |
 |
[Move to End]*2 |
 |
[Next Frame] |
 |
[Forward (10 frames)]*2 |
 |
[Back (10 frames)]*2 |
*1Buttons available for use only on the Player (deck mode)
*2Buttons available for use only on the Player (file mode)
|
Button |
Function |
|---|---|
 |
[Clear In/Out Point (Recorder)] |
 |
[Set In/Out Point to Focused Area] |
 |
[VTR Emulation]*1 |
 |
[VTR Emulation (Render All)]*1 |
 |
[VTR Emulation (Render Load Area)]*1 |
 |
[VTR Emulation (Render Overload Area)]*1 |
 |
[Set In] |
 |
[Set Out] |
 |
[Export] |
 |
[Set Gang Mode]*2 |
 |
[Toggle Status] |
 |
[Toggle Safe Area Display] |
 |
[Toggle Zebra Display On/Off] |
 |
[Full Screen Preview (All Monitors)] |
 |
[Full Screen Preview (Monitor 1)] - [Full Screen Preview (Monitor 8)] |
 |
[Toggle Rotate Preview] |
 |
[Match Frame (Recorder to Player)] |
 |
[Loop] |
 |
[Stop] |
 |
[Move to Start] |
 |
[Play] |
 |
[1 Frame Back] |
 |
[Previous Edit Point] |
 |
[Review] |
 |
[Fast Forward] |
 |
[Move to End] |
 |
[Next Frame] |
 |
[Next Edit Point] |
 |
[Play the Current Area] |
 |
[Forward (10 frames)] |
 |
[Back (10 frames)] |
 |
[Review Selected Clips] |
*1Available only when you have VTR Emulation Option. See VTR Emulation Option User Guide for more details.
|
Button |
Function |
|---|---|
 |
[Folder] |
 |
[Search] |
 |
[Move Up] |
 |
[Add Clip] |
 |
[Add Title] |
 |
[New Clip] |
 |
[Cut] |
 |
[Copy] |
 |
[Paste] |
 |
[Register K2 Asset] |
 |
[Show in Player] |
 |
[Add to Timeline] |
 |
[Delete] |
 |
[Property] |
 |
[View] |
 |
[Tool] |
 |
[Normalize (Selected Clips)] |
 |
[Audio Offset] |
|
Button |
Function |
|---|---|
 |
[Copy (Between In/Out) - All Tracks] |
 |
[Copy (Between In/Out) - Selected Tracks] |
 |
[Ripple Cut (Between In/Out) - All Tracks] |
 |
[Ripple Cut (Between In/Out) - Selected Tracks] |
 |
[Ripple Delete (Between In/Out)] |
 |
[Render In/Out (Render Overload Area)] |
 |
[Cut (Between In/Out) - All Tracks] |
 |
[Cut (Between In/Out) - All Tracks (Follow Mode)] |
 |
[Cut (Between In/Out) - Selected Tracks] |
 |
[Cut (Between In/Out) - Selected Tracks (Follow Mode)] |
 |
[Delete (Between In/Out)] |
 |
[Delete (Between In/Out) - Follow Mode] |
 |
[V Mute] |
 |
[Redo] |
 |
[Snap to Event] |
 |
[Audio Offset] |
 |
[Ripple Delete Audio Clips] |
 |
[Delete Audio Clips] |
 |
[Delete Audio of Selected Clip (Follow Mode)] |
 |
[Audio Channel Map] |
 |
[Toggle Audio Mixer Display] |
 |
[Add Cut Point (Selected Tracks)] |
 |
[Replace Clip (All)] |
 |
[Set Group/Link Mode] |
 |
[Copy] |
 |
[Display Thumbnail] |
 |
[Create New Sequence] |
 |
[Set Sequence Marker/Clear Sequence Marker (Toggle)] |
 |
[Audio Source Channel Mode (Stereo/Monoral)] |
 |
[Reset Source Channel] |
 |
[Toggle Source Browser Display] |
 |
[Create Title] |
 |
[Move Track Patch (Up)] |
 |
[Move Track Patch (Down)] |
 |
[Toggle Extend Clips when Applying Transition/Cross Fade] |
 |
[Nudge (+10 frames)] |
 |
[Nudge (+1 frame)] |
 |
[Nudge (-10 frames)] |
 |
[Nudge (-1 frame)] |
 |
[Normalize (Selected Clips)] |
 |
[Normalize (Selected Tracks)] |
 |
[Toggle Palette Display] |
 |
[Ripple Delete Video Clips] |
 |
[Delete Video Clips] |
 |
[Delete Video of Selected Clip (Follow Mode)] |
 |
[Toggle Bin Window Display] |
 |
[Fade In] |
 |
[Fade Out] |
 |
[Freeze Frame] |
 |
[Proxy Mode] |
 |
[Save Project] |
 |
[Open Project] |
 |
[Toggle Vector Scope/Waveform Display] |
 |
[Toggle Voice Over Display] |
 |
[Match Frame (Recorder to Source)] |
 |
[Multicam] |
 |
[Loudness Measurement] |
 |
[Ripple Trim (In Point)] |
 |
[Ripple Trim (Out Point)] |
 |
[Set Ripple Mode] |
 |
[Ripple delete] |
 |
[Undo] |
 |
[Cut (Follow Mode)] |
 |
[Delete] |
 |
[Delete (Follow Mode)] |
 |
[Toggle Insert/Overwrite Mode] |
 |
[Set Default Transition] |
 |
[Create a Still Image] |
 |
[Add/Delete Rubber Band Points in Current Position] |
 |
[Paste to Current Location] |
 |
[Partial Download (All Sequences)] |
 |
[Partial Download (All Sequences and Bin)] |
 |
[Partial Download (Current Sequence)] |
 |
[Partial Download (Replace Partially Downloaded Clip with Original Clip)] |
|
Button |
Function |
|---|---|
 |
[Hide Effect View] |
 |
[Move up one folder] |
 |
[Folder Link] |
 |
[Add to Timeline] |
 |
[Delete] |
 |
[Property] |
 |
[View] |
 |
[lock] |
|
Button |
Function |
|---|---|
 |
[Folder] |
 |
[Move Up] |
 |
[View] |
 |
[Show Background Job] |
|
Button |
Function |
|---|---|
 |
[Snap to Event] |
 |
[Set Group/Link Mode] |
 |
[Display Thumbnail] |
 |
[Audio Source Channel Mode (Stereo/Monoral)] |
|
|
[Proxy Mode] |
 |
[Set Ripple Mode] |
 |
[Toggle Insert/Overwrite Mode] |
 |
[Sync-Lock Sequence Marker - Toggle] |
