EDIUS 7 Online Help
Reference ManualHardware Setup Guide
Installation Manual
User Guide
When a key frame is set, you can change the layout along the timeline.
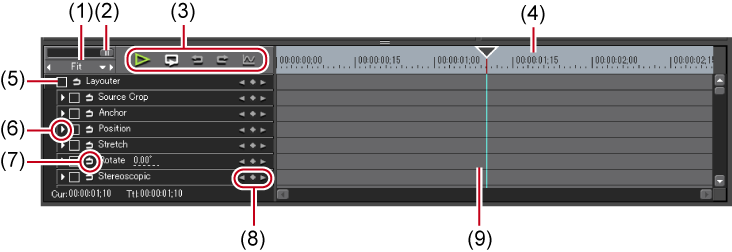
Set the key frame on the timeline in layouter.
|
(1)
|
Timeline controller
|
Drag the slider to the left and right to adjust the time scale display unit. Move the slider to the left to reduce the display unit, or to the right to increase it. The right end is [Fit]. |
|
(2)
|
Time scale settings
|
Click this to toggle the specified display unit and [Fit]. Click the left arrow to reduce the display unit, or click the right arrow to increase the display unit. |
|
(3)
|
Playback/Tool buttons
|
|
|
|
||
|
[Ctrl] + [Z]
|
||
|
[Ctrl] + [Y]
|
||
|
The numerical values and gradations of the Y axis can be changed by entering numerical values.  |
||
|
(4)
|
Time scale for key frame
|
Display a scale with the unit selected in the time scale setting on the timeline. Right-click the time scale and click [Timeline Timecode] to display the timecode of the timeline or click [Zero base Timecode] to display the timecode with the beginning of the clip as 0. If a sequence marker is set for the position where the clip is placed, right-click the time scale and click [Go to Previous Sequence Marker] or [Go To Next Sequence marker] to move the timeline cursor to the previous or next sequence marker. |
|
(5)
|
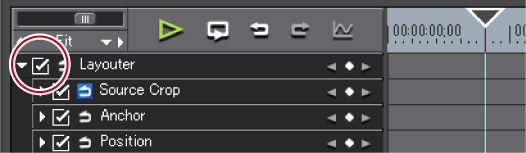
Enable/Disable
|
Unchecking the item disables the parameter settings. To set a key frame, check [Layouter]. |
|
(6)
|
Expand button
|
Click this button to configure detailed settings for each item. The layout can be edited by entering a numerical value or moving the mouse to a control and dragging when the mouse cursor changes shape. |
|
(7)
|
[Add default key]
|
Click this item to set the key frame of the items for each parameter in the layout (in an unchanged state) set as the [Default] in the preset at the timeline cursor position. |
|
(8)
|
Key frame setting
|
Click Click the left and right arrow to move to the previous and next key frame. |
|
(9)
|
Key frame timeline
|
When a layout is edited at the timeline cursor position, a key frame is automatically added. Also, when parameter items are expanded, parameters can be edited by dragging the key frame up or down. |
Key frame settings are enabled.
The timeline cursor is displayed by clicking the time scale.
A key frame is automatically added. If it is not added, click [Add Key / Delete] in the key frame settings.

A key frame is automatically added. Repeat step 5 if necessary.

Key frames can be set without moving the timeline cursor by right-clicking the position to set the key to and clicking [Add].
When the timeline is right-clicked and [Default] is clicked, the key frame is set to the right-clicked position on the layout currently set to [Default] in the preset (i.e. without any changes made to the layout).
To delete a key frame, right-click the key frame and click [Delete].
When the item name of a parameter is right-clicked and [Clear parameter of (item)] is clicked, all key frames for that item are deleted.
Parameter items can be expanded, and copy, paste and other edit operations can be performed by right-clicking on the key frame.
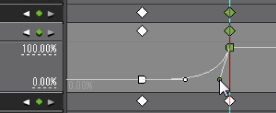
Parameter items can be expanded, and the method of interpolation can be changed by right-clicking the key frame. Select from [Hold] (fix layout up to next key frame), [Line] (change intuitively) and [Bezier] (change smoothly). The key changes shape when the interpolation method is changed.
Parameter items can be expanded, and the parameters of the key frame can be edited by setting to chart display The interpolation curve can also be edited by dragging handles when the interpolation method is [Bezier].
All set keys can be selected by right-clicking the timeline and clicking [Select All].
Key frames can be added to the position of the timeline cursor by double-clicking the preview.
When [Shift] + [V] on the keyboard are pressed, a key frame is added to all parameters with a valid key frame setting at the timeline cursor position.
When [V] on the keyboard is pressed, a key frame is added to the currently selected parameter at the timeline cursor position.
An orange line is displayed on clips set with the layouter.

 : Play back the timeline on the Recorder.
 : Repeatedly play back the clip currently being edited.
 : Undo an operation.
 : Redo the undone operation.
 : Switch the changes of each parameter to the chart view. In the chart view, the timeline is represented by a chart display of the selected key. The parameters can be edited by moving the keys up and down.
 in the center to set a key frame on the position of the timeline cursor. When the timeline cursor is located over the key frame, the key frame will be deleted.