EDIUS 7 Online Help
Reference ManualHardware Setup Guide
Installation Manual
User Guide
You can use filters for the whole clip, to adjust image quality (such as color and brightness) or edit audio.
You can adjust the color tone to match the previous/next video, or adjust the brightness by correcting color cast, highlight detail loss, and shadow detail loss. The following filters are provided for color correction.
Correct colors for shadow (black), intermediate (gray), and highlight (white).
Adjusting 3-Way Color Collection
Adjust luminance (Y), blue color difference (U), and red color difference (V) on the chart. You can make a fine adjustment to balance the shadow and highlight.
Keys can be added for the YUV curve but interpolation animation between keys is not available.
Adjust chroma, luminance, contrast, and color tone with the slider.
Move the pointer to adjust the color density, or rotate the wheel to adjust the color tone.
Make the video monotone.
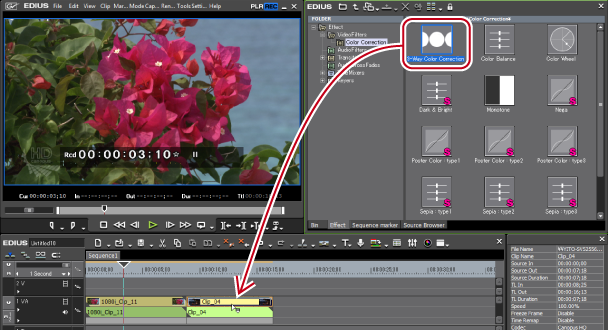
 Alternative
Select the clip on the timeline, right-click the filter in the [Effect] palette, and click [Add to Timeline].
Right-drag an effect and drop it to the clip, and click [Add] or [Replace].
The [3-Way Color Correction] dialog box appears.
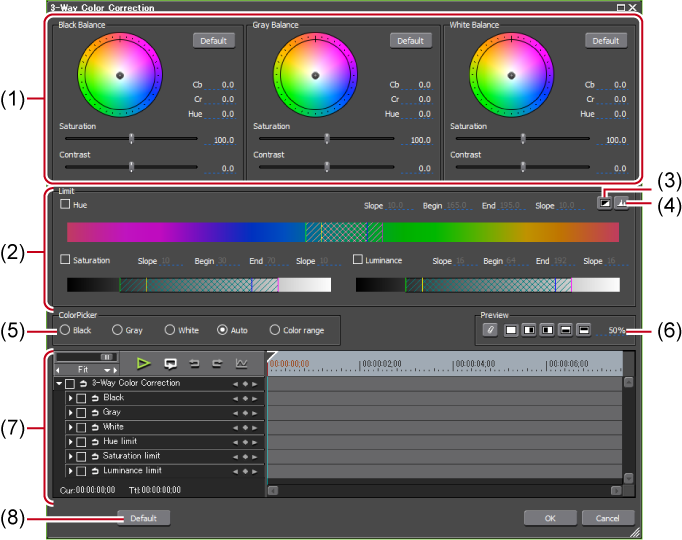
[3-Way Color Correction] Dialog Box
|
(1)
|
[Black Balance]/[Gray Balance]/[White Balance]
|
Drag a point in each color to correct colors for shadow (black balance), intermediate (gray balance), and highlight (white balance). Drag the point of color wheel to adjust the hue, or move the slider to adjust saturation and contrast. |
|
(2)
|
[Limit]
|
Correct colors in the specified range. Check [Hue], [Saturation], and [Luminance] to specify the range to adjust. You can set the effect range by entering a value directly in each field or dragging the triangle slider, or grating/slant parts. 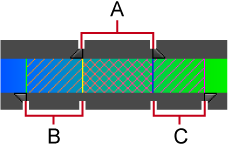 A: Range to apply 100% adjustment B: Range where you increase the adjustment volume gradually C: Range where you decrease the adjustment volume gradually |
|
(3)
|
[Key display]
|
View which range is applied with the effects by setting [Limit]. The area with the effects applied 100% is displayed in white; 0% in black. |
|
(4)
|
[Histogram display]
|
Display a calculated histogram for each of hue, saturation, and luminance. |
|
(5)
|
[ColorPicker]
|
Select a color from the displayed image on the Player or the Recorder. |
|
(6)
|
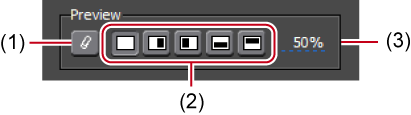
Preview setting
|
|
|
(7)
|
Key frame setting
|
|
|
(8)
|
[Default]
|
Click [Default] in each balance frame to reset only the parameters related to that balance to their default values. Click [Default] at the bottom of the window to delete all keys and restore the default settings for all the parameters. |
The [3-Way Color Correction] dialog box appears.
[3-Way Color Correction] Dialog Box
When you click [Black], an adjustment is made so that the color obtained in the color picker should be black. Similarly, an adjustment is made so that it should be gray or white when you select [Gray] or [White], respectively.
If you click [Auto], the color is determined based on the brightness of the obtained color. For example, the color is adjusted for white when a bright color is obtained.
The color is automatically corrected. You can also adjust the color by using the color wheel point, or the sliders of saturation and contrast.
When correcting a color-casted white table
Click [White] in Color Picker, and click a point on the table in the image.
You can define the range to apply the correction, when adjusting the color tone of skin.
The [3-Way Color Correction] dialog box appears.
[3-Way Color Correction] Dialog Box
Click additional points with [Shift] on the keyboard held down to include the color of the points to the currently specified range.
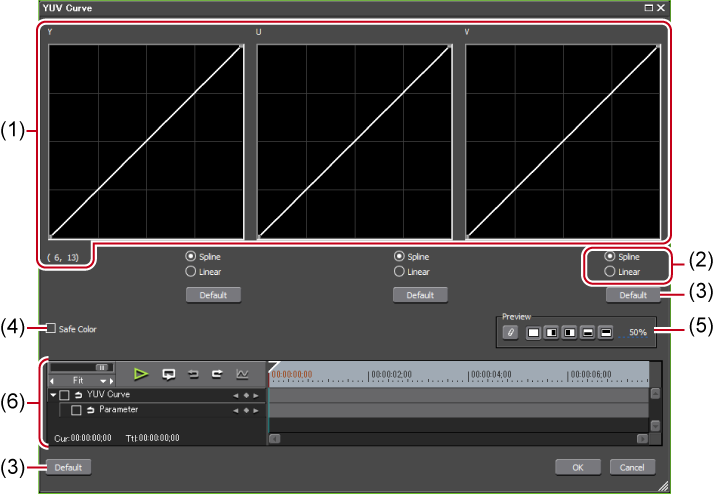
The [YUV Curve] dialog box appears.
|
(1)
|
YUV curve
|
Drag the line on each chart to adjust Y, U, and V. The value on the bottom left of the Y curve indicates the input value and output value. |
|
(2)
|
[Spline]/[Linear]
|
Select the line of the chart (curve or straight). |
|
(3)
|
[Default]
|
Click [Default] of each chart to restore the defaults for each Y, U, and V value and add them as the keys. Click [Default] at the bottom of the window to delete all the keys and reset the chart to its initial values. |
|
(4)
|
[Safe Color]
|
Check this item to make an automatic adjustment to keep the video signal within the YUV color space. |
|
(5)
|
Preview setting
|
|
|
(6)
|
Key frame setting
|
Adjust the YUV curve chart for each key frame. The field option for the key will be [Hold], and no change along the time axis is allowed. For how to set a key frame, see Key frame setting. |

Although Safe Color clips a range of luminance 16-235 and chroma 16-240, and the chroma is not automatically included in the safe area, it is calculated to include luminance/chroma within IRE0-100.
You can lay and compare the image applied color correction and the original image.
|
(1)
|
[Use current screen to show filter effect]
|
Fix the screen with the timeline cursor position when comparing filter effects. |
|
(2)
|
Check the filter effects
|
Set the segmentation of the screen when checking the result of the filter. |
|
(3)
|
Filter apply screen ratio
|
Set the screen ratio to display the video with the filter applied when comparing the result of the filter. |
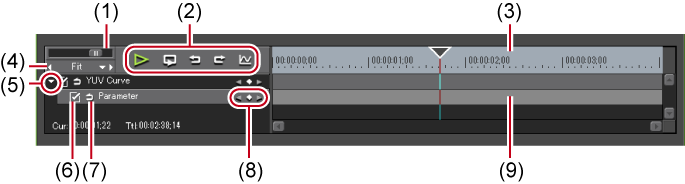
You can change the parameters of color correction along the time axis, and play it to check the result.
|
(1)
|
Timeline controller
|
Drag the slider to the left and right to adjust the time scale display unit. Move the slider to the left to reduce the display unit, or to the right to increase it. The right end is [Fit]. |
|
(2)
|
Playback/Tool buttons
|
[Ctrl] + [Z]
[Ctrl] + [Y]
The numerical values and gradations of the Y axis can be changed by entering numerical values. 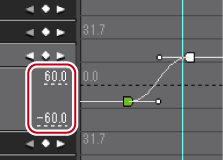 |
|
(3)
|
Time scale for key frame
|
Display a scale with the unit selected in the time scale setting on the timeline. Right-click the time scale and click [Timeline Timecode] to display the timecode of the timeline or click [Zero base Timecode] to display the timecode with the beginning of the clip as 0. If a sequence marker is set for the position where the clip is placed, right-click the time scale and click [Go to Previous Sequence Marker] or [Go To Next Sequence marker] to move the timeline cursor to the previous or next sequence marker. |
|
(4)
|
Time scale settings
|
Click here to toggle the specified display unit and [Fit]. Click the left arrow to reduce the display unit, or click the right arrow to increase the display unit. |
|
(5)
|
Expand button
|
Click this button to configure detailed settings for each item. You can edit the parameters by moving the cursor to a value input or control and dragging it when the mouse cursor shape changes. |
|
(6)
|
Enable/Disable
|
Unchecking the item disables the parameter settings. To configure a key frame, check the effect name. |
|
(7)
|
[Add default key]
|
Click this item to set the default key frames of each parameter item at the timeline cursor position. |
|
(8)
|
Key frame setting
|
Click Click the left and right arrow to move to the previous and next key frame. |
|
(9)
|
Key frame timeline
|
Automatically add a key frame when you edit an effect at the timeline cursor. If you expand each parameter item, you can edit the parameter by dragging key upward or downward. |
Right-click the timeline for key or key frame to display a menu to add/delete keys or switch the method of interpolation between key frames. You can select the interpolation method from [Hold], [Line], and [Bezier].
When the item name of a parameter is right-clicked and [Clear parameter of (item)] is clicked, all key frames for that item are deleted.
When [Shift] + [V] on the keyboard are pressed, a key frame is added to all parameters with a valid key frame setting at the timeline cursor position.
When [V] on the keyboard is pressed, a key frame is added to the currently selected parameter at the timeline cursor position.
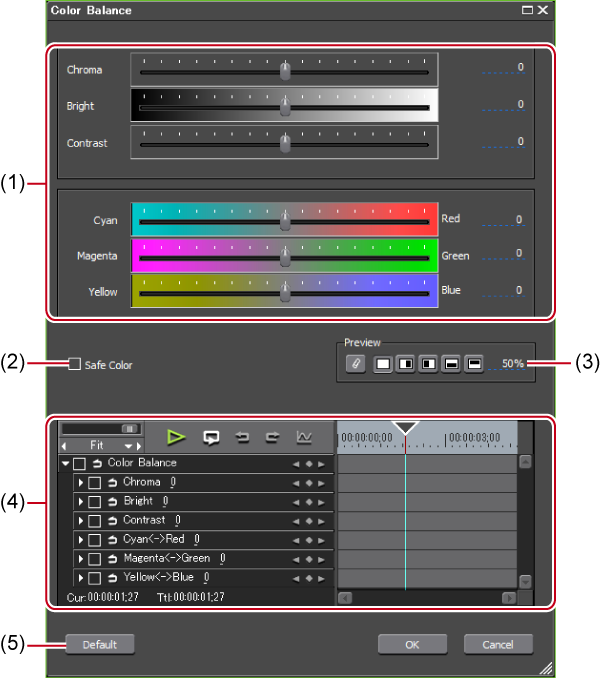
The [Color Balance] dialog box appears.
|
(1)
|
Sliders
|
Move the slider to adjust each item. |
|
(2)
|
[Safe Color]
|
Check this item to make an automatic adjustment to keep the video signal within the YUV color space. |
|
(3)
|
Preview setting
|
|
|
(4)
|
Key frame setting
|
|
|
(5)
|
[Default]
|
Click this button to restore the default settings for all the sliders. |
Although Safe Color clips a range of luminance 16-235 and chroma 16-240, and the chroma is not automatically included in the safe area, it is calculated to include luminance/chroma within IRE0-100.
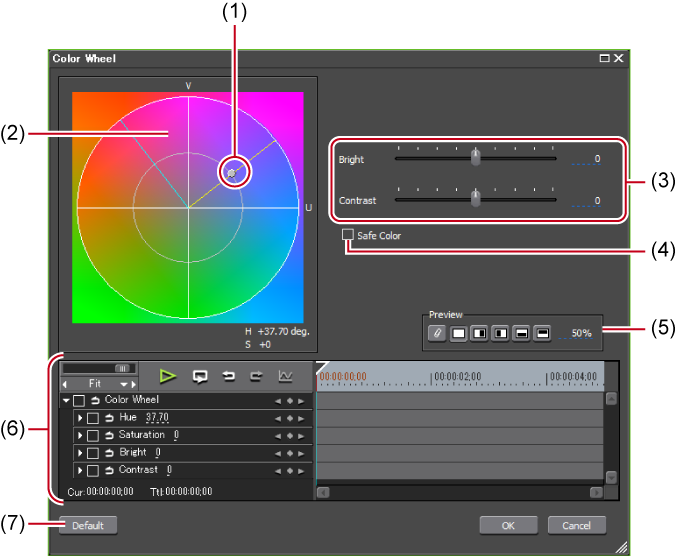
The [Color Wheel] dialog box appears.
|
(1)
|
Color wheel point
|
Slide this point to adjust the color density (chroma). Chroma increases as the point moves to the outline of the circle. |
|
(2)
|
Wheel
|
Drag and rotate it to adjust the color tone. |
|
(3)
|
[Bright]/[Contrast]
|
Adjust the luminance and contrast by moving the sliders. |
|
(4)
|
[Safe Color]
|
Check this item to make an automatic adjustment to keep the video signal within the YUV color space. |
|
(5)
|
Preview setting
|
|
|
(6)
|
Key frame setting
|
|
|
(7)
|
[Default]
|
Click this button to delete all the keys and restore the default settings for the wheel and color wheel point. |
Although Safe Color clips a range of luminance 16-235 and chroma 16-240, and the chroma is not automatically included in the safe area, it is calculated to include luminance/chroma within IRE0-100.
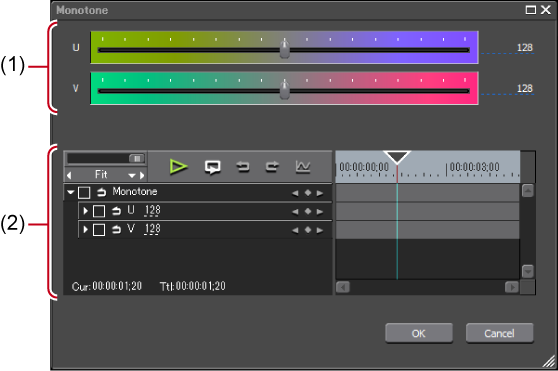
The [Monotone] dialog box appears.
|
(1)
|
Sliders
|
Adjust the color tone by moving the slider. |
|
(2)
|
Key frame setting
|
You can add such effects as reducing flicker or make the image stereoscopic like a lithograph to the whole video.
Check the filter details in the description in the property, or by trying to apply the filter.
AlternativeSelect a clip on the timeline. Select an effect in the [Effect] palette, and click [Add to Timeline].
Select a clip on the timeline. Right-click an effect in the [Effect] palette, and click [Add to Timeline].
Select an effect in the [Effect] palette, and right-drag it to the clip on the timeline, and click [Add] or [Replace].
You can make such adjustment to audio part as reducing noise or emphasizing human voice.
Check the filter details in the description in the property, or by trying to apply the filter.
AlternativeSelect a clip on the timeline. Select an effect in the [Effect] palette, and click [Add to Timeline].
Select a clip on the timeline. Right-click an effect in the [Effect] palette, and click [Add to Timeline].
Select an effect in the [Effect] palette, and right-drag it to the clip on the timeline, and click [Add] or [Replace].

 : Play back the timeline on the Recorder.
 : Repeatedly play back the clip currently being edited.
 : Undo an operation.
 : Redo the undone operation.
 : Switch the changes of each parameter to the chart view. In the chart view, the timeline is represented by a chart display of the selected key. The parameters can be edited by moving the keys up and down.
 in the center to set a key frame on the position of the timeline cursor. If the timeline cursor is on the key frame, the key will be deleted.