EDIUS 7 Online Help
User GuideReference Manual
Hardware Setup Guide
Installation Manual
Use the normalization function to adjust the entire audio volume and use the V-mute function to reduce momentary noise.
Normalization function is useful to perform entire volume adjustment. Set a reference level of audio and adjust the volume of the entire video at one time. When normalization is applied to multiple clips, the volume level is adjusted to be appropriate for each clip.
The [Normalize] dialog box appears.
The initial level setting will be the [Audio reference level] in the project setting.
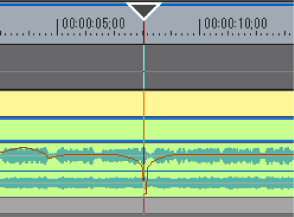
When normalization is applied, an orange line will be displayed in the area below the audio part of the clip.
Fade in or fade out before and after a specified point to make noise less conspicuous.
The track expands and the rubber band and the waveform are displayed.
You can detect noise, etc. by reviewing the waveform range and the sound actually being played back.
Confirm the shape of the waveform display, and adjust the position of the timeline cursor.
The audio volume of the time cursor position will be 0.
 Alternative
V-mute settings: [Shift] + [V]
