EDIUS 7 Online Help
User GuideReference Manual
Hardware Setup Guide
Installation Manual
Export files in various formats.
The following procedure explains how to export a Windows Media Video format file. For how to export in other formats, see the Reference Manual.
Exporting in the Windows Media Video format

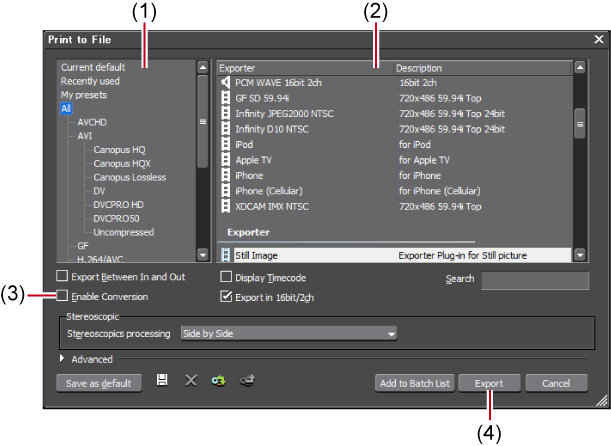
The [Print to File] dialog box appears.
|
(1)
|
Category tree
|
Select a category to narrow down the exporter options. |
|
(2)
|
Exporter/preset list
|
Display the exporters within a selected category in a list. |
|
(3)
|
[Enable Conversion]
|
Check this item to enable conversion processing used to export in formats that differ from the project settings. |
|
(4)
|
[Export]
|
Display the dialog box to set the export details such as file name. |

If exporters are not displayed on the exporter/preset list, the project settings do not match the format of the export destination.
Checking [Enable Conversion] in the [Print to File] dialog box may convert the current settings into the format of the export destination and consequently the export may succeed. See the Reference Manual for more details.
Exporters in [Windows Media] are displayed in the exporter/preset list.
The [WindowsMediaVideo] dialog box appears.
After step 4, the procedure differs according to the selected exporter. Perform operations following the on-screen instructions.
You can export a project to a P2 card or SxS memory card. Files can also be exported to the PC hard disk. The following procedure explains how to export to a P2 card as an example.
 Note
NoteMake sure that the P2 device driver is already installed.
Audio will be exported in 16-bit format audio, even if the project preset is set to 24-bit format audio.
Make sure that the P2 device is powered on and a P2 card is inserted into the slot. For more information on connection methods, see the manuals of your PC or P2 device.
The [Print to File] dialog box appears.
Select either one of [P2 Clip], [HD P2 Clip], or [HD P2 3D Clip] as the exporter. Exporters that do not support the project settings will not be displayed. If a P2 card is not connected to the PC, the [Browse For Folder] dialog box will appear. Specify a file export destination and click [OK].
The setting items differ depending on the exporter.
If there is no more free space on the export destination, or if clips consist of files exceeding 4 GB, they will be split and exported. If [Automatically select the next card when card is full.] is checked, when the clip is split, a P2 card drive with free space will be selected automatically to be exported to. If it is unchecked, when the clip is split, a dialog box will appear to select the export destination.
Export starts.
