You can export a project as a disc image file to be written to DVD/BD.
Regardless of the details of the project settings, you can start up Disc Burner and write the project to DVD or BD. Even projects in progressive formats (such as 60p) can be written to DVD/BD by changing the export format on Disc Burner.
|
|
|---|
|
You can write a project to a DVD/BD. You can create title and chapter menus, as well as set the background of the menu screen and buttons displayed on the screen.

To export only one part of an edited video, make sure to specify the export range using a [Set In] and [Set Out] on the Recorder.
To add a chapter, make sure that an orange sequence marker is set to the desired position in advance.
|
|
|---|
|
1) Click [Export] on the Recorder.

2) Click [Burn to disc].
Disc Burner starts up.
 Alternative
Click [File] on the menu bar, and click [Export] → [Burn to disc].
Exporting to DVD/BD: [Shift] + [F11]
Clicking [Return] ends the settings, and returns to EDIUS. If you return to EDIUS and save the project, the settings of Exporting to Disc will also be saved.
3) Click the [Basic] tab, and set the disc type or codec.
4) Click the [Movie] tab, and set the movie to be exported to disc.
5) Click the [Style] tab, and set the style for the menu screen.
6) Click the [Edit] tab to edit the menu.
7) Click the [Write] tab to set the export settings.
8) Click [Create Disc].
Start writing to disc.
When you perform format conversion at export, in the confirmation dialog box that appears, click [Yes].
|
[Disc] |
Select the type of disc to be exported to from the list. [Format] Select the format to export. To export in the same format as the original project settings, select the format with the indication [(No conversion)]. The formats that can be selected are as follows. The displayed formats differ depending on the project settings.
|
|
[Codec] |
When exporting to BD, select the codec. |
|
[Menu] |
Select [Use Menu] to create a disc with a menu screen. |
|
|
|---|
|
|
[Disc Information] |
Displays the number and file size of the titles to be added and the available disc space. |
|
[Media] |
Select the type of disc to be exported to from the list. |
|
[Movie] |
Displays the added titles. [Settings] Displays the settings dialog box used to change the bitrate. [Delete] Remove titles from the list. Does not delete the original file. [Up]/[Down] Change the order of titles. |
|
[Add File] |
Click this button to display the [Add Title] dialog box. Select a file, and click [Open]. |
|
[Add Sequence] |
Click this button to display the [Select Sequence] dialog box. Check the sequence to be added and click [OK]. |
|
[Automatic] |
Uncheck this item to set the format and bitrate for video and audio. |
|
[Prohibit Operations During Playback] |
Disable operations such as moving chapters or fast-forwarding by the user during title playback. |
|
[Display Timecode] |
Add a timecode to the video if the title is a sequence. The type of timecode can be set at [Application] in [User Settings] → [Timeline]. |
|
[Stereoscopic] |
Stereoscopic processing is possible on sequences titled EDIUS only when exporting in MPEG-2 format in the stereoscopic edit mode. Select the format of stereoscopic processing from the list. |
|
[Auto Layout] |
Set the placement of the buttons. Uncheck [Auto] to select the number of buttons to place from the [Row] and [Horizontal] lists. |
|
[Aspect Ratio] |
Select the size of the menu screen. If [BD] is selected for [Disc], you cannot select [4:3]. |
|
[Frame Rate] |
If [BD] is selected for [Disc], you can change the frame rate of the menu. Normally, there is no need to change the frame rate. |
|
[No Chapter Buttons] |
Check this item to use thumbnails as chapter buttons. |
|
[No Chapter Menu (Only One Chapter)] |
If there is only one chapter, only the title menu will be created. |
|
[No Title Menu (Only One Title)] |
If there is only one title, only the chapter menu will be created with no title menu. Not displayed when there are multiple titles. |
|
[Cursor style] |
Select the shape of the selection cursor displayed on the menu screen. |
|
Style list |
Select a design for the menu screen from the list. The styles are classified in each tab according to type. |
You can download and add a style.
Click [Help] on the menu bar, and click [Download DVD Menu Style] to download the setup file in the msi format. Double-click the setup file to add a style to the style list in the [Style] tab of Disc Burner.
If you have update from the version EDIUS 8 or earlier, a message prompting download of the setup file may appear to add a style. Follow the on-screen instructions to add a style.

|
(1) |
Edit screen |
Displays a preview of the menu screen. Items can be edited directly, such as by clicking a title to enter text or moving or resizing pictures. If you double-click or right-click an item or picture then click [Setting], the [Menu Item Settings] dialog box appears. |
|
(2) |
Page selection |
Select the page of the menu to be edited from the list. Click the buttons to display the previous or next page. |
|
(3) |
Edit buttons |
|
|
(4) |
[Motion Menu] |
Check this item to set a video as the menu background. Set the video to be used at the [Picture] tab in the [Menu Item Settings] dialog box. [Menu Item Settings] Dialog Box [Length] Enter the length of the motion menu. The maximum length is 1 minute. [Fade In]/[Fade Out] Check this item to add In/Out effects to the motion menu. |
|
(5) |
Item list |
Displays the items shown in the edit screen as a list. If you click an item in the list, a red frame appears around the selected item in the edit screen. If you double-click or right-click an item or picture then click [Setting], the [Menu Item Settings] dialog box appears. |
|
(6) |
[Setting] |
Select an item and click this button to display the [Menu Item Settings] dialog box. |
|
(7) |
Item position/size |
Change the position and size of an item by entering values.
|
Multiple items can be selected by clicking items with the [Shift] key on the keyboard held down. If you right-click with multiple items selected, you can choose align top, align left, etc. by selecting [Placement].
You can add an item or picture by right-clicking on the item list. You can delete an item or picture by right-clicking an added item or picture and clicking [Remove Item].
|
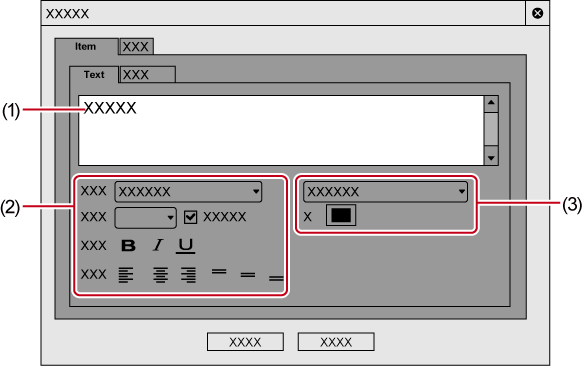
(1) |
Text field |
Enter the text to be displayed. |
|
(2) |
Text settings |
Set the font, text size, decoration, and text position within the item display frame. |
|
(3) |
Color settings |
Select from [Solid Color], [Gradation Color] or [Texture File]. Clicking [Color] displays the [Color Select] dialog box. To select a texture file, click [...] and select a file. |
|
Preview |
Display a preview with the current settings. |
|
[Change] |
Click this item to change the image to be used for the thumbnail. Move the timeline cursor in EDIUS and click [Set]. |
|
[Set Image File] |
Import an image file or sequence to use for thumbnails. Check this item and click [select image file] to select a file, or click [Select Sequence] to select a sequence. |
|
[Zoom] |
Change the zoom factor for an image by moving the position bar or by entering a value. |
|
[Add Effects] |
Check this item to apply effects such as a frame or shadow to thumbnails. If you selected [Picture Frame], click [...] and select a file to use as a frame. |
|
[Settings] |
Set the number of discs to write to and the volume label. |
|
Drive information |
Set which drive to use and the write speed. |
|
[Enable Detailed Settings] |
Check this item to add setting items. [Folder Settings] Specify the folder in which to save files (such as MPEG and disc image files) that are created for the purpose of making a disc. [Compile disc image to folder] Check this item to create only the disc image file, without writing it to disc media. [Create Disc and Also Export as Image File] Check this item to prevent deletion of the disc image file after the disc image file has been written to disc media. Check this item to save the disc image file on the HDD. [Verify Disc After Creating] Check this item to verify that data can be read correctly after having been written to media. [Number of Drives] Simultaneously write to a specified number of multiple drives. The settings tab for each drive is displayed in the drive information. |
To create multiple discs with the same content, after 1 disc is created change the disc and continue the disc creation.
The disc image file that remains when [Create Disc and Also Export as Image File] is checked is overwritten upon export of another movie. If you need that disc image file, either change the folder settings or move the file from the save destination.
|
[First play command] |
Select the action performed when a created disc is inserted into a disc player. |
|
[Command after playing movie] |
Select the action performed after a playback of one title. |
|
[Command after playing the last movie title] |
Select the action performed after a playback of all titles. |


 : Undo an operation to return to the previous state.
 : Redo the undone operation.
 : Display lines as guidance.
 : Display a preview as viewed on TV.
 : Save the layout of the current page (background image, position of page labels, position of title buttons, position of page buttons).
 : Reflect a saved page layout to the current page.
 : Display lines as guidance using a selected item as reference.
 : Fix the aspect ratio of a selected item.