You can place specified clips in order while playing back the timeline in the same way as linear editing.
1) Click [Mode] on the menu bar, and click [Title Insertion Mode].
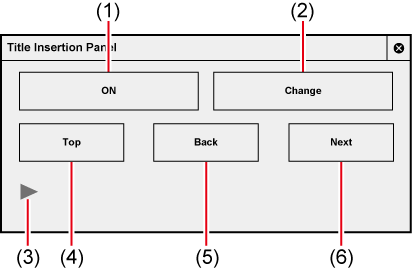
The [Title Insertion Panel] dialog box appears.
2) Set the channel mapping for the tracks on which clips are placed.
3) Move the timeline cursor to the position to place the clip.
4) Select a clip in the bin.
Select the clip to be placed at the beginning.
5) Click [ON] in the [Title Insertion Panel] dialog box and specify the In point where the clip is to be placed.
The In point of the timeline where the clip is placed is fixed. [ON] changes to blue.
The focus moves to the next clip to the one to be placed first in the bin.
6) Click [Play] in the [Title Insertion Panel] dialog box.
As the timeline playback proceeds, clip placement on the timeline starts.
Alternatively, click [Play] on the Recorder to play back the timeline.
7) Click [ON] at the Out point and place the clip.
The Out point of the clip is fixed, and the clip is placed.
Click [Change] to make the Out point of the placed clip connected to the In point of the next clip.
8) Repeat step 7) as necessary.
9) Click [Play] in the [Title Insertion Panel] dialog box.
Timeline playback stops.
Alternatively, click [Stop] on the Recorder to stop playback of the timeline.

If you add [Title Insertion Mode] to the bin window as an operation button, you can switch the mode simply by clicking the button.
|
(1) |
[ON] |
Specify the In and Out points of the clip to be placed. |
|
(2) |
[Change] |
Click this while placing a clip to switch to the next clip placement. |
|
(3) |
[Play] |
Play back the timeline. Clicking this during playback stops playback. |
|
(4) |
[Top] |
Move the focus to the clip at the beginning in the bin. |
|
(5) |
[Back] |
Move the focus to the previous clip of the selected clip in the bin. |
|
(6) |
[Next] |
Move the focus to the next clip to the selected clip in the bin. |
