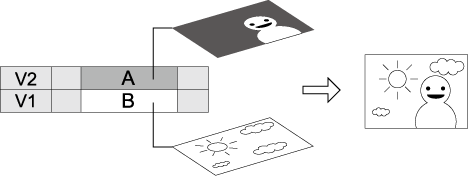
You can composite multiple video by overlaying.

When you composite videos, the videos are displayed in the order of the alignment on the track. Overlay the track with the video to apply the composition (A) on the track with the video to be the background (B).
You can composite 2 video.
1) In the folder view of the [Effect] palette, click the [Keyers] tree.
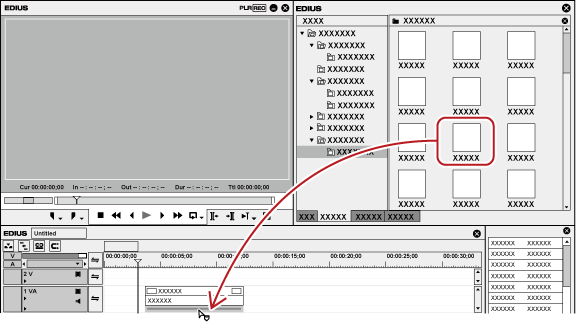
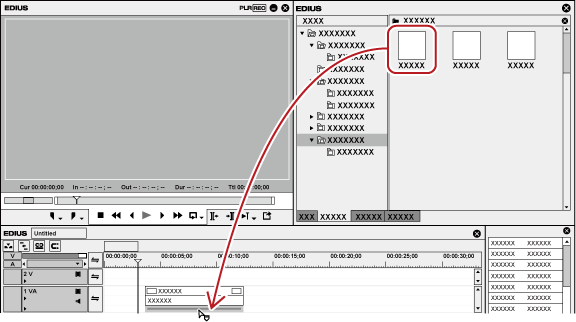
2) Click the [Blend] tree, and drag and drop the composition to be applied on the mixer area of the clip.
Check the composition details in the description in the property, or by trying to apply the composition.
Clips with key effects applied are displayed with an orange line.
 Alternative
Select a mixer of the clip on the timeline. Select an effect in the [Effect] palette, and click [Add to Timeline].
Select a mixer of the clip on the timeline. Right-click an effect in the [Effect] palette, and click [Add to Timeline].
Select an effect in the [Effect] palette and right-drag it to the mixer of the clip on the timeline, and click [Add] or [Replace]
You can overlay a video onto another, and display the lower video through the upper video. The keys include [Chromakey] to transmit specific color and [Luminancekey] to transmit specific brightness.
1) In the folder view of the [Effect] palette, click the [Keyers] tree.
2) Drag and drop [Chromakey] ([Luminancekey]) onto the mixer area of the clip.
Clips with key effects applied are displayed with an orange line.
Alternative
Select a mixer of the clip on the timeline. Select an effect in the [Effect] palette, and click [Add to Timeline].
Select a mixer of the clip on the timeline. Right-click an effect in the [Effect] palette, and click [Add to Timeline].
Select an effect in the [Effect] palette and right-drag it to the mixer of the clip on the timeline, and click [Add] or [Replace]
1) Click the mixer area of the clip with the key applied and display the [Information] palette.
2) Click [Chromakey] ([Luminancekey]) and click [Open Setup Dialog].
The [Chromakey] ([Luminancekey]) dialog box appears.
Alternative
Double-click [Chromakey] ([Luminancekey]) in the [Information] palette.
Drag and drop [Chromakey] ([Luminancekey]) in the [Information] palette onto [Open Setup Dialog].
Right-click [Chromakey] ([Luminancekey]) in the [Information] palette and click [Open Setup Dialog].
3) Configure the settings and click [OK].
|
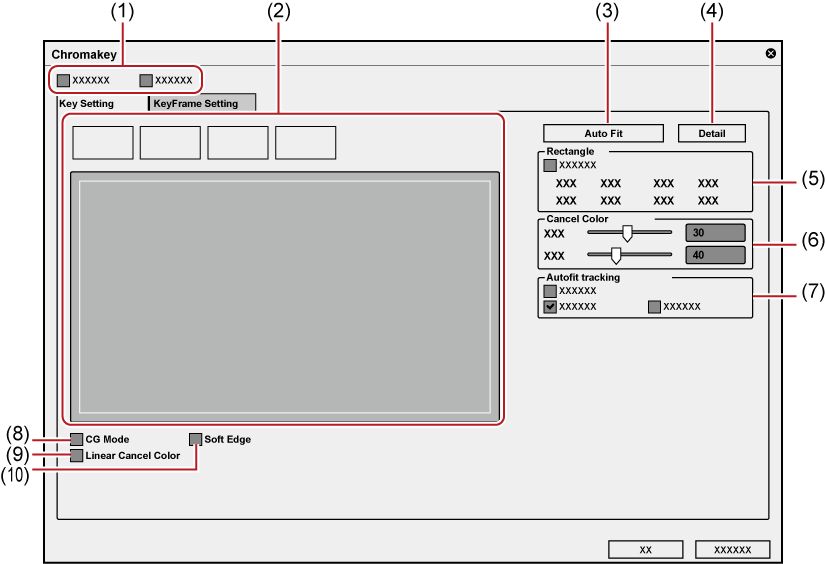
(1) |
Display switching |
Check [Key display] to display a part available to cut out in black. Check [Histogram display] to display the histogram. |
|
(2) |
Color selection |
Select a color to transmit from the window. You can select a color (key color) to transmit by 4 methods. |
|
(3) |
[Auto Fit] |
Click this button to automatically define keyer settings appropriate for the selected key color. |
|
(4) |
[Detail] |
Define the detailed keyer settings. |
|
(5) |
[Rectangle] |
Apply chromakey to a particular range. |
|
(6) |
[Cancel Color] |
Add the key color and its opposite color onto the border part where the key color and other colors are bounded so that a natural composite image can be created. |
|
(7) |
[Autofit tracking] |
Check [Enable] to adjust the key color variation automatically. |
|
(8) |
[CG Mode] |
Check this item to set the parameter for CG. |
|
(9) |
[Linear Cancel Color] |
Check this item to resolve the bleeding of the blue screen or green screen or the discoloration by reflections. |
|
(10) |
[Soft Edge] |
Check this item to blur the border of the background image and overlaid image. |
|
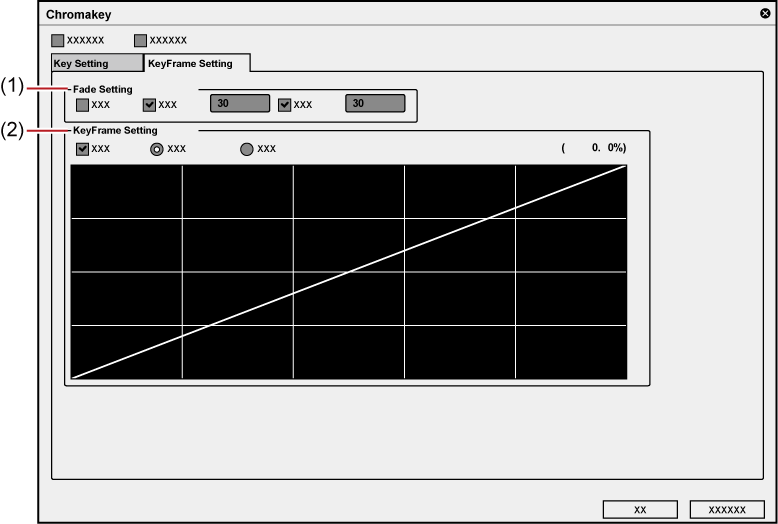
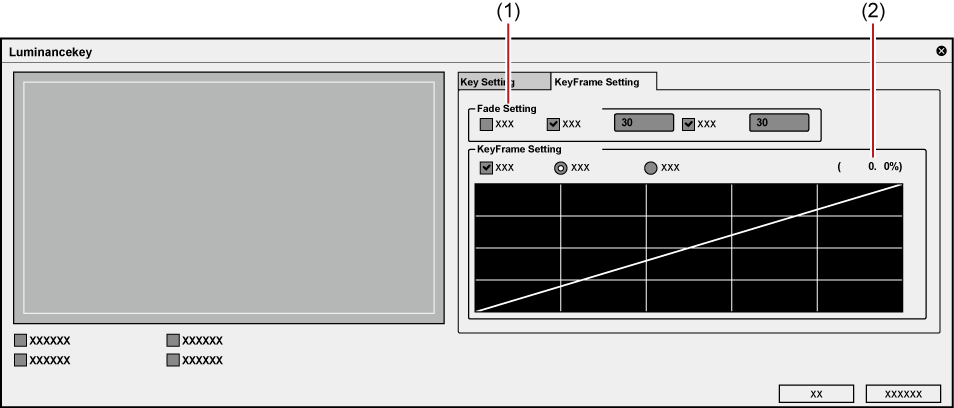
(1) |
[Fade Setting] |
Check [Enable] to add fade effects to In and Out of the area applied with chromakey. Duration can be set to each of In and Out. |
|
(2) |
[KeyFrame Setting] |
Check [Enable] to increase or decrease the effect of chromakey. Click the line to add key frame, and drag the point to set. Field option can be set from either linear or curve. |
|
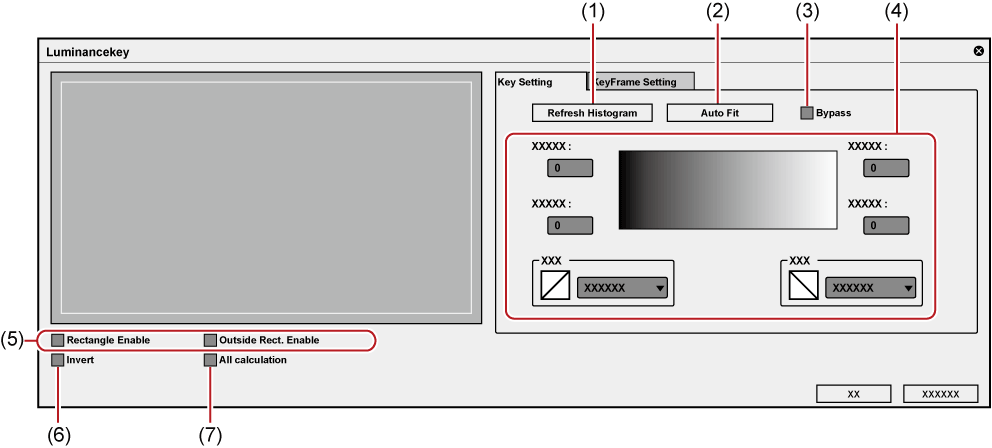
(1) |
[Refresh Histogram] |
Click this button to refresh the histogram. |
|
(2) |
[Auto Fit] |
Click this button to automatically define keyer settings appropriate for the selected key color. |
|
(3) |
[Bypass] |
Switch the image applied with the luminancekey and the original image. |
|
(4) |
Setting range to apply |
Set the range to apply by entering a value directly in each field or dragging the triangle slider, or grating/slant parts. 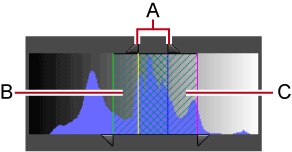 A: Range to apply 100% B: Range to increase the effect of luminancekey gradually C: Range to decrease the effect of luminancekey gradually Select the form to show increase or decrease of the effect in range B and C (slope). |
|
(5) |
[Rectangle Enable] |
Set the range to set the luminancekey. The area outside the range becomes all transparent and the track image below is displayed through. Select [Outside Rect. Enable] to apply the luminancekey only within the range. |
|
(6) |
[Invert] |
Invert the range with the luminancekey applied. |
|
(7) |
[All calculation] |
Check this item to calculate all the area including the range specified with the [Rectangle Enable] settings. |
|
(1) |
[Fade Setting] |
Check [Enable] to add fade effects to In and Out of the area applied with luminancekey. Duration can be set to each of In and Out. |
|
(2) |
[KeyFrame Setting] |
Check [Enable] to increase or decrease the effect of luminancekey. Click the line to add key frame, and drag the point to set. Set either linear or curve. |
You can overlay a video onto another, and transmit the upper video to display lower video, by changing the transparency of one of the videos.
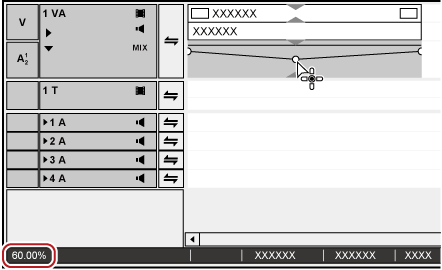
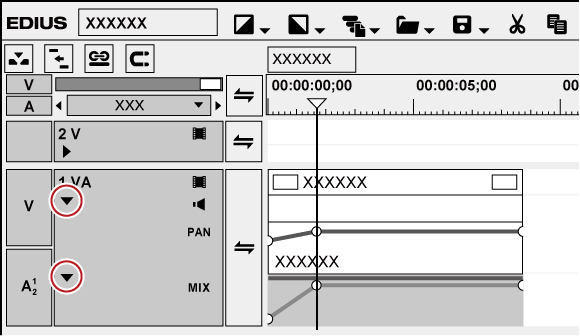
1) Click the expand button of the mixer of the track panel where the clip whose transparency is to be changed is placed.

2) Click [Mixer].

3) Click the rubber band to set the key frame.

4) Drag up and down to adjust the transparency.
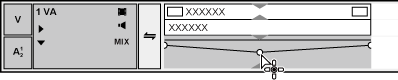
The transparency is displayed on lower left on the timeline. The video becomes completely transparent when the transparency is 0%.
Clips with transparency applied are displayed with an orange line.
To finely adjust the rubber band, drag it with [Ctrl] on the keyboard held down.
To change the whole rubber band, drag the line while pressing [Shift] key of the keyboard.
The operation procedure to adjust or delete the key frame with value entry is the same as in the audio rubber band.
You can set [Fade In] to make the video appear gradually, or [Fade Out] to make the video disappear gradually.
1) Select a clip to set fade in/fade out.
You can select multiple clips on separate tracks.
2) Move the timeline cursor to the end position of the fade in effect (or the start position of the fade out effect).
3) Click [Fade In] or [Fade Out] on the timeline.

The mixer area with [Fade In] or [Fade Out] applied is displayed with an orange line.
You can view the settings of the audio and video parts by clicking the audio expand button or mixer expand button on the track panel. A key frame is added to the position to which [Fade In] or [Fade Out] is set.
To delete the [Fade In] or [Fade Out] effect, delete both the audio part and the video parts.
To delete the video part, select and right-click a clip, and click [Delete Parts] → [Mixer] → [Transparency].
To delete the audio part, select and right-click a clip, then click [Delete Parts] → [Audio Rubber Band] → [Volume].
|
|
|---|
|
You can set fade in or fade out effects to the video or audio parts individually.
1) Select a clip to set fade in/fade out.
You can select multiple clips on separate tracks.
2) Move the timeline cursor to the end position of the fade in effect (or the start position of the fade out effect).
3) Click the [Fade In] or [Fade Out] list button on the timeline.

4) Click [Video clip only] or [Audio clip only].
Alternative
Release the link mode and specify fade in/fade out.
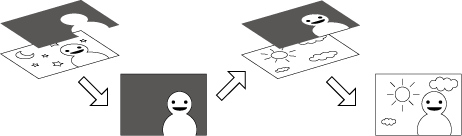
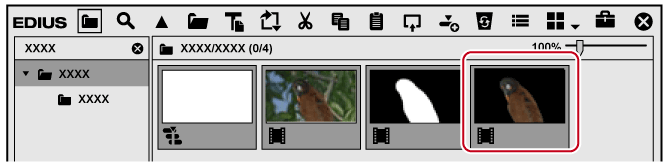
You can add a clip with transparency information as an alpha channel (data area with transparency information) of another clip. The effect makes the image to look like being masked, and you can overlay the image onto the image to be the background.
|
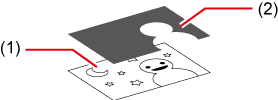
(1) |
This is the image to be added with the alpha channel. It is called “Fill”. |
|
|
(2) |
This is the image to be added to the “Fill” as the alpha channel. It is called “Key”. |
|
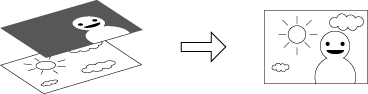
You can apply the clip to be the “Key” like a mask as the alpha channel of “Fill”. Overlay the created clip to an image to be the background to composite the clip.
|
|
|---|
|
1) Register clips to be “Fill” or “Key” to the bin.
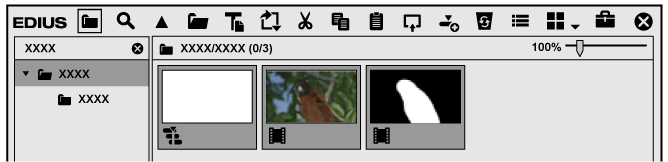
2) Select 2 clips in the bin.
3) Right-click the 2 clips, and click [Convert] → [Alpha matte].
The [Save As] dialog box appears.
4) Set the file type, convert format, or “Fill” and “Key” assignation.
|
[Save as type] |
Specify a codec. The available file format differs depending on the specification (HD/SD) and other factors. |
|
[Fill Key(F)] |
Specify which image to be “Fill” (or “Key”) from the 2 images. |
|
[Convert format] |
Specify which element of the clip selected as “Key” to be applied as the alpha channel. [Alpha matte] Select this item when the clip selected as “Key” includes an alpha channel, and the alpha channel is applied as the alpha channel for “Fill”. [Alpha matte (invert)] Select this item when the clip selected as “Key” includes an alpha channel, and the alpha channel is inverted and applied to the alpha channel for “Fill”. [Luminance matte] Select this item when applying the luminance lever (0% to 100%) of the clip selected as “Key” is applied to the alpha channel for “Fill”. Luminance level 100% is transparency 100%. [Luminance matte (invert)] Select this item when applying the luminance lever (0% to 100%) of the clip selected as “Key” is applied to the alpha channel for “Fill”. Luminance level 0% is transparency 100%. |
|
[Repeat last frame] |
Check this item to complement by repeating the last frame in “Key” clip (or the alpha channel), when the duration of the “Fill” clip is shorter than that of “Key” clip. |
5) Click [Save].
Click [Cancel] to cancel the saving procedure.
The created clip is automatically registered in the bin window when saving is completed.
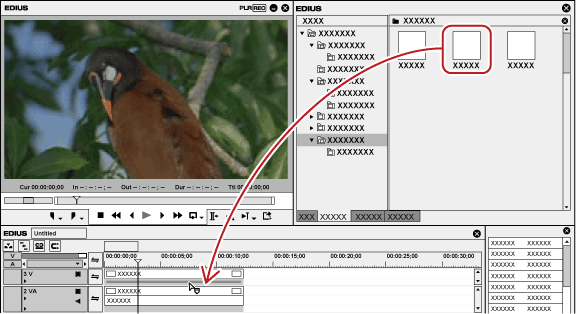
6) Composite the clips by laying them on the timeline.

Generate alpha (transparency information) from the clip placed on the timeline as a matte clip, and multiply it by alpha of the clip placed as a source clip. In addition, you can place it overlaying the background image.
1) Place a clip to use as a matte clip on a track.
2) Place a clip to use as a source clip on a track on the matte clip.
3) In the folder view of the [Effect] palette, click the [Keyers] tree.
4) Drag and drop [Track Matte] to the mixer area of the clip.
Clips with key effects applied are displayed with an orange line.
Alternative
Select a mixer of the clip on the timeline. Select an effect in the [Effect] palette, and click [Add to Timeline].
Select a mixer of the clip on the timeline. Right-click an effect in the [Effect] palette, and click [Add to Timeline].
Select an effect in the [Effect] palette and right-drag it to the mixer of the clip on the timeline, and click [Add] or [Replace]
5) Display the [Information] palette.
6) Click [Track Matte], and click [Open Setup Dialog] in the [Information] palette.
The [Track Matte] dialog box appears.
Alternative
Double-click [Track Matte] in the [Information] palette.
Drag [Track Matte] in the [Information] palette and drop it on [Open Setup Dialog].
Right-click [Track Matte] in the [Information] palette, and click [Open Setup Dialog].
7) Configure the settings and click [OK].
8) Place a background clip on the track beneath the matte clip and compose.

|
|
|---|
|
|
[Matte] |
[Luminance] Use the matte clip luminance (16 - 235) as alpha (0 - 100%) and multiply it by the source clip alpha. [Alpha] Multiply the matte clip alpha by the source clip alpha. |
|
[Invert] |
Invert alpha generated from the matte clip and multiply. |

