Configuring GV I/O Time Delay channels

  • Install the GVIO-SW-OPT-TD license before configuring the recorder and player channels.
  • Stop AppCenter if it is running. It is not advised to configure channels while AppCenter is running as any changes to the configuration requires a restart of the AppCenter.

The Time Delay option requires a minimum of two channels on a GV I/O, one for the record and one for the time delayed playout.

This provides the ability to set up a loop record on one channel and have a time delay for playout set on one or more of the other available channels.

  1. Click on the Channels tab, and select the specific GV I/O channel that you want to configure.

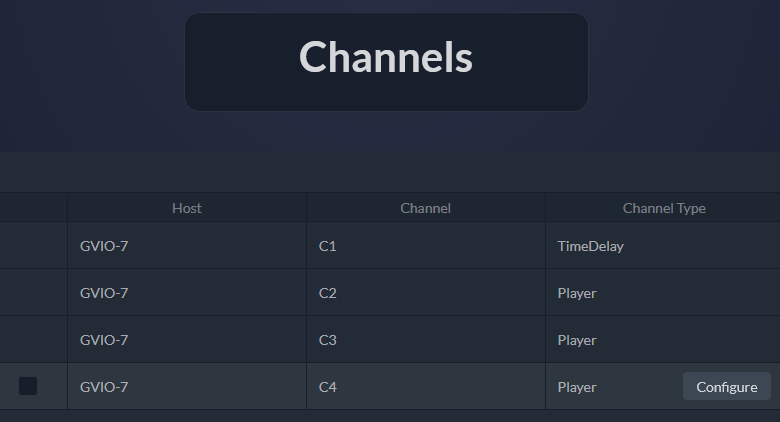
  2. Click the Configure button.

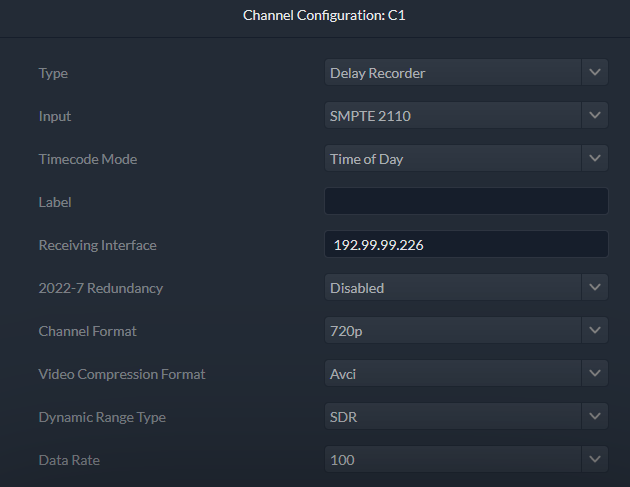
    The Channel Configuration page displays.

  3. Click on the drop-down list and select the appropriate option for each setting:
    Setting or button Description
    Type Select the Type as Delay Recorder to configure the GV I/O delay recorder channel.
    Timecode Mode The timecode mode for the channel can be set at Fixed Start, Time of Day or AncVITC.
    Input Input signal type that has been connected to the channel at the GV I/O Live Ingest and Playout Server. Available input signals are in the list below:
    • Unassigned - The channel input is set to this initial setting by default. No other settings are configurable when this option is selected.
      Note: Changing a channel's I/O configuration to Unassigned will set channel configuration information to a default state and release any SabreTooth licenses associated with the channel.
    • SDI - Configures the channel to use SDI input. Requires the GVIO-HW-CORVID88 hardware configuration and GVIO-SVR-SDI license per channel.
    • SMPTE 2110 - Configures the channel to use 10/25GigE SFP input and allows for SDP file import. Requires the GVIO-HW-CX6 hardware configuration and GVIO-SVR-IP license per channel.
    • NDI - Configures the channel to use NDI input. Requires the GVIO-SW-NDI-CH license per channel, with maximum of 4 channels per GV I/O server.
    Label The label that you want to assign to the GV I/O channel.
    Receiving Interface For a channel configured for SMPTE 2110 input signal type, enter the IP address that goes with the SFP connector used to receive the media stream.
    2022-7 Redundancy Select to enable or disable redundancy of ingests. This is only applicable when SMPTE 2110 is selected for the channel input.
    2022-7 Receiving Interface When the 2022-7 redundancy option is enabled, a 2022-7 Receiving Interface (IP address) is also required, and it represents the IP address of a second GV I/O input as the backup.
    Channel Format Select a format for the channel from the drop-down list. The setting determines the video format expected at the GV I/O channel’s input.
    Video Compression Format Select a format for the channel from the drop-down list. This setting also determines the video codec used to compress the video while recording.
    Dynamic Range Type Select a dynamic range type for the channel from the drop-down list. The default is set to SDR, as this is the only available option if you selected SDI, SMPTE 2110, or NDI for the channel's input.
    Data Rate Select a data rate for the channel.
  4. If SMPTE 2110 is selected as the channel's input, NMOS settings display as follows:

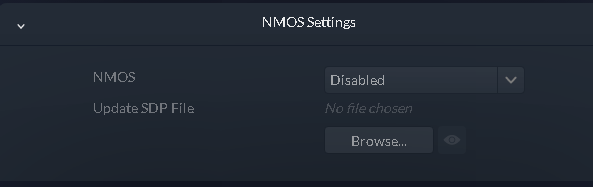
    Setting Description
    NMOS Select to enable or disable the NMOS option for the channel.
    Update SDP File If NMOS is disabled, click Browse and select the location to import the SDP file from. This is only applicable to SMPTE 2110 option as it requires an import of data from a .sdp file for the GV I/O channel configuration.
  5. Configure Audio Settings as follows:

    Setting Description
    Digital Ref Level Select the digital reference level for the audio of the channel.
    Audio Format Select the audio format to be either 16bit or 24 bit.
    Tracks to Record Select the number of tracks to record, up to 64 tracks.
  6. Configure Delayed Playout Settings as follows:

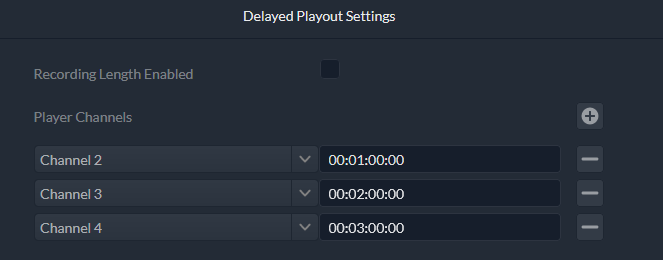
    Setting Description
    Recording Length Enabled Select the check-box to enable or disable a recording length for the delayed playout.

    If enabled, set a duration for the Recording Length.

    Player Channels Set the time delayed playout channels as follows:
    • Click and select a channel from the drop-down list to add a playout channel
    • Set the time duration for the delay of each playout channel
    • Click to delete a playout channel, if no longer needed
  7. Click Apply to save your current settings, or click Back to return to the last saved settings.

Copyright © 2018 - 2022 GVBB Holdings SARL and Grass Valley USA, LLC. All rights reserved. Specifications are subject to change without notice. GV I/O 5.0 gvtp_20220624_17:51:56
Other Topic Library Versions