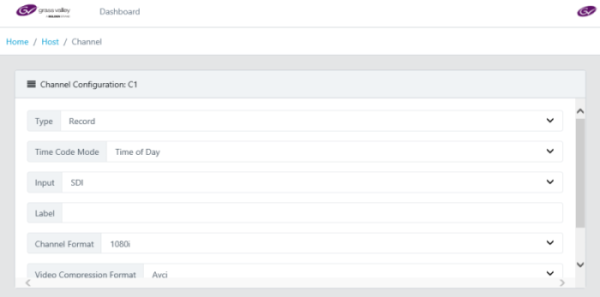
| Channel Type |
The Channel Type selected is Record for the GV I/O Live Ingest and Playout Server. ] |
| Time Code Mode |
The time code mode for the channel can be set at Fixed
Format or Time of Day. |
| Input |
Input signal type that has been connected to the channel at the GV I/O Live Ingest and Playout Server. Available input signals are in the list below:
- Unassigned - The channel input is set to this
initial setting by default. No other settings are configurable when this
option is selected.
Note: Changing a channel's I/O configuration to Unassigned will set
channel configuration information to a default state and release any
SabreTooth licenses associated with the channel.
- SDI - Configures the channel to use SDI input.
Requires the GVIO-HW-CORVID88 hardware configuration and GVIO-SVR-SDI
license per channel.
- SMPTE 2110 - Configures the channel to use
10/25GigE SFP input and allows for SDP file import. Requires the
GVIO-HW-CX5 hardware configuration and GVIO-SVR-IP license per channel.
- SMPTE 2022-6 - Configures the channel to use
10/25GigE SFP input and allows for a single RTP URL entry of the form
rtp://ip_address:port_number as
described below.
- ip_address : The multicast IP address of the
SMPTE 2022-6 media stream to be recorded
- port_number : The UDP port configured for the
media stream
For example, “rtp://239.100.100.1:10000”.
Requires the
GVIO-HW-CX5 hardware configuration and GVIO-SVR-IP license per
channel.
- Web Stream - Configures the channel to use 10GigE
RJ45 input and allows for a single RTP URL entry of the form
rtp://ip_address:port_number as
described below.
- ip_address : The multicast IP address of the
media stream to be recorded
- port_number : The UDP port configured for the
media stream
For example, “rtp://239.100.100.1:10000”.
Requires the
GVIO-HW-CX5 hardware configuration and GVIO-SVR-WEB license per
channel.
|
| Label |
The label of the GV I/O channel. |
| Channel Format |
Select a format for the channel
from the drop-down list. The setting determines the video format expected at
the GV I/O channel’s input. |
| Video Compression Format |
Select a format for the channel from the drop-down list. This setting
also determines the video codec used to compress the video while recording.
|
| Data Rate |
Select a data rate for the channel. |
| Receiving IP |
For a channel configured for SMPTE 2110 or SMPTE 2022-6 input signal
type, enter the IP address that goes with the SFP connector used to receive
the media stream. |
| 2022-7 Redundancy |
Select to enable or disable redundancy of ingests. This is only
applicable when SMPTE 2110 is selected for the Channel Input. |
| 2022-7 Receiving Interface |
When the 2022-7 redundancy option is enabled, a 2022-7 Receiving
Interface (IP address) is also required, and it represents the IP address of a
second GV I/O input as the backup. |