
Creating the GV STRATUS maintenance plan
Maintenance plans automate database tasks necessary to ensure database integrity and recovery in case of data loss.
If you moved the GV STRATUS database to a new/different server machine, you have to create the GV STRATUS maintenance plan on the particular machine separately.
Grass Valley recommends that the database backup location be network storage, preferably one that is backed up or has some kind of RAID protection. If the database is backed up to a network share, the account under which SQL Server (MSSQLSERVER) and SQL Server Agent (MSSQLSERVER) run must have permission to write to the network share. If these services are running a virtual Network Service or NT Service\MSSQLSERVER account, then the network share must have permission for the computer account (e.g., yourDomain\StratusCoreServer$).
To create or manage maintenance plans, you must log in as a member of the sysadmin fixed server role.
- Open and log in to Microsoft SQL Server Management Studio.
- In the tree-view, open the Management | Maintenance Plans nodes.
- Right-click the Maintenance Plans node a select Maintenance Plan Wizard. The Maintenance Plan Wizard opens.
-
On the Maintenance Plan Wizard, click
Next.
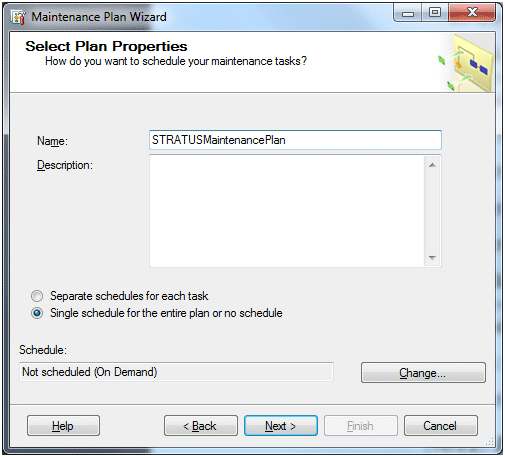
The Select Plan Properties page opens.
-
On the Select Plan Properties page do the following:
- In the Name field, type StratusMaintenancePlan.
- Select Single schedule for the entire plan or no schedule
-
Click
Change.
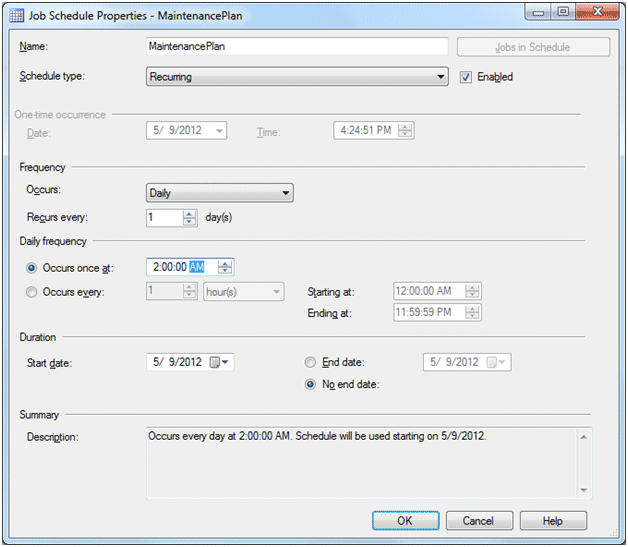
The Job Schedule Properties dialog box opens.
-
In the
Frequency section do the following:
- In the Occurs drop-down list select Daily.
- Set Recurs every: to 1 day.
-
In the
Daily frequency section do the following:
- Select Occurs once at:
- Accept the default time of 12:00:00 AM or change it to a time more suitable to your site.
-
In the
Duration section, verify the following:
- Start Date is today's date.
- No end date is selected.
-
Click
OK and
Next.
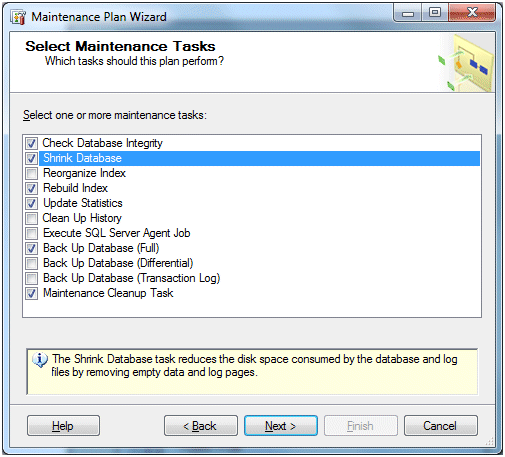
The Select Maintenance Tasks page opens.
-
Select the following:
- Check Database integrity
- Shrink Database
- Rebuild Index
- Update Statistics
- Back Up Database (Full)
- Maintenance Cleanup Task
- Click Next. The Select Maintenance Task Order page opens.
-
On the Select Maintenance Task Order page, leave settings at the
default configuration. Click
Next.
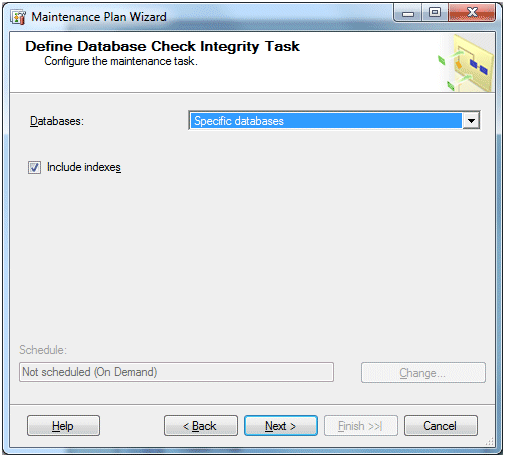
The Define Database Check Integrity Task page opens.
-
On the Define Database Check Integrity Task page, do the
following:
-
Click the
Databases drop-down list.
A dialog box opens.
-
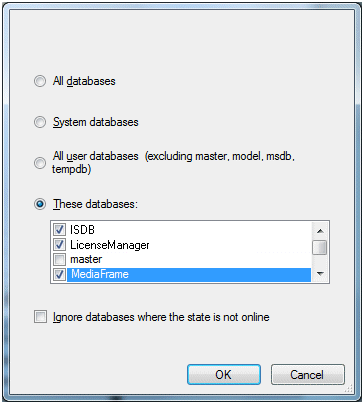
Select
These databases and select the following
from the list:
- ISDB
- MediaFlow
- MediaFrame
- RulesEngine
- WfPersistence
- Click OK to save settings and close the dialog box.
- On the Define Database Check Integrity Task page, select Include indexes.
- Click Next.
-
Click the
Databases drop-down list.
A dialog box opens.
-
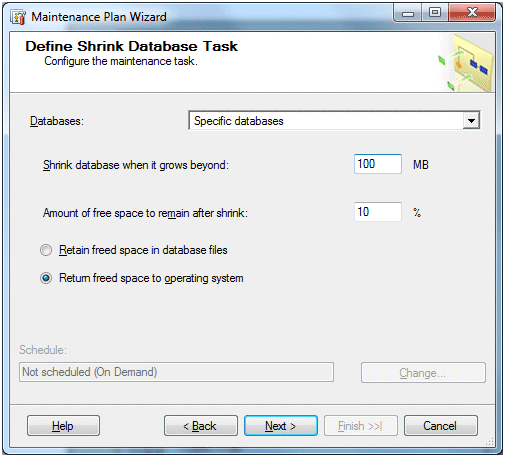
On the Define Shrink Database Task page, do the following:
-
Click the Databases drop-down list, and select the
following:
- ISDB
- MediaFlow
- MediaFrame
- RulesEngine
- WfPersistence
- Click OK.
- Set Shrink database when it grows beyond: to 100 MB. Leave other settings at the default configuration.
- Click Next.
-
Click the Databases drop-down list, and select the
following:
-
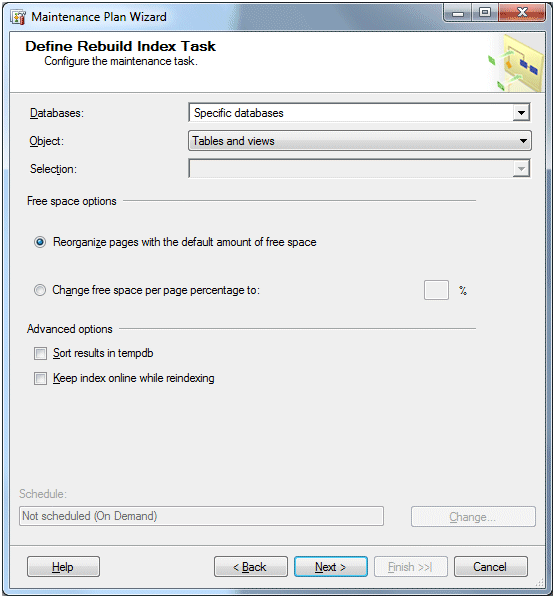
On the Define Rebuild Index Task page, do the following:
-
Click the Databases drop-down
list, and select the following:
- ISDB
- MediaFlow
- MediaFrame
- RulesEngine
- WfPersistence
- Click OK. Leave other settings at the default configuration.
- Click Next.
-
Click the Databases drop-down
list, and select the following:
-
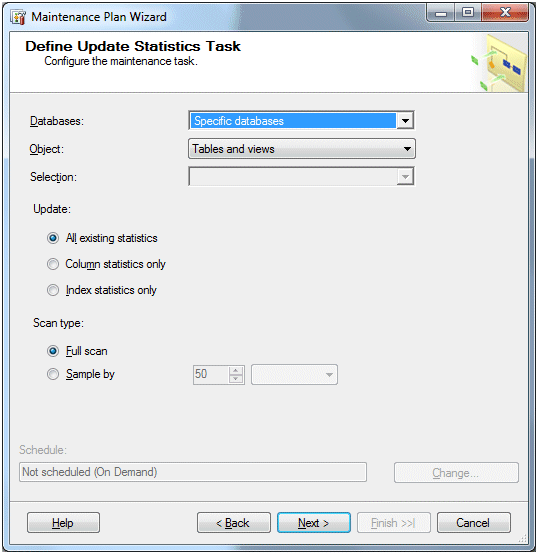
On the Define Update Statistics Task page, do the following:
-
Click the Databases drop-down
list, and select the following:
- ISDB
- MediaFlow
- MediaFrame
- RulesEngine
- WfPersistence
- Click OK. Leave other settings at the default configuration.
- Click Next.
-
Click the Databases drop-down
list, and select the following:
-
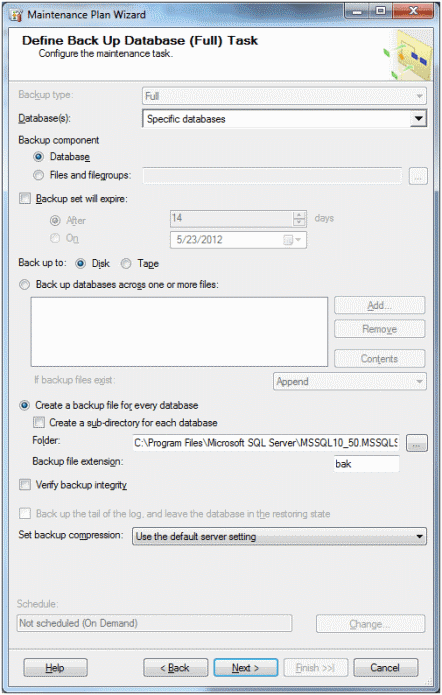
On the Define Back Up Database (Full) Task page, do the following:
-
Click the Databases drop-down
list, and select the following:
- ISDB
- MediaFlow
- MediaFrame
- RulesEngine
- WfPersistence
- Click OK.
- Select Create a backup file for every database.
- In the Folder field, enter the path to your site's database backup location. Copy the folder path so you can paste it on the next page.
- In the Backup file extension field, enter bak as the file extension. Leave other settings at the default configuration.
- Click Next.
-
Click the Databases drop-down
list, and select the following:
-
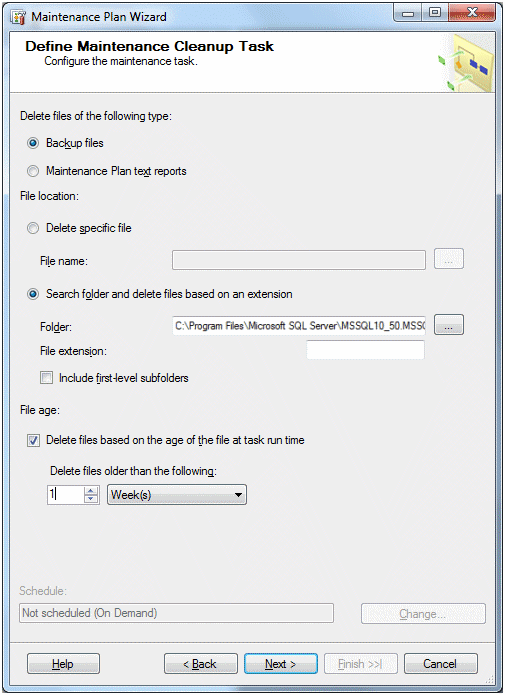
On the Define Maintenance Cleanup Task page, do the following:
- In the File location section, select Search folder and delete files based on an extension.
- In the Folder field, paste the path of your site's database backup location that you copied earlier.
-
In the File extension field, leave it blank.
Warning: Do not enter .bak as it prevents files from getting automatically deleted and quickly fills up the core’s C: drive without warning.
- In the File age section, select Delete files based on the age of the file at task run time.
- Set Delete files older than the following: to 1 week. Leave other settings at the default configuration.
- Click Next.
- On the Select Report Options page, leave settings at the default configuration. Click Next. The Complete the Wizard page opens.
- On the Complete the Wizard page, click Finish. The Maintenance Plan Wizard Progress page opens and reports progress.
- When the page reports success for all actions, click Close.