
Transferring using Send Destination
- If quota is configured on the K2 system bin, ensure you have enough disk space before transferring assets.
If the send destination is configured for conform, a complex asset can be flattened as part of the send operation to become a simple clip. You can configure the format of flattened asset in the Format setting of GV STRATUS Control Panel. You can also set the start timecode of the resultant simple clip according to EDIUS Start Timecode setting in GV STRATUS Control Panel. For same-format conforms (e.g.: 720p to 720p); if the Restripe Timecode checkbox is not selected during Send Destination configuration, the original timecode of the clip is preserved. For mixed-format conforms (e.g.: combination of 720p and 1080i); the resultant clip always consists of restriped timecode according to EDIUS Start Timecode setting in GV STRATUS Control Panel.
- In the Navigator panel, select the source bin location. The assets in the bin are displayed in an Asset List.
-
Right-click on the asset that you want to
transfer and select
Send (
 F11).
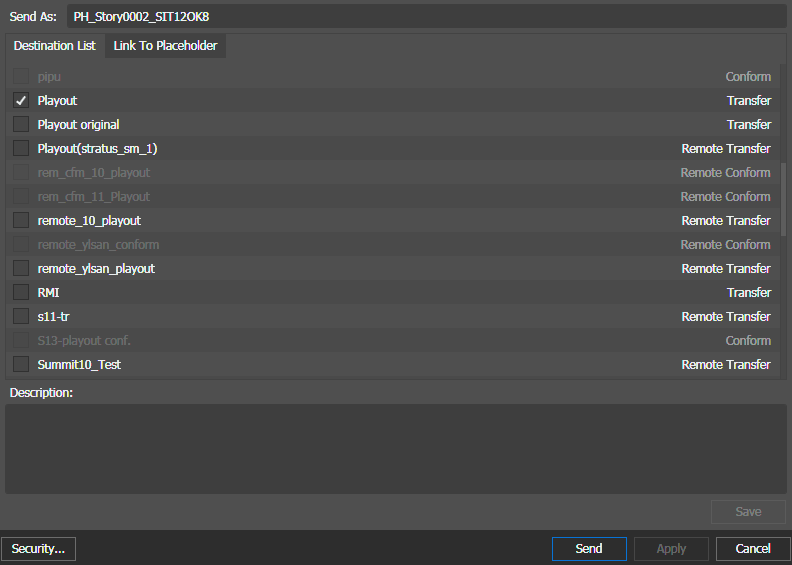
The Send Destinations
dialog box opens and displays a list of destinations.
F11).
The Send Destinations
dialog box opens and displays a list of destinations.
- If desired, in the Send As field, enter a different name for the asset at the destination location.
-
In the Destination List, select
one from the following:
- Select one or more transfer destinations
- Select one or more conform destinations
You are not allowed to select both transfer and conform destinations at the same time.
Note: If a local transfer destination is labeled as 'Remote Transfer', you need to re-save the send destination configuration on GV STRATUS Control Panel to get the correct label. -
If configured for a Newsroom Computer System,
you can also link the asset to a local or remote placeholder.
- If GV STRATUS security is enforced, your credentials must give you adequate permissions on bins, assets, and metadata.
- In order to link to a placeholder, you must be assigned with the Rename Asset Rights role and write permission for the Name property in Metadata section of GV STRATUS Control Panel.
-
On the Link
To Placeholder tab, select a placeholder.
If a remote placeholder, expand the remote site node.
If already linked to a placeholder, you can select a different placeholder.
- If desired, in the Placeholder Description field, enter text and click Save. The placeholder description is updated. It is not necessary to click Send to update the placeholder description.
-
If you have adequate permissions, click Security and configure
security options as desired, then click OK.
The Security dialog box is available only if you have the role of Security Manager or you are the Owner.
-
Click Send.
The Send order is translated into a rules workflow job. All subsequent jobs (conform(s), transfer(s), asset creation, metadata and marker copy) are managed by the rules workflow job.
To view the status of the transfer, open the Jobs Monitor.

The Rules Workflow job progress provides the overall status of the send order. Subsequent jobs like Conform or Transfer have their individual progress state.
In case assets would exist at the destination with the same name, the rules workflow job handles that gracefully. In case one of the subsequent jobs would fail, the rules workflow job rolls back all other subsequent jobs in a transactional fashion.