
Binding disk modules - Redundant K2 SAN
- If you have not already done so, launch Storage Utility from the K2Config application.
- As prompted, wait while Storage Utility gathers system information, then Storage Utility opens.
-
In the Storage Utility main window, identify bound
RANKs and unbound disks by their placement in the hierarchy of the tree view.
In the following illustration, disk numbers are represented by “XX”.
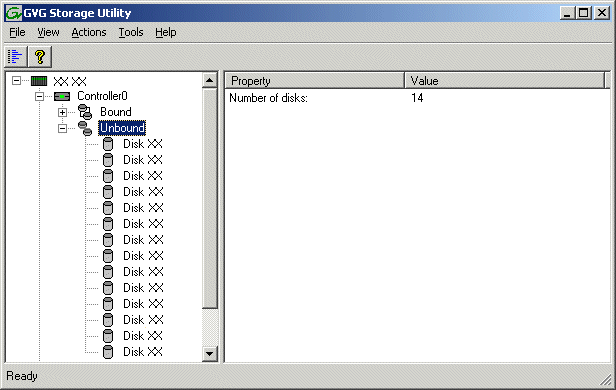
There is one RAID 1 pair with two disks. View disk properties and identify the two disks you will use for the metadata/journal RAID 1 RANK. Make sure you select disks appropriately as you bind disks in the remainder of this procedure. -
For systems that use RAID 1 RANKs, you must now
create the separate RAID 1 storage for file system metadata files and journal
files. To bind unbound disks for metadata and journal storage, do the
following:
-
Right-click the
Unbound node for the controller, then
select Bind in the context menu. (If the RAID chassis has two controllers, both
controllers are represented by the single “Controller” node)
The Bind dialog box opens showing all unbound disks for the
controller listed in the Available Disk list.
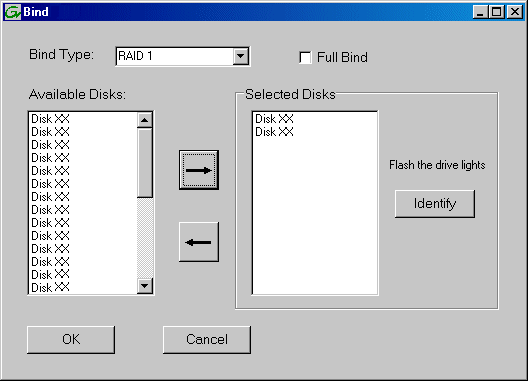
- Leave Full Bind unchecked.
- In the Bind Type drop down box, select RAID 1.
- In the Available Disks box, select two contiguous disks at the top of the list. These should be the first two disks in the primary RAID chassis. (TIP: Use ‘shift-click’ or ‘control-click’ to select disks.) This creates a RAID 1 RANK for file system metadata and journal storage.
-
Click the add (arrow) button to add disks to the Selected
Disks list.
Note: As an aid in identifying a disk module’s physical location, select it in the Selected Disks list, then click Identify Disks. This causes the disk drive light to flash.
- Click OK to close the Bind dialog box and begin the binding process. The Progress Report dialog box opens, showing the status of the binding process.
- Close the Progress Report .
- Make the third disk in the primary RAID chassis a Hot Spare. In the Bind Type drop down box, select Hot Spare.
-
Right-click the
Unbound node for the controller, then
select Bind in the context menu. (If the RAID chassis has two controllers, both
controllers are represented by the single “Controller” node)
The Bind dialog box opens showing all unbound disks for the
controller listed in the Available Disk list.
-
Right-click the
Unbound node for a controller, then select
Bind in the context menu.
If the RAID chassis has two controllers, both controllers are
represented by the single “Controller” node.
The Bind dialog box opens showing all unbound disks for the
controller listed in the Available Disk list.

- Leave Full Bind unchecked.
- In the Bind Type drop down box, select RAID 5 or RAID 6, as specified by your system design.
- In the Available Disks box, select six contiguous disks at the top of the list. Use ‘shift-click’ or ‘control-click’ to select disks.
-
Click the add (arrow) button to add disks to the
Selected Disks list.
Note: As an aid in identifying a disk module’s physical location, select it in the Selected Disks list, then click Identify Disks. This causes the disk drive light to flash.
-
Click
OK
to close the Bind dialog box and begin the binding
process.
The Progress Report dialog box opens, showing the status of the
binding process.

- Close the Progress Report and repeat these steps for other unbound disks. If specified by your system design, you can bind some disks as Hot Spares. When you are done, if you did not bind any extra Hot Spares, you should have the following results: For redundant storage, on the primary RAID chassis you should have one RAID 1 RANK disk, one Hot Spare Disk, and one or more RAID 5 or RAID 6 RANKs, with each RANK having six disks, as necessary to fill the primary RAID chassis. For each optional Expansion chassis, RANKs are similar.
- Click Close in Progress Report window.
-
Restart the K2 Media Server.
Note: Make sure start up processes on the K2 Media Server are complete before proceeding.