EDIUS 7 Online Help
Reference ManualHardware Setup Guide
Installation Manual
User Guide
The following explains how to determine the directory to capture sources to in advance and import sources all together.

The [Batch Capture] dialog box appears.
 Alternative
Click [Capture] on the menu bar, and click [Batch Capture].
Displaying the [Batch Capture] dialog box: [F10]
To set a reel name, uncheck [UserBit is used as a Reel No.] and enter a reel name. You can also select previously entered reel names from the list.
 Note
NoteWhen the source has been captured in MPEG TS format, the information of the preset reel name will not be recorded to the captured source file but to the project file. The information of the reel name set at capture will not be reflected even if that source file is opened in another project file after EDIUS is restarted.
When the In point is placed ahead of the Out point on the timeline, the text in that row is displayed in red. This area will not be captured.

The In point and duration can also be specified as the capture range. Specify the In point, then click the timecode at [Dur] on the Player, enter the duration, and press [Enter] on the keyboard.
 Alternative
Click [Add to Batch Capture List] on the Player.
Click the [Add to Batch Capture List] list button on the Player, and click [Video and Audio].
Only the video part or audio part is captured when the [Add to Batch Capture List] list button on the Player is clicked and [Video Only] or [Audio Only] is clicked.
Adding to batch capture list: [Ctrl] + [B]
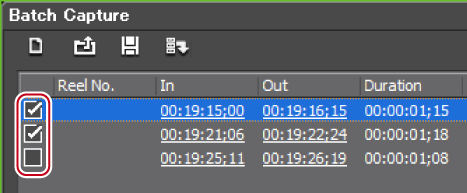
The check buttons are turned on immediately after the sources are added to the list.

If a reel name is not set in step 4, capturing starts and the progress is displayed in [Status] of the [Batch Capture] dialog box. The captured clip is registered to the bin.
If you set a reel name in step 4, proceed to step 10.
 Note
NoteWhen HDV is batch-captured in “MPEG TS” format, the result of [Status] sometimes ends not as 100% but as “101%” or “102%”. This is normal operation due to the specifications for capturing MPEG by the GOP.
The time required for capturing is indicated next to the reel name.
Capture of the source corresponding to the selected reel name starts, and the progress is displayed in [Status] of the [Batch Capture] dialog box. The captured clip is registered to the bin.
If you set multiple reel names, repeat steps 10 to 11.

|
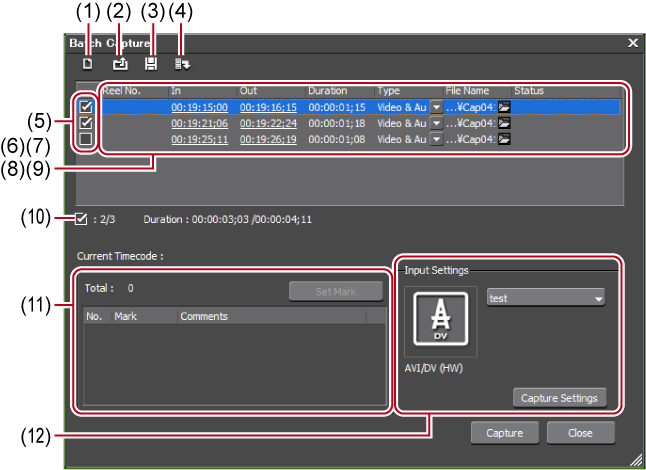
(1)
|
[Create new capture list]
|
Create a new batch capture list. |
|
(2)
|
[Load capture list]
|
Import the saved batch capture list (ECL, CSV, RNL, ALE or FCL file). |
|
(3)
|
[Save capture list]
|
Save the content of the batch capture list as a CSV file. |
|
(4)
|
[Add to Batch Capture List]
|
Add to the batch capture list. |
|
(5)
|
Source to be captured
|
Check the sources to capture from the list. |
|
(6)
|
[Reel No.]
|
Click this button to edit a reel name. If there is not even one batch capture list set with a reel name, the [Reel No.] items are not displayed in the dialog box. |
|
(7)
|
[In]/[Out]/[Duration]
|
Display the In and Out points and duration of the source. The timecode that is given priority at capture is underlined. To change the timecode that is given priority, select the source and right-click, and click [Change to In/Out capture] or [Change to In/Duration capture]. The numerical value can also be changed by clicking the timecode at [In]/[Out]/[Duration]. |
|
(8)
|
[Type]
|
Click and select the content to capture (both video and audio parts/video part only/audio part only). |
|
(9)
|
[File Name]
|
Click this item to specify the file name and save destination of the source to capture. Click the folder icon to specify the save destination of the source to capture. You can also select multiple sources to specify the save destination. |
|
(10)
|
Number of sources and duration
|
Display the number of checked sources/total number of sources in list and each duration. During a capture, the duration available for capture, current disk space usage, and the number of file divisions are displayed. |
|
(11)
|
Clip marker
|
During capture, add a marker with a comment to the source clip. A list of clip marker timecodes and comments is displayed. Multiple clip markers can be assigned. When the source has been captured in MPEG TS format, the information of the preset clip marker will not be recorded to the captured source file but to the project file. The information of the clip marker set at capture will not be reflected even if that source file is opened in another project file after EDIUS is restarted. |
|
(12)
|
[Input Settings]
|
Click the list to select the device preset used for capture. [Capture Settings]
Display the [System Settings] dialog box. You can check and change [Capture]. |

To delete the source to capture from the batch capture list, select and right-click the source, and click [Delete].
To select all sources in the batch capture list, select and right-click the source, and click [Select All].
You can save batch-captured sources as a list.

The [Batch Capture] dialog box appears.
 Alternative
Click [Capture] on the menu bar, and click [Batch Capture].
Displaying the [Batch Capture] dialog box: [F10]

When “Mode1” is selected for the save format, hours/minutes/seconds/frames will be entered in a column. When “Mode2” is selected, hours/minutes/seconds/frames will be entered in each respective column.
Import saved batch capture lists.
Batch capture lists can be imported in the following formats:
Batch capture list (*.ecl): Binary format file of batch capture list
CSV file (*.csv): Text format file containing data delimited by commas
RNL file (*.rnl): Files created by Grass Valley StormNavi, RexNavi, RaptorNavi, or EzNavi
ALE file (*.ale): Files equivalent to Avid Log Exchange batch capture list
FCL file (*.fcl): Files equivalent to Final Cut Pro batch capture list
 Note
NoteWhen a batch capture list other than a CSV file created with EDIUS has been imported, capture becomes In/Out capture, and video and audio parts are captured.
If you import the FCL file to EDIUS, the condition below must be met:
Files in which “Name”, “Rules”, “Start of media”, and “End of media” columns are described
Files with the “*.fcl” extension
Files exported by Final Cut Pro 6 or later
To import ALE files to EDIUS, “Name”, “Start”, “End”, or “Duration” columns must be described in the ALE file.

The [Batch Capture] dialog box appears.
 Alternative
Click [Capture] on the menu bar, and click [Batch Capture].
Displaying the [Batch Capture] dialog box: [F10]