EDIUS 7 Online Help
User GuideReference Manual
Hardware Setup Guide
Installation Manual
This section describes frequently used effects. For descriptions of other effects, see the Reference Manual or Grass Valley website.
Adjust the brightness and color of video in tone, color cast, highlight detail loss, shadow detail loss, etc.
EDIUS has video filters for color correction; 3-Way Color Correction, YUV curve, color balance, color wheel, and monotone. The filters can be adjusted by moving the slider or point.
The following procedure explains the operation of [3-Way Color Correction] as an example.
In this section, [3-Way Color Correction] is applied and the color is corrected entirely. For how to correct only desired colors, see the Reference Manual.
Clips with [3-Way Color Correction] applied are displayed with an orange line.
The [3-Way Color Correction] dialog box appears.

When you click [Black], an adjustment is made so that the color obtained in the color picker should be black. Similarly, when you select [Gray] or [White], an adjustment is made so that it should be gray or white respectively. If you click [Auto], the color is determined automatically based on the brightness of the obtained color. For example, the color is adjusted to be white when a bright color is obtained.
The color is automatically corrected. You can also adjust the color using the points of the color wheel, or the sliders of saturation and contrast.
To correct a color-casted white table
Click [White] in the color picker, and click a point on the table in the image.
 Note
NoteColors appear differently depending on the monitor. Therefore, when exact color adjustment is necessary, output the video to the monitor on which the final video is screened.
If the completed video is broadcasted on TV, adjust the colors within the range of the regulations.
If you check [Safe Color] in [Color Balance] or [Color Wheel] of color correction, the upper or lower limit of brightness and color can be adjusted within a certain range.
Use video filter to apply special effects on video, and use audio filter to apply special effects on audio. The following procedures explains [Old Movie/Film] and [Mask] as examples.
Apply effects like old films such as noise, grain, and limb darkening.
Clips with [Old Movie/Film] applied are displayed with an orange line.

Apply video filters on the video part of clips. Apply audio filters on the audio part of clips.
The [Old Movie/Film] dialog box appears.
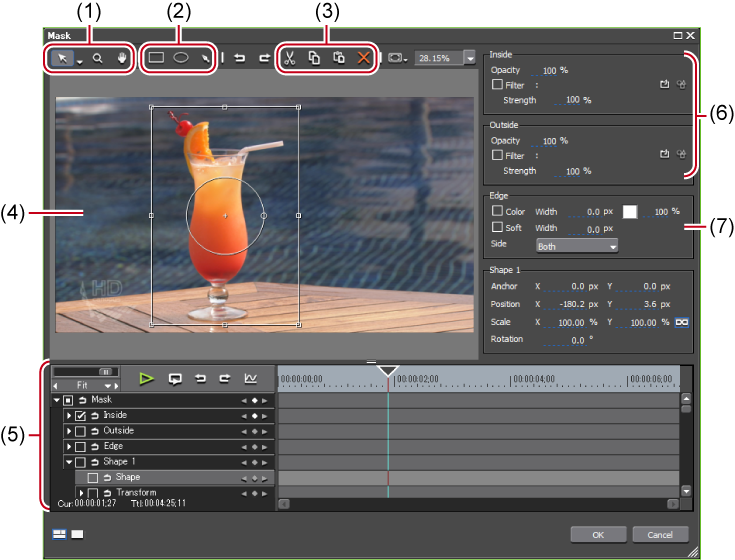
You can apply a video filter to outside and inside of any range. The applied range can be rectangular, circular, or any shape specified with a path. You can also move the mask position with the key frame along the video or make the applied range transparent. See the Reference Manual for more details.
Clips with [Mask] applied are displayed with an orange line.
The [Mask] dialog box appears.
|
(1)
|
Tool buttons
|
Select or move paths, transform paths, enlarge/reduce/move the display range, or perform other operations. |
|
(2)
|
Drawing buttons
|
Set the range using rectangle, ellipse, or Bezier curve. |
|
(3)
|
Edit buttons
|
Cut, copy, paste, and delete a selected path. |
|
(4)
|
Preview
|
Set the selection range for [Mask]. The applied effect can be checked in the preview window. |
|
(5)
|
Key frame timeline
|
Set a key frame to apply motion to the mask position. |
|
(6)
|
[Inside]/[Outside]
|
Set video filters to the outside and inside the path. |
|
(7)
|
[Edge]
|
Set a frame line to the path border or apply blur to the border. |
To the part where a clip shifts to another, apply transition for video and apply audio cross fade for audio. The following procedure explains the operation of [Dissolve] as an example.
[Dissolve] is a transition effect that fades out the image of previous clip and fades in the image of the next clip. By default, applying [Dissolve] automatically adds [Linear out/in] for the audio cross fade. [Linear out/in] is an audio cross fade effect that fades out the audio of previous clip and fades in the audio of the next clip.
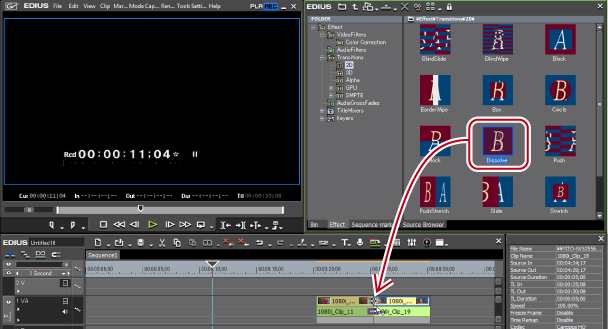
The timeline display changes as shown below. [Linear out/in] for audio cross fade is added at the same time.

To change the duration of the transition, right-click the transition on the timeline, select [Duration], and then set the duration.
The [Dissolve] dialog box appears.
Transition is an effect that overlays images of 2 adjacent clips and gradually shifts to the next scene. For the overlaying operations, you can use either of the extend mode or fix mode.
For details on the extend mode/fix mode, see the Reference Manual.
If there is no clip margin, transition cannot be applied in the extend mode (except for the mixer part).
If clips do not have margins, triangle marks are added at the edges of the clips.

If clips have margins, they are displayed as in the following figure.

High quality and complex transitions that use the GPU (Graphics Processing Unit) can be set. A large number of presets are included in the [GPU] effect folder. If you want to set parameters to create a new transition, they can be set and applied from the [Advanced] folder.
The setting dialog box of each transition contains [Design] settings to adjust the motion, lighting, etc. and [Time] settings to specify a key frame for changing the motion along the time axis. These settings can be used to apply complex motion and effects.
To display GPUfx transition, click the [Transitions] tree in the folder view of the [Effect] palette, and click the [GPU] tree.
 Note
NoteGPUfx cannot be used if video memory on your PC is smaller than 256 MB. The [GPU] folder also will not be displayed on the [Effect] palette.
To use GPUfx transition, an operating environment that satisfies certain conditions is required. For details on operating environment, see the Grass Valley website.
The following procedure explains how to adjust [Explosion] in the [Advanced] folder as an example. For how to apply GPUfx transition, see Applying Effect on Transition Part of Video (Transition/Audio Cross Fade).
Applying Effect on Transition Part of Video (Transition/Audio Cross Fade)
The [Explosion] dialog box appears.

|
(1)
|
[Design]
|
Display a setting screen to adjust the motion or lighting. Use [Divide] to change the fragment size, use [Spread] to change the spread of fragments, and perform other operations. Also set key frames to change the motion of video along the time axis. |
|
(2)
|
[Time]
|
Display the setting screen to set the key frame and apply changes along the time axis. |
|
(3)
|
Controller
|
Drag up and down to adjust. |
Composite video by overlaying multiple images.
When you composite video, they are displayed in the order of the up and down positions of the track. Overlay the video (A) to composite on the track of the video to be the background (B).

You can composite 2 videos.

Check the composition details in the descriptions in the property, or by applying the composition.
Clips with keyers effect applied are displayed with an orange line.

You can overlay a video onto another, making parts of the upper video transparent to show the lower video. The keyers include [Chromakey] to make specific colors transparent and [Luminancekey] to make specific brightness transparent. The following procedure explains the operation of [Chromakey] as an example.

Clips with [Chromakey] applied are displayed with an orange line.
The [Chromakey] dialog box appears.
Generate alpha (transparency information) from the clip placed on the timeline as a matte clip, and multiply it by alpha of the clip placed as a source clip. In addition, you can place it overlaying the background image.

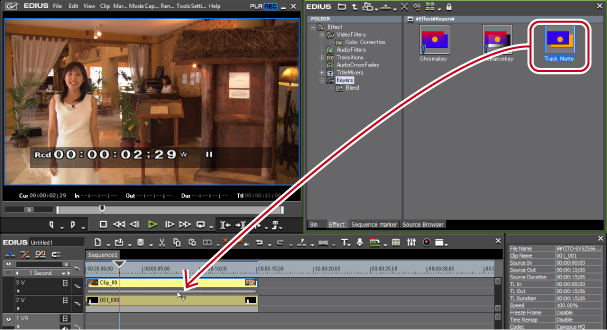
Clips with [Track Matte] applied are displayed with an orange line.
The [Track Matte] dialog box appears.
 Note
NoteIf there is no clip to be the matte clip beneath the source clip, [Track Matte] setting will not be applied.
Use the layouter to enlarge/reduce, crop, rotate, or move video. In addition, motion can be added by setting keyers.
The effect [Layouter] used for image size adjustment etc. is applied on all clips placed on the V/VA tracks by default. Operations to add the effect is not necessary.
The layout setting of title clips can also be performed.
The [Layouter] dialog box appears.

|
(1)
|
[Crop] tab
|
Display the crop preview. Perform intuitive crop operations with a mouse. |
|
(2)
|
[Transform] tab
|
Display the layout preview. Enlarge/reduce, move, or rotate intuitively with a mouse. |
|
(3)
|
Mode buttons
|
Switch 2D/3D modes, or switch view/hide of the guides such as center line or safe area. |
|
(4)
|
Tool buttons
|
Move, perform handle operations, or enlarge/reduce the screen. |
|
(5)
|
[Parameter] tab
|
Edit crops and transforms by entry of numeric values or using sliders. Use [Edge] to add a frame, use [Drop shadow] to add drop down shadow, or perform other operations. |
|
(6)
|
[Preset] tab
|
Save edited layouts and apply them to other clips. |
|
(7)
|
Key frame timeline
|
Set the key frame to apply animation effects to crops and transforms. The length of the timeline is the duration of the clip currently being edited. |
|
(8)
|
[Reset all]
|
Click this button to return the layouter settings to their defaults. To restore the layout to the settings before they were changed, apply [Default] in the preset. |
 Alternative
Starting up layouter: [F7]
Place the cursor onto the operation handle at the four corners and the center of the side lines, and drag it to adjust.

The details edited in the [Parameter] tab is reflected in the preview. You can also edit parameters by dragging handles inside the preview.

|
(1)
|
Stretch handle
|
Move the cursor to the operation handles at the four corners and the center of the side lines to resize the area. |
|
(2)
|
Guide
|
Display the underscan, overscan, title safe, and horizontal/vertical centerlines. |
|
(3)
|
Rotation handle
|
Move the cursor onto the rotation handle and drag it to rotate the image. In the 3D mode, green rotates the image around the Y axis, red rotates it around the X axis, and blue rotates it around the Z axis. |
|
(4)
|
Preview
|
Display the video on which the layouter is applied. Drag it to move. In the 3D mode, the preview anchor part shows the arrows of X, Y, and Z axes, which allow stereoscopic movement toward the respective directions.  |
|
(5)
|
Anchor
|
Display the reference point of video. This point is a reference point for the rotation center and for stretching. Drag it while holding down [Ctrl] on the keyboard to change the position. |
Clips with the layouter set are displayed with an orange line.
Set a key frame (the motion point frame) on the timeline exclusive for the layouter, and make the layout transform along the passage of time.
Adjusting Size/Angle/Crop/Edge/Drop Shadow
The [Layouter] dialog box appears. Set the key frame on the timeline in the layouter.
Key frame setting is enabled.

The timeline cursor is displayed by clicking the time scale.
Adjusting Size/Angle/Crop/Edge/Drop Shadow
A key frame is added automatically, and the edited details are reflected. If a key frame is not added, click [Add Key / Delete] in the key frame settings.

To correct a set key frame, move the timeline cursor to each key frame and adjust it.
A key frame is automatically added. Repeat step 5 as necessary.
Expand each parameter item and display as a chart, to edit the parameters of key frames. When the interpolation method is [Bezier], the interpolation curve can be edited by dragging the handles. The interpolation method can be changed by right-clicking on the key frame.

Clips with the layouter set are displayed with an orange line.
