To adjust the brightness and colors of a source shot in the Log format (S-Log source)
Create a project (QFHD 3840x2160 29.97p, 10 -bit).
Import the S-Log source file in the source browser, register it to the bin, and place the clip on the timeline.
1) In the folder view of the [Effect] palette, click the [Effect] tree.
2) Click the [VideoFilters] tree, and click [Color Correction].
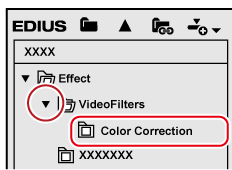
A list of [Color Correction] effects is displayed in the effect view.
3) Drag and drop [Primary Color Correction] to the clip (video part) on the timeline.
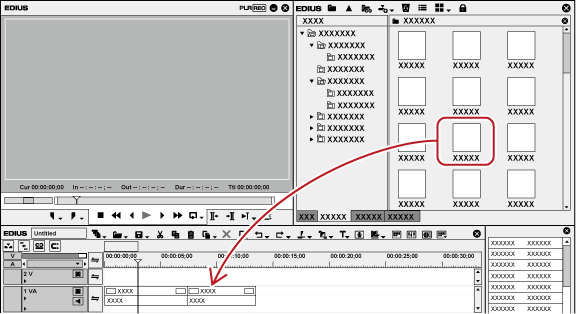
Clips with the [Primary Color Correction] effect applied (video part) are displayed with an orange line.
When a clip is recognized as a Log file, an optimal color space will be applied automatically to adjust the brightness and color. You can view the result of the applied color space in the preview window.
If a color space has not been applied automatically, you can open the [Primary Color Correction] dialog box to apply a color space manually. To apply a color space manually or finely adjust the brightness and colors, proceed to step 4) .
4) Display the [Information] palette, and double-click [Primary Color Correction].
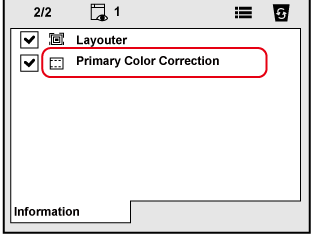
The [Primary Color Correction] dialog box appears.
5) Click the list button of [Source] in [Color Space] and select a color space that is optimal for the source shot in the Log format.
If the color space was selected automatically, this operation is not necessary.
6) While viewing the video in the preview window, make fine adjustment to the parameters.
7) Click [OK].
The [Primary Color Correction] dialog box is closed.

If real time playback is not possible after [Primary Color Correction] is applied, right-click on a clip and click [Render] to perform rendering to the clip.
The rendered clip will maintain the rendered status even after being moved.
(If an effect is readjusted or added, rendering is required again.)
|
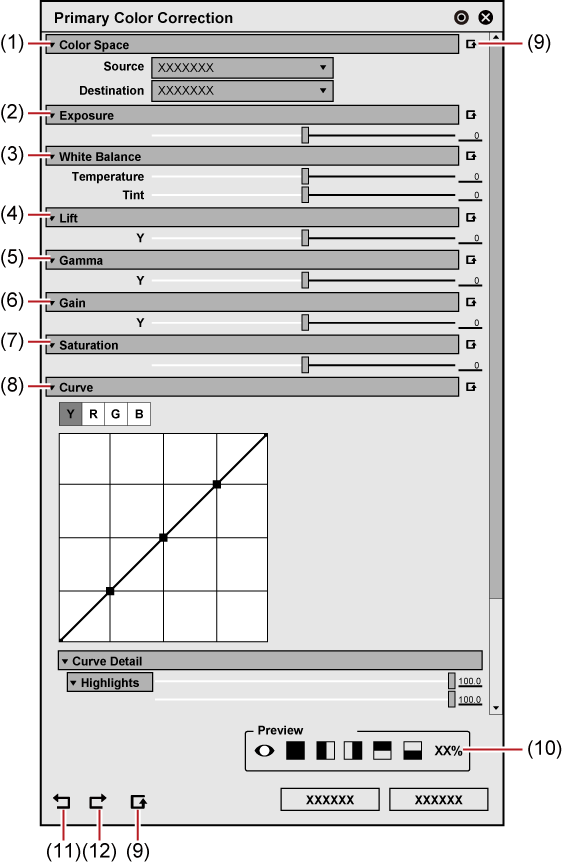
(1) |
[Color Space] |
[Source] Select a color space to apply to the clip. [Destination] Select a color space to apply when exporting. |
|
(2) |
[Exposure] |
Adjusts the brightness. |
|
(3) |
[White Balance] |
[Temperature] Adjusts the color temperature. [Tint] Adjusts the tint. |
|
(4) |
[Lift] |
Locks the highlight area and adjust the brightness of the shadow area. |
|
(5) |
[Gamma] |
Adjusts the brightness of intermediate tone area. |
|
(6) |
[Gain] |
Locks the shadow area and adjust the brightness of the highlight area. |
|
(7) |
[Saturation] |
Adjusts the saturation. |
|
(8) |
[Curve] |
Adjusts the hue and saturation using the tone curves. [Curve Detail] Moves the five points of [Curve] set by the luminosity level vertically and horizontally to adjust the brightness. |
|
(9) |
[Set default parameters] |
Click [Set default parameters] on the right of each item to restore the default setting for the item. Click [Set default parameters] on the bottom of the dialog box to restore the default settings for all items. |
|
(10) |
Preview setting |
Aligns the video of a clip to which primary color correction is applied and the other clips to compare the colors. |
|
(11) |
[Undo] |
Undoes an operation. |
|
(12) |
[Redo] |
Redoes an undone operation. |
For landscape shooting, “highlight detail loss” may cause the blue sky to appear in all white or the clouds and distant mountains to be merged with each other.
Standard shooting format has limited dynamic range compared to that of the Log format. With an improper exposure setting, highlight detail loss occurs, causing the color tones exceeding the upper limit of the dynamic range to be lost and all replaced by white.
Thus, video shot in the standard format may not be able to reproduce the realistic image quality of material texture, etc. even if applying post-shooting color corrections, because the light condition is adjusted and recorded at the time of shooting.
The Log format has wider dynamic range and enables recording of the range for the tone of light that could normally be recorded as white in the standard shooting. By performing color grading on a Log source, the color tone of areas where highlight details have been lost can be reproduced and video with realistic details like film images can be obtained.
1) Perform steps 1) to 5) in Adjusting with [Primary Color Correction] .
2) Click [Toggle Vector Scope/Waveform Display] on the timeline.
The [Vector Scope/Waveform] dialog box appears.

3) While viewing the waveform, adjust [Gain] in the [Primary Color Correction] dialog box in the minus direction.
While locking the shadow area, adjust the brightness of the highlight areas.
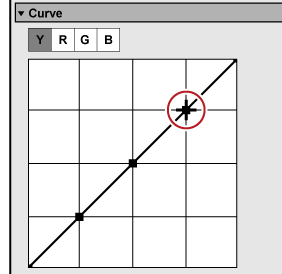
4) In [Curve], drag the second point from the upper right to finely adjust the brightness of the highlight area.
Move the mouse cursor onto the point until the point turns red, then you can adjust the position of the point.
When shot with sunset or light in the background, the image of a person in the video may be dark because of the backlight, resulting in “shadow detail loss”. In the same way as “highlight detail loss”, post-shooting color correction of such a video may not be possible as intended.
If the source is shot in the Log format, the color tone of areas where shadow details have been lost can be reproduced by performing color grading.
1) Perform steps 1) to 5) in Adjusting with [Primary Color Correction] .
2) Click [Toggle Vector Scope/Waveform Display] on the timeline.
The [Vector Scope/Waveform] dialog box appears.
3) While checking the waveform, adjust [Lift] in the [Primary Color Correction] dialog box in the plus direction.
While locking the highlight area, adjust the brightness of the shadow areas.
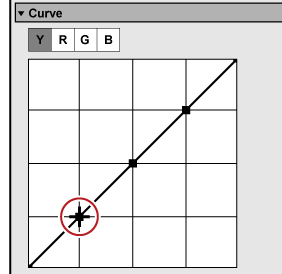
4) In [Curve], drag the second point from the lower left to finely adjust the brightness of the shadow area.
Move the mouse cursor onto the point until the point turns red, then you can adjust the position of the point.