
EDIUS can be used to apply effects such as fade-in/fade-out.
You can apply effects using the properties bar. A text, image or shape properties bar will be displayed depending on whether text, an image or shape is selected. The text properties bar is used here for demonstration purposes. Your screen may differ depending on what you have selected.
You can set the color of text and shapes. You can also apply a gradation effect.
|
|
|---|
|
1) Select the text or shape in which to change the color.
2) Click the [Fill color] tree on the properties bar.
3) Click the color palette.
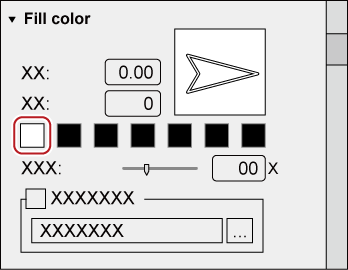
The [Color Select] dialog box appears.
4) Specify a color.
|
|
|---|
|

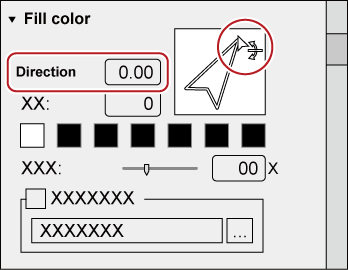
1) Select a text or shape in which to apply gradation.
2) Click the [Fill color] tree on the properties bar.
3) Enter the number of colors used for the gradation in [Color].
Up to 7 colors can be used.
4) Click the color palette.
The [Color Select] dialog box appears.
5) Specify a color.
6) Repeat steps 4) and 5) for the number of specified colors.
7) Adjust the color gradation by entering a value in [Direction] or by dragging the arrow figure.
You can adjust the transparency of a text object in order to see the background behind it.

1) Select the text object of which to adjust transparency.
2) Click the [Fill color] tree on the properties bar.
3) Move the [Transparency] slider to adjust transparency.
You can paste a texture file onto a text object.

1) Select a text object in which to paste texture.
2) Click the [Fill color] tree on the properties bar.
To paste the texture on the edge (border), click the [Edge] tree (for objects, click the [Border / Line Shape] tree).
3) Check [Texture File], and click [...].
4) Select the image file to be pasted, and click [Open].
File formats that can be used for texture mapping are as follows:
Windows Bitmap (*.bmp, *.dib, *.rle)
GIF format (*.gif)
JPEG format (*.jpeg, *.jpg)
PNG format (*.png)
TIFF format (*.tiff, *.tif)
Windows Extended Metafile (*.emf, *.wmf)
Photoshop format (*.psd)
Targa format (*.tga, *.targa, *.vda, *.icb, *.vst)
You can set the color of or paste a texture to text and object borders.

1) Select a text object on which to apply an edge (border).
2) Click the [Edge] tree on the properties bar, and check it.
[Borders] is displayed on the image properties bar, [Border / Line Shape] is displayed on the object properties bar.
3) Click the color palette.
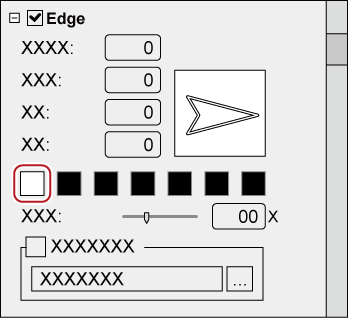
The [Color Select] dialog box appears.
4) Specify a color.
5) Enter a value in [Hard width] to specify a width for the edge (border).
6) Enter a value in [Soft width] to specify the blur for the edge (border).
You can also set gradation, paste a texture or adjust transparency.
You can apply shadow to text objects.

1) Select a text object on which to apply shadow.
2) Click the [Shadow] tree on the properties bar, and check it.
3) Click the color palette.
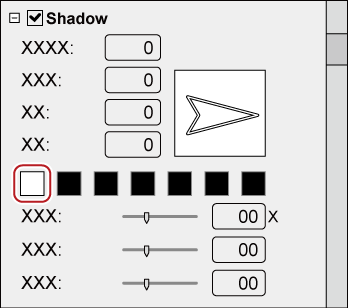
The [Color Select] dialog box appears.
4) Specify a color.
5) Enter a value in [Hard width] to specify a width for the shadow.
6) Enter a value in [Soft width] to specify the blur for the shadow.
7) Move the [Horizontal] and [Vertical] sliders to adjust the position of the shadow.
8) Move the [Transparency] slider to adjust the shadow transparency.
A gradation effect can be applied to a shadow.
An emboss effect can be applied to text objects.

|
|
|---|
|
1) Select a text or shape where emboss is applied.
2) Click the [Emboss] tree on the properties bar, and check it.
3) Click [Inside] or [Outside].
For shapes, [Inside] and [Outside] are displayed.
4) Enter values for [Angle] and [Edge Height] to specify the degree of emboss.
5) Set the light source position.
You can apply a blur effect to text object borders.

1) Select a text object on which to apply blur.
2) Click the [Blur] tree on the properties bar, and check it.
3) Move the sliders to adjust the blur.
Move the slider or enter a value for following properties; [Text / Edge] to apply the blur to a text string and the edge, [Edge] to apply to the edge only, and [Shadow] to apply to the shadow only.
[Image / Border], [Border] and [Shadow] are displayed on the image properties bar.
[Shape / Border], [Border] and [Shadow] are displayed in the object properties bar.
You can set an action that moves a text object horizontally/vertically.
Clicking the background will display the background properties.
1) When the background properties bar is displayed, select an action from the [Title type] list.
|
[Title type] |
Select an action for the text. Roll moves vertically and crawl moves horizontally. |
|
[Number of pages] |
Displays the number of pages that the text object moves across, where 1 page represents the range of the display area. A vertical scroll bar appears for 2 or more pages. A white dotted line is shown at page breaks, though it is not shown in the actual video. |
Roll/crawl settings such as the start point or end point are performed from the timeline in EDIUS.
The roll/crawl speed depends on the number of pages and the length of the title clip. Shorten the length of the title clip for a quick roll/crawl. Extend the length of the title clip for a slow roll/crawl. Set the title clip length on the timeline in EDIUS.

