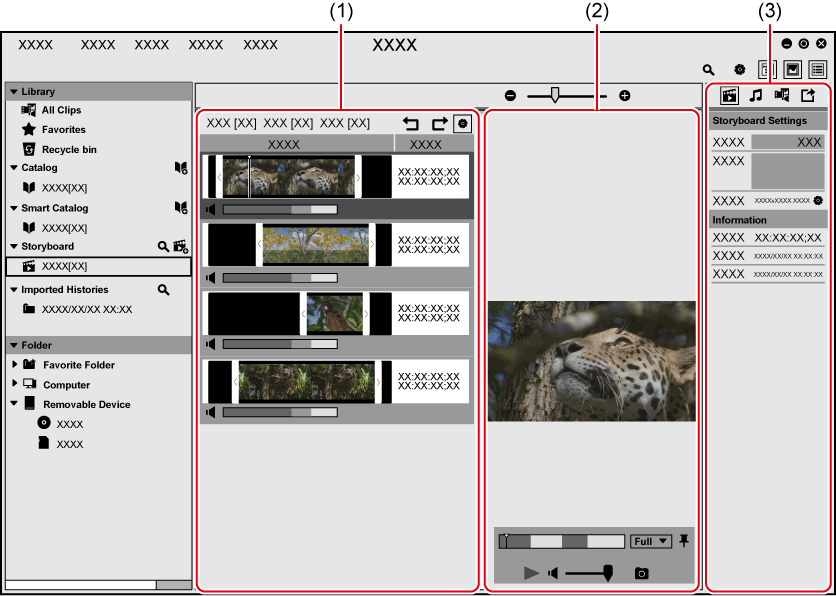
The screen configuration and operations while in storyboard editing differ from those for [Library] and [Catalog].
|
(1) |
Thumbnail pane |
The clips registered in the selected storyboard are displayed in a linear style. Click [Play] in the preview pane to play back clips in order from the one on the top. |
|
(2) |
Preview pane |
Click [View] on the menu bar, and click [Preview] to display the preview pane. The frame image of the slider position is displayed, and you can perform operations such as playback/stop, volume adjustment, etc. |
|
(3) |
Properties pane |
Configure the storyboard settings, export edited storyboards to files, and perform other operations. You can also configure the audio volume and background music. |
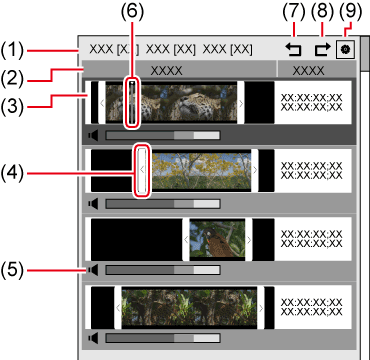
In the thumbnail pane, you can edit clip length, playback order, etc.
|
(1) |
Number of clips |
The number of clips registered in the selected storyboard is displayed by type. |
|
(2) |
Items to be displayed |
Right click on this part to add/remove items to be displayed. |
|
(3) |
Clip |
The clips registered in the selected storyboard are displayed in a linear style. |
|
(4) |
Trimming bar |
Drag it to the right and left to adjust the clip length. |
|
(5) |
Clip volume adjuster |
Drag the volume slider to the right and left to adjust the audio volume of the clip. |
|
(6) |
Slider |
Click on a clip to display it on the left of the clip. Drag it to the right and left to change the playback position. The frame of the position of the slider is displayed in the preview pane. |
|
(7) |
[Undo] |
Undo an operation of storyboard editing. |
|
(8) |
[Redo] |
Redo an undone operation of storyboard editing. |
|
(9) |
[Adjust Clip Volume] |
Switch the show/hide of the area to adjust the audio volume of the clip. |
Right-click on a clip displayed in the thumbnail pane to use the following functions.
|
[Remove from storyboard] |
Deregister selected clips from the storyboard. |
|
[Duplicate] |
Copy selected clips to the same storyboard. |
|
[Cut] |
Cut a clip at the slider position and divide into two clips. |
|
[Set In Point] |
Trim a clip so that the slider position is set to the In point. |
|
[Set Out Point] |
Trim a clip so that the slider position is set to the Out point. |
|
[Set as subclip] |
Switch the display view of trimmed clips to subclips. Since subclips are zoomed to fit the width of the thumbnail pane, this option is useful when fine trimming adjustment is performed. |
|
[Cancel subclip] |
Restore the display view of subclips to their original view. |
|
[Save as still image] |
Save the image displayed in the preview pane as a still image. |
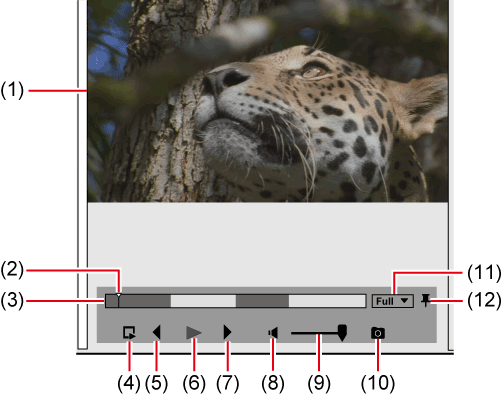
In the preview pane, you can perform playback operations of storyboard.
|
(1) |
Preview area |
The preview image is displayed. |
|
(2) |
Slider |
Drag it to the right and left to change the playback position. A frame of the position of the slider is displayed in the preview area. |
|
(3) |
Position bar |
Indicates the timeline of the storyboard. Clips of odd numbers in the playback order are displayed in blue, and clips of even numbers are displayed in light blue. Clicking on a point on the position bar displays the frame in the preview area. |
|
(4) |
[Play Around Slider] *1 |
Playback starts from three seconds before the position of the slider. |
|
(5) |
[Previous Frame] *1 |
Each click rewinds the timeline one frame at a time in the reverse direction. |
|
(6) |
[Play]/[Stop] |
Start/stop playback of the storyboard. |
|
(7) |
[Next Frame] *1 |
Each click advances the timeline one frame at a time in the forward direction. |
|
(8) |
[Mute] *1 |
Toggle mute/unmute. |
|
(9) |
Volume adjustment *1 |
Adjust the playback volume. |
|
(10) |
[Snapshot] |
Save the image displayed in the preview pane as a still image. |
|
(11) |
[Preview Quality/Preview Color Space] |
Switch the image quality and color space for preview. |
|
(12) |
[Pin] |
Every click switches whether or not to always display the operation area of the preview pane. Turn the icon vertical to always display the operation area. Turn the icon horizontal to display the operation area only when the mouse cursor is moved onto the preview pane. |
*1 Depending on the size of the preview pane, the item may not be displayed.
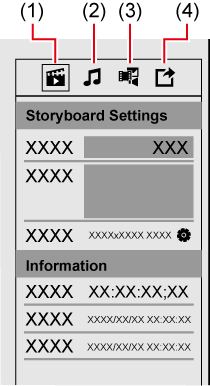
In the properties pane, you can perform storyboard operations such as configuration and export.
Click an icon on the top of the properties pane to switch the setting contents.
|
(1) |
[Storyboard] |
Switch the properties pane to the [Storyboard] view. You can add comments or set [Format] of the storyboard. |
|
(2) |
[Audio] |
Switch the properties pane to the [Audio] view. You can configure the audio volume and background music. |
|
(3) |
[Clip] |
Switch the properties pane to the [Clip] view. You can check the properties of a clip selected in the thumbnail pane. |
|
(4) |
[Export] |
Switch the properties pane to the [Export] view. You can export an edited storyboard. |
