In EDIUS, original proxy files recorded in the P2 or XDCAM camera can be used. You can also utilize functions such as “Proxy originated editing” that allows to use an untransferred clip or temporary editing clip (proxy source) while editing and replace it with the actual editing clip (high-resolution source) before final export.

Formats that allow switching between high-resolution and proxy editing sources are as follows.
Sony: XDCAM, XAVC, XAVC S
Panasonic: P2
Formats that can be used in proxy originated editing are as follows.
Sony: XDCAM, XAVC, XAVC S
Panasonic: P2, sub-recording format by Panasonic cameras
Canon: XF-AVC
1) From the source browser, import sources (such as P2 or XDCAM) containing a proxy file.
High-resolution/Proxy is displayed in the area of High-resolution/Proxy of the bin, because sources have a property of a high-resolution and proxy.
2) Switch to the proxy mode and edit.
3) Replace the proxy source with a high-resolution clip and export the edited clip.
The flow of proxy originated editing is as follows.
1) Import proxy sources.
Untransferred clips or temporary editing clips are registered in the bin.
2) Edit the timeline using the untransferred clips or temporary editing clips.
3) Replace the untransferred clips or temporary editing clips with the actual editing clips.
There are two methods to import proxy sources.
1) Connect media that contain proxy sources to the PC.
2) In the folder view of the source browser, click the medium to view, and then click on the drive or reference folder.
The operation differs depending on the medium.
Sources on the medium are displayed in the clip view.
3) Right-click on a proxy source clip to import, and click [Add and Transfer to Bin].
Data transfer to the PC will be started in the background at the same time that the clip is registered to the bin.
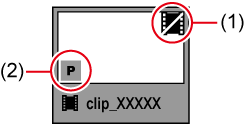
The clip will become an untransferred clip and will be recognized as a source that has only proxy data (not transferred to high-resolution data).

|
(1) |
Icon for untransferred clips |
|
|
(2) |
Icon that indicates proxy data |
|
1) Transfer proxy source files to the local disk on the explorer or other means.
The following files are recognized as proxy files.
P2: MOV and MP4 files in the “PROXY” folder
XDCAM: MXF files in the “Sub” folder
XAVC: MP4 files in the “Sub” folder
(MXF proxy files in the MPEG HD422 format cannot be handled as temporary editing clips.)
XAVC S: MP4 files in the “SUB” folder
2) Register the proxy source clips to the bin.
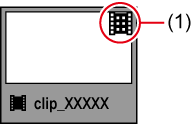
The clips will become temporary editing clips. Since they are recognized as high-resolution sources, the icon indicating proxy will not be displayed.

|
(1) |
Icon for temporary editing clips |
|
1) Place the imported untransferred clips or temporary editing clips on the timeline.
On the status bar of the timeline window, a message will appear to indicate that untransferred clips or temporary editing clips are used.
When imported from the source browser
The icon indicating untransferred clips is displayed with the number.

When imported from the [Open] dialog box
The icon indicating temporary editing clips is displayed with the number.

Replace the untransferred clips or temporary editing clips with the actual editing clips as follows.
Replace untransferred clips in the bin individually to the actual editing clip.
This procedure is only available when proxy sources have been imported from the source browser.
1) Right-click a clip in the bin, and click [Transfer HiRes].
The [Disc Request - Background Job] dialog box appears.
2) Connect media that contain the actual editing clips to the PC.
Data transfer to the project folder is started in the background.
The clip in the bin now references the file transferred to the project folder.
In the [Restore and Transfer Clips] dialog box, specify the actual editing clips for the untransferred or temporary editing clips and replace them individually.
1) Display the [Restore and Transfer Clips] dialog box.
2) Select a clip from [Clip list], and select either [Transfer HiRes] or [Relink (select file)] from the [Restoration Method] list.
Select [Transfer HiRes] for untransferred clips or select [Relink (select file)] for temporary editing clips.
3) In the [Open] dialog box, select the actual editing clip file, and click [Open].
4) Click [OK].
The [Restore and Transfer Clips] dialog box closes and the untransferred clips or temporary editing clips are replaced with the actual editing clips.
1) Connect media that contain the actual editing clips to the PC.
2) In the folder view of the source browser, click the medium to view, and then click on the drive or reference folder.
The operation differs depending on the medium.
Sources on the medium are displayed in the clip view.
3) When the message is displayed indicating that the actual editing clip corresponded to the untransferred clip or the temporary editing clip is found, click [Yes].
The [Restore and Transfer Clips] dialog box appears with [Restoration Method] and [Restore file] preconfigured.
4) Click [OK].
The [Restore and Transfer Clips] dialog box closes and the untransferred clips or temporary editing clips are replaced with the actual editing clips.
The procedure for untransferred clips imported from the source browser is as follows.
1) Click [Export] on the Recorder.
2) Click [Print to File].
The [Print to File] dialog box appears.
3) Select an exporter, and click [Export].
4) Configure export details and confirm the file name, saving destination, etc.
A message appears to indicate that temporary editing clips are used.
5) Click [Yes].
The [Restore and Transfer Clips] dialog box appears.
6) Click [OK].
The [Disc Request - Background Job] dialog box appears.
7) Connect media that contain the actual editing clips to the PC.
Data transfer to the project folder is started in the background.
Repeat step 7) as necessary.
When all untransferred clips have been replaced with the actual editing clips, the export operation starts automatically.
The procedure for temporary editing clips imported from the[Open] dialog box is as follows.
1) Click [Export] on the Recorder.
2) Click [Print to File].
The [Print to File] dialog box appears.
3) Select an exporter, and click [Export].
4) Configure export details and confirm the file name, saving destination, etc.
A message appears to indicate that temporary editing clips are used.
5) Click [Yes].
The [Restore and Transfer Clips] dialog box appears.
6) Select a clip from [Clip list], and select [Relink (select file)] from the [Restoration Method] list.
7) In the [Open] dialog box, select the actual editing clip file, and click [Open].
8) Repeat steps 6) to 7) as necessary to specify the actual editing clips to be restored.
9) Click [OK].
The [Restore and Transfer Clips] dialog box closes and the temporary editing clips are replaced with the actual editing clips. The export operation starts automatically.