You can adjust the color tone to match the previous/next video, or adjust the brightness by correcting color cast, highlight detail loss, and shadow detail loss. The following filters are provided for color correction.
Correct colors for shadow (black), intermediate (gray), and highlight (white).
Adjusting 3-Way Color Correction
Adjust luminance (Y), blue color difference (U), and red color difference (V) on the chart. You can make a fine adjustment to balance the shadow and highlight.
Keys can be added for the YUV curve but interpolation animation between keys is not available.
Adjust chroma, luminance, contrast, and color tone with the slider.
Move the pointer to adjust the color density, or rotate the wheel to adjust the color tone.
Make the video monotone.
Adjust the brightness and color by applying color grading on a clip shot in the Log format.
Adjusting Primary Color Correction
1) In the folder view of the [Effect] palette, click the [VideoFilters] tree.
2) Click the [Color Correction] tree to display filters.
3) Drag and drop the filter to use to the clip on the timeline.

 Alternative
Select the clip on the timeline, right-click the filter in the [Effect] palette, and click [Add to Timeline].
Right-drag an effect and drop it to the clip, and click [Add] or [Replace].
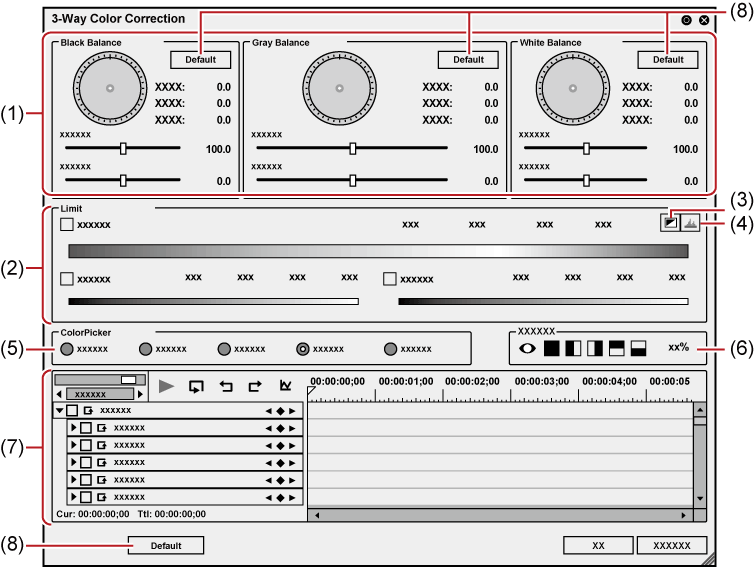
1) Display the [Information] palette, and double-click [3-Way Color Correction].
The [3-Way Color Correction] dialog box appears.
2) Adjust the balance of each color and click [OK].
|
|
|---|
|
|
(1) |
[Black Balance]/[Gray Balance]/[White Balance] |
Drag a point in each color to correct colors for shadow (black balance), intermediate (gray balance), and highlight (white balance). Drag the point of color wheel to adjust the hue, or move the slider to adjust saturation and contrast. |
|
(2) |
[Limit] |
Correct colors in the specified range. Check [Hue], [Saturation], and [Luminance] to specify the range to adjust. You can set the effect range by entering a value directly in each field or dragging the triangle slider, or grating/slant parts. 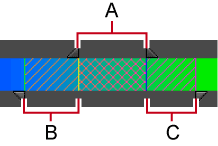 A: Range to apply 100% adjustment B: Range where you increase the adjustment volume gradually C: Range where you decrease the adjustment volume gradually |
|
(3) |
[Key display] |
View which range is applied with the effects by setting [Limit]. The area with the effects applied 100% is displayed in white; 0% in black. |
|
(4) |
[Histogram display] |
Display a calculated histogram for each of hue, saturation, and luminance. |
|
(5) |
[ColorPicker] |
Select a color from the displayed image on the Player or the Recorder. |
|
(6) |
Preview setting |
|
|
(7) |
Key frame setting |
|
|
(8) |
[Default] |
Click [Default] in each balance frame to reset only the parameters related to that balance to their default values. Click [Default] at the bottom of the window to delete all the keys and reset the parameters to their default values. |
1) Display the [Information] palette, and double-click [3-Way Color Correction].
The [3-Way Color Correction] dialog box appears.
2) Click the color to correct from Color Picker.
When you click [Black], an adjustment is made so that the color obtained in the color picker should be black. Similarly, an adjustment is made so that it should be gray or white when you select [Gray] or [White], respectively.
If you click [Auto], the color is determined based on the brightness of the obtained color. For example, the color is adjusted for white when a bright color is obtained.
3) Click the part to correct in Recorder.
The color is automatically corrected. You can also adjust the color by using the color wheel point, or the sliders of saturation and contrast.
When correcting a color-casted white table
Click [White] in Color Picker, and click a point on the table in the image.
You can define the range to apply the correction, when adjusting the color tone of skin.
1) Display the [Information] palette, and double-click [3-Way Color Correction].
The [3-Way Color Correction] dialog box appears.
2) Click [Color range] in Color Picker.
3) Click the part to correct in Recorder.
Click additional points with [Shift] on the keyboard held down to include the color of the points to the currently specified range.
4) Correct the color.
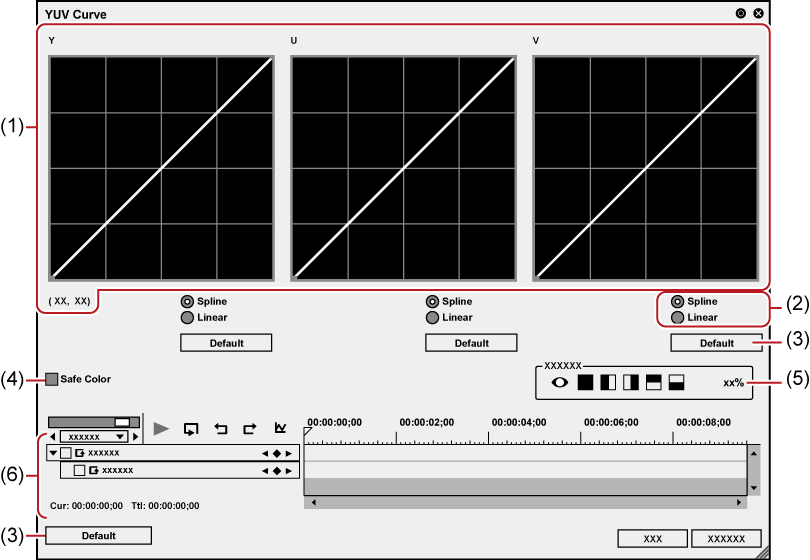
1) Display the [Information] palette, and double-click [YUV Curve].
The [YUV Curve] dialog box appears.
2) Adjust the YUV curve and click [OK].
|
(1) |
YUV curve |
Drag the line on each chart to adjust Y, U, and V. The value on the bottom left of the Y curve indicates the input value and output value. |
|
(2) |
[Spline]/[Linear] |
Select the line of the chart (curve or straight). |
|
(3) |
[Default] |
Click [Default] of each chart to restore the defaults for each Y, U, and V value and add them as the keys. Click [Default] at the bottom of the window to delete all the keys and reset the chart to its initial values. |
|
(4) |
[Safe Color] |
Check this item to make an automatic adjustment to keep the video signal within the YUV color space. |
|
(5) |
Preview setting |
|
|
(6) |
Key frame setting |
Adjust the YUV curve chart for each key frame. The field option for the key will be [Hold], and no change along the time axis is allowed. For how to set a key frame, see Key frame setting . |

Although Safe Color clips a range of luminance 16-235 and chroma 16-240, and the chroma is not automatically included in the safe area, it is calculated to include luminance/chroma within IRE0-100.
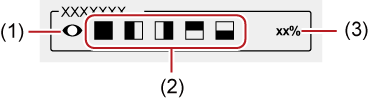
You can lay and compare the image applied color correction and the original image.
|
(1) |
[Use current screen to show filter effect] |
Fix the screen with the timeline cursor position when comparing filter effects. |
|
(2) |
Check the filter effects |
Set the segmentation of the screen when checking the result of the filter. |
|
(3) |
Filter apply screen ratio |
Set the screen ratio to display the video with the filter applied when comparing the result of the filter. |
You can change the parameters of color correction along the time axis, and play it to check the result.

|
(1) |
Time scale slider |
Drag the slider to the left and right to adjust the time scale display unit. Move the slider to the left to reduce the display unit, or to the right to increase it. The right end is [Fit]. |
|
(2) |
Playback/Tool buttons |
[Ctrl] + [Z]
[Ctrl] + [Y]
The numerical values and gradations of the Y axis can be changed by entering numerical values.  |
|
(3) |
Time scale for key frame |
Display a scale with the unit selected in the time scale setting on the timeline. Right-click the time scale and click [Timeline Timecode] to display the timecode of the timeline or click [Zero base Timecode] to display the timecode with the beginning of the clip as 0. If a sequence marker is set for the position where the clip is placed, right-click the time scale and click [Go to Previous Sequence Marker] or [Go To Next Sequence marker] to move the timeline cursor to the previous or next sequence marker. |
|
(4) |
Time scale settings |
Click here to toggle the specified display unit and [Fit]. Click the left arrow to reduce the display unit, or click the right arrow to increase the display unit. |
|
(5) |
Expand button |
Click this button to configure detailed settings for each item. You can edit the parameters by moving the cursor to a value input or control and dragging it when the mouse cursor shape changes. |
|
(6) |
Enable/Disable |
Unchecking the item disables the parameter settings. To configure a key frame, check the effect name. |
|
(7) |
[Add Default Key] |
Click this item to set the default key frames of each parameter item at the timeline cursor position. |
|
(8) |
Key frame setting |
Click
Click the left and right arrow to move to the previous and next key frame. |
|
(9) |
Key frame timeline |
Automatically add a key frame when you edit an effect at the timeline cursor. If you expand each parameter item, you can edit the parameter by dragging key upward or downward. |
Right-click the timeline for key or key frame to display a menu to add/delete keys or switch the method of interpolation between key frames. You can select the interpolation method from [Hold], [Line], and [Bezier].
When the item name of a parameter is right-clicked and [Clear parameter of (item)] is clicked, all key frames for that item are deleted.
When [Shift] + [V] on the keyboard are pressed, a key frame is added to all parameters with a valid key frame setting at the timeline cursor position.
When [V] on the keyboard is pressed, a key frame is added to the currently selected parameter at the timeline cursor position.
1) Display the [Information] palette, and double-click [Color Balance].
The [Color Balance] dialog box appears.
2) Adjust the color balance and click [OK].

|
(1) |
Sliders |
Move the slider to adjust each item. |
|
(2) |
[Safe Color] |
Check this item to make an automatic adjustment to keep the video signal within the YUV color space. |
|
(3) |
Preview setting |
|
|
(4) |
Key frame setting |
|
|
(5) |
[Default] |
Click this button to restore the default settings for all the sliders. |
Although Safe Color clips a range of luminance 16-235 and chroma 16-240, and the chroma is not automatically included in the safe area, it is calculated to include luminance/chroma within IRE0-100.
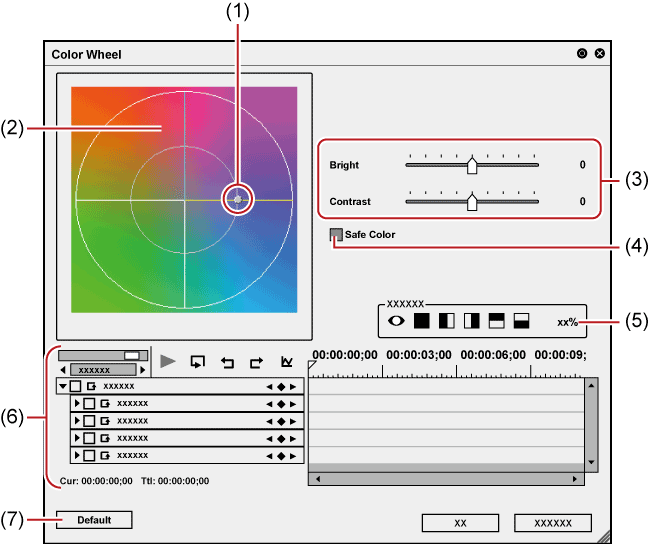
1) Display the [Information] palette, and double-click [Color Wheel].
The [Color Wheel] dialog box appears.
2) Adjust the color wheel and click [OK].
|
(1) |
Color wheel point |
Slide this point to adjust the color density (chroma). Chroma increases as the point moves to the outline of the circle. |
|
(2) |
Wheel |
Drag and rotate it to adjust the color tone. |
|
(3) |
[Bright]/[Contrast] |
Adjust the luminance and contrast by moving the sliders. |
|
(4) |
[Safe Color] |
Check this item to make an automatic adjustment to keep the video signal within the YUV color space. |
|
(5) |
Preview setting |
|
|
(6) |
Key frame setting |
|
|
(7) |
[Default] |
Click this button to delete all the keys and restore the default settings for the wheel and color wheel point. |
Although Safe Color clips a range of luminance 16-235 and chroma 16-240, and the chroma is not automatically included in the safe area, it is calculated to include luminance/chroma within IRE0-100.
1) Display the [Information] palette, and double-click [Monotone].
The [Monotone] dialog box appears.
2) Adjust the monotone and click [OK].

|
(1) |
Sliders |
Adjust the color tone by moving the slider. |
|
(2) |
Key frame setting |
You can adjust the brightness and color by applying color grading on a clip shot in the Log format.
[Primary Color Correction] has predefined color space profiles that support Log formats for each of the camera manufacturers.
When a clip is recognized by its metadata as a Log file, [Primary Color Correction] filter will automatically select an optimal color space and adjust the brightness and colors.
You can also select the color space manually.
Alternatively, you can register LUT files (*.cube) to [Primary Color Correction] and apply to clips.
You can obtain preferred brightness and colors by fine adjusting the parameters.
|
|
|---|
|
Log is a shooting format that can maintain wide dynamic range.
For videos shot in the Log format, color grading is essential. By performing color grading on a shot video with lower contrast, wider color tone range can be realized to reproduce realistic images that are closer to what it actually looks like.
Even under conditions where highlight/shadow detail loss is likely to occur, shooting in the Log format will help in correcting the details later without deteriorating the image quality.
Reproducing Clouds Where Highlight Detail Loss Has Occurred
Adjusting the Brightness of a Person Where Shadow Detail Loss Has Occurred Due to Backlight
LUT (Look Up Table) is a standard profile for color space conversion. You can apply it to adjust the brightness and color on video shot in the Log format.
To adjust the brightness and colors of a source shot in the Log format (S-Log source)
Create a project (QFHD 3840x2160 29.97p, 10 -bit).
Import the S-Log source file in the source browser, register it to the bin, and place the clip on the timeline.
1) In the folder view of the [Effect] palette, click the [Effect] tree.
2) Click the [VideoFilters] tree, and click [Color Correction].

A list of [Color Correction] effects is displayed in the effect view.
3) Drag and drop [Primary Color Correction] to the clip (video part) on the timeline.
Clips with the [Primary Color Correction] effect applied (video part) are displayed with an orange line.
When a clip is recognized as a Log file, an optimal color space will be applied automatically to adjust the brightness and color. You can view the result of the applied color space in the preview window.
If a color space has not been applied automatically, you can open the [Primary Color Correction] dialog box to apply a color space manually. To apply a color space manually or finely adjust the brightness and colors, proceed to step 4) .
4) Display the [Information] palette, and double-click [Primary Color Correction].
The [Primary Color Correction] dialog box appears.
5) Click the list button of [Source] in [Color Space] and select a color space that is optimal for the source shot in the Log format.
If the color space was selected automatically, this operation is not necessary.
6) While viewing the video in the preview window, make fine adjustment to the parameters.
7) Click [OK].
The [Primary Color Correction] dialog box is closed.
If real time playback is not possible after [Primary Color Correction] is applied, right-click on a clip and click [Render] to perform rendering to the clip.
The rendered clip will maintain the rendered status even after being moved.
(If an effect is readjusted or added, rendering is required again.)
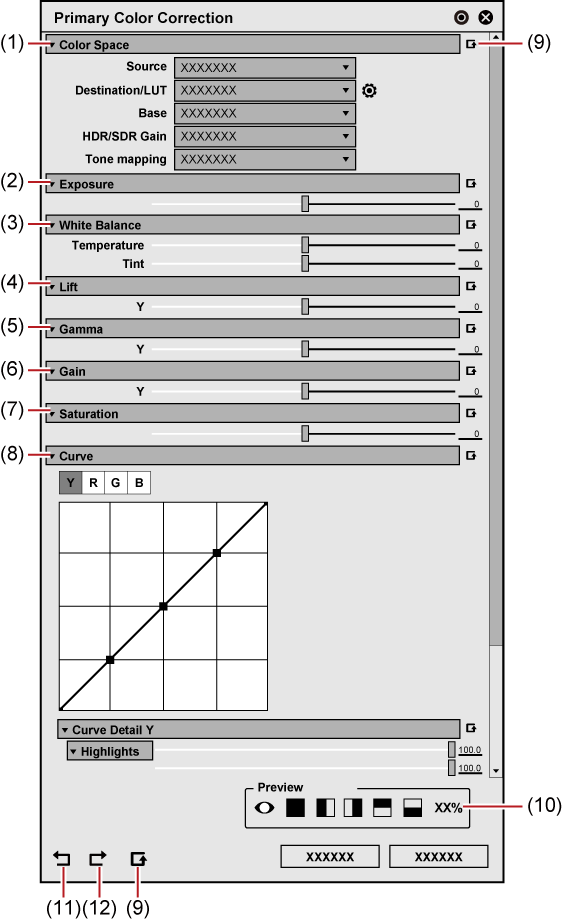
|
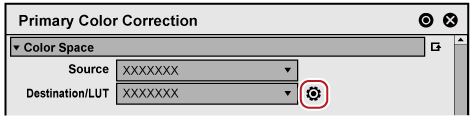
(1) |
[Color Space] |
[Source] Select a color space to apply to the clip. [Destination/LUT] Select a color space or LUT to apply when exporting. Click [LUT Settings] on the right of [Destination/LUT] to display the [LUT Settings] dialog box. Configure settings of LUT, such as registering/unregistering LUT. [Base] Enable settings for color space conversion format.
[HDR/SDR Gain] Set the gain value to be applied when the color space of either HDR or SDR is converted to/from the other. In some conditions, the brightness of the reference white of HDR may differ from that of SDR. In this case, a video converted from HDR to SDR will appear brighter, and that converted from SDR to HDR will appear darker. Setting [HDR/SDR Gain] will apply the gain value when the color space of either HDR or SDR is converted to/from the other, preventing the variation in brightness. Set the gain value to the conversion value for the display light. Select an item from [Disable], [Current project setting], [0.00 dB], [3.00 dB], [6.00 dB], [6.15 dB], [9.00 dB] and [12.00 dB]. Select [6.15 dB] to comply with ITU-R BT.2408. The content in [Current project setting] will be determined in accordance with the [HDR/SDR gain] setting in the project settings. You can also directly enter a value (unit: dB) within a range from “0.00” to “20.00”.
[Tone mapping] This setting is applied to conversion in which the dynamic range of the color space gets smaller, such as when a HDR source is used as SDR. Setting [Disable] will not apply the tone mapping. Areas with brightness that exceeds the luminance range of SDR will be replaced to 100% white. Setting [Soft Clip] will compress the high-luminance areas to show smooth gradation so that they will not be clipped easily. The content in [Current project setting] will be determined in accordance with the [Tone mapping] setting in the project settings.
|
|
(2) |
[Exposure] |
Adjusts the brightness. Increasing or decreasing the numeric value by 25 will increase or decrease the brightness equivalent to 1 stop in aperture. |
|
(3) |
[White Balance] |
[Temperature] Adjusts the color temperature. [Tint] Adjusts the tint. |
|
(4) |
[Lift] |
Locks the highlight area and adjust the brightness of the shadow area. |
|
(5) |
[Gamma] |
Adjusts the brightness of intermediate tone area. |
|
(6) |
[Gain] |
Locks the shadow area and adjust the brightness of the highlight area. |
|
(7) |
[Saturation] |
Adjusts the saturation. |
|
(8) |
[Curve] |
Adjusts the hue and saturation using the tone curves. [Curve Detail] Moves the five points of [Curve] set by the luminosity level vertically and horizontally to adjust the brightness. |
|
(9) |
[Set default parameters] |
Click [Set default parameters] on the right of each item to restore the default setting for the item. Click [Set default parameters] on the bottom of the dialog box to restore the default settings for all items. |
|
(10) |
Preview setting |
Aligns the video of a clip to which primary color correction is applied and the other clips to compare the colors. |
|
(11) |
[Undo] |
Undoes an operation. |
|
(12) |
[Redo] |
Redoes an undone operation. |
The types and sort order of color spaces that are displayed when the list button of [Source]/[Destination/LUT] in [Color Space] is clicked can be changed in [Application] → [Color Space] of [System Settings].
For landscape shooting, “highlight detail loss” may cause the blue sky to appear in all white or the clouds and distant mountains to be merged with each other.
Standard shooting format has limited dynamic range compared to that of the Log format. With an improper exposure setting, highlight detail loss occurs, causing the color tones exceeding the upper limit of the dynamic range to be lost and all replaced by white.
Thus, video shot in the standard format may not be able to reproduce the realistic image quality of material texture, etc. even if applying post-shooting color corrections, because the light condition is adjusted and recorded at the time of shooting.
The Log format has wider dynamic range and enables recording of the range for the tone of light that could normally be recorded as white in the standard shooting. By performing color grading on a Log source, the color tone of areas where highlight details have been lost can be reproduced and video with realistic details like film images can be obtained.
The following procedure shows an example of primary color correction.
1) Perform steps 1) to 5) in Adjusting with [Primary Color Correction] .
2) Click [Toggle Videoscope Display] on the timeline.
The [Videoscope] dialog box appears.

3) While viewing the waveform, adjust [Gain] in the [Primary Color Correction] dialog box in the minus direction.
While locking the shadow area, adjust the brightness of the highlight areas.
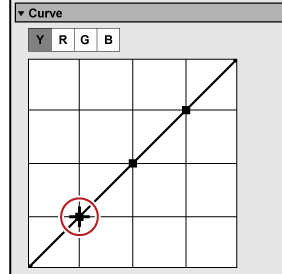
4) In [Curve], drag the second point from the upper right to finely adjust the brightness of the highlight area.
Move the mouse cursor onto the point until the point turns red, then you can adjust the position of the point.

When shot with sunset or light in the background, the image of a person in the video may be dark because of the backlight, resulting in “shadow detail loss”. In the same way as “highlight detail loss”, post-shooting color correction of such a video may not be possible as intended.
If the source is shot in the Log format, the color tone of areas where shadow details have been lost can be reproduced by performing color grading.
The following procedure shows an example of primary color correction.
1) Perform steps 1) to 5) in Adjusting with [Primary Color Correction] .
2) Click [Toggle Videoscope Display] on the timeline.
The [Videoscope] dialog box appears.
3) While checking the waveform, adjust [Lift] in the [Primary Color Correction] dialog box in the plus direction.
While locking the highlight area, adjust the brightness of the shadow areas.
4) In [Curve], drag the second point from the lower left to finely adjust the brightness of the shadow area.
Move the mouse cursor onto the point until the point turns red, then you can adjust the position of the point.
LUT files (*.cube) that are provided by camera manufacturers can be registered to [Primary Color Correction] to apply to clips.
Prepare the LUT files (*.cube) on your PC in advance.
1) Display the [Primary Color Correction] dialog box.
Apply [Primary Color Correction] to a clip on the timeline, and double-click [Primary Color Correction] in the [Information] dialog box.
2) Click [LUT Settings] on the right of [Destination/LUT].
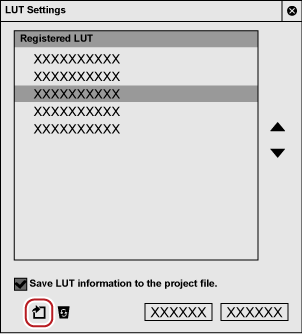
The [LUT Settings] dialog box appears.
3) Click [Register new LUT].
The [Open] dialog box appears.
4) Select a LUT file to register, and click [Open].
The [Setting for LUT] dialog box appears.
5) Set the range of LUT for [Input]/[Output].
Select the range to which LUT is to be associated at the time of input or output from [Full] or [Video].
|
[Full] |
Associate the RGB value 0 to 100% of LUT to the entire range including super black and super white. |
|
[Video] |
Associate the RGB value 0 to 100% of LUT to the range of reference black to reference white of video (video range). |
|
|
|---|
|
6) Click [OK].
The selected LUT is added to [Registered LUT] in the [LUT Settings] dialog box.
The range setting values selected in 5) will be displayed on the right of the LUT name.
7) Click [OK].

|
(1) |
[Registered LUT] |
Displays the list of registered LUT. |
|
(2) |
[Save LUT information to the project file.] |
Check this item to save the information of the LUT file to the project file. Even when the project file is imported in a different environment from that where the file was created, it can be used with the registered LUT. |
|
(3) |
[Move up]/[Move down] |
Sorts LUT. Selecting LUT from [Registered LUT] and clicking [Move up] or [Move down] move up or down the selected LUT. |
|
(4) |
[Register new LUT] |
Click this item to display the [Open] dialog box that allows to register the LUT file. |
|
(5) |
[Remove LUT from list] |
Unregisters a LUT selected in [Registered LUT]. |
If the project file is imported and used in another environment, checking on [Save LUT information to the project file.] is recommended.
If it is unchecked, the used LUT file must be registered when the project file is imported in another environment.
Be sure to check it when you use EDIUS XRE/GVRE.
The LUT process in [Primary Color Correction] is based on input LUT.
The LUT file format supported in [Primary Color Correction] is only “No shaper LUT” in the *.cube formats of DaVinci Resolve.
The results may differ between when the color space is converted with [Primary Color Correction] and when an equivalent LUT file provided by a camera manufacturer is applied, because camera manufacturers make their own adjustments in the file. For details on LUT file settings, the information will be released in the FAQ on our website.
The entire LUT data imported from a file is not saved in an effect preset. Therefore, the LUT cannot be referred to (when LUT is not registered or saved in the project file), a proper operation will not be performed, which makes clips on the timeline to appear checkered in red and black.
Apply registered LUT to clips.
1) Display the [Primary Color Correction] dialog box.
Apply [Primary Color Correction] to a clip on the timeline, and double-click [Primary Color Correction] in the [Information] dialog box.
2) Click the [Destination/LUT] list button in [Color Space], and click a LUT to apply.

The LUT is applied, and brightness and color are adjusted.
You can view the result of the applied LUT in the preview window. Move the timeline cursor to show the frame that includes the adjustment result.
Make fine adjustment of parameters as necessary.
3) Click [OK].
The [Primary Color Correction] dialog box is closed.


 : Play back the timeline on the Recorder.
 : Repeatedly play back the clip currently being edited.
 : Undo an operation.
 : Redo the undone operation.
 : Switch the changes of each parameter to the chart view. In the chart view, the timeline is represented by a chart display of the selected key. The parameters can be edited by moving the keys up and down.
 in the center to set a key frame on the position of the timeline cursor. If the timeline cursor is on the key frame, the key will be deleted.