Set EDIUS operations.
Set show/hide or sorting order of color space, etc. used on EDIUS.
[Color Space] setting is reflected in the following contents.
[Primary Color Correction] dialog box
[Clip Properties] dialog box for clips in bin/source browser
Display items in clip view of bin
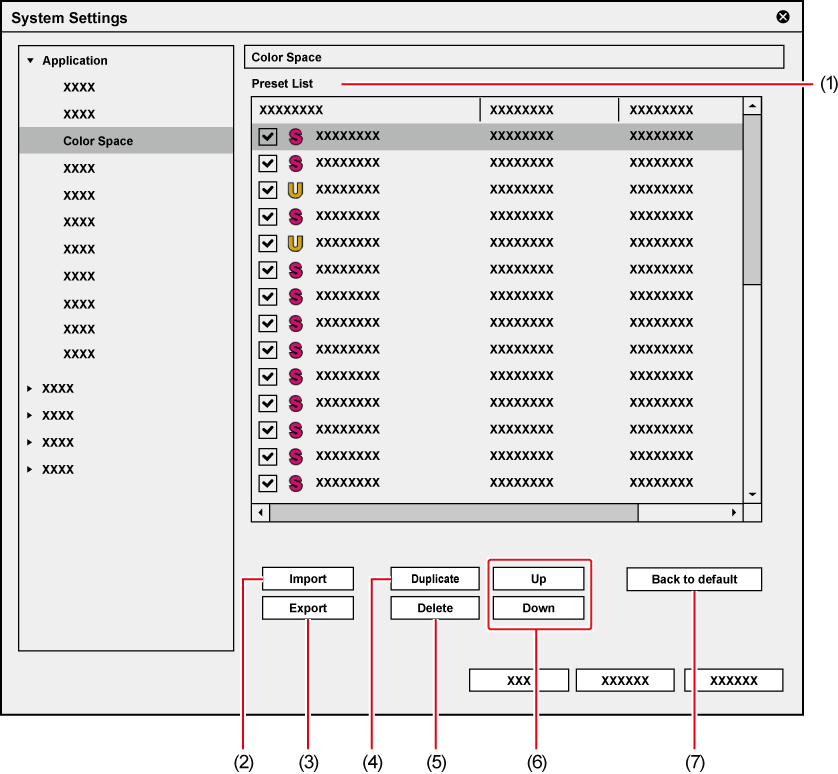
1) Click [Settings] on the menu bar, and click [System Settings].
2) Click the [Application] tree, and click [Color Space].
The [Color Space] screen appears.
3) Set each item.
|
(1) |
[Preset List] |
Display color space presets in a list.
[Use] Switch the show/hide setting of presets. [Name] The names and types of presets are displayed. There are the following two types of presets.
[Gamma] *1 Display the preset gamma. [Gamut] *1 Display the preset gamut. [Matrix] *1 Display the preset matrix. [Default Range] *1 Display the preset range. |
|
(2) |
[Import] |
Import the setting file (XML format) of [Preset List]. |
|
(3) |
[Export] |
Export [Preset List] to a setting file (XML format). |
|
(4) |
[Duplicate] |
Copy a preset.
|
|
(5) |
[Delete] |
Delete a preset.
|
|
(6) |
[Up]/[Down] |
Sort the presets.
|
|
(7) |
[Back to default] |
Restore the default setting. |
*1
The setting of a system preset color space can be changed by clicking
 .
.
For [Matrix] and [Default Range], when an item except for [Default] is selected, “*” appears in the end of the setting value.
4) Click [OK].
You can continue to set other items by clicking [Apply].
You can select the size of the proxy file that is created when proxy is edited.
1) Click [Settings] on the menu bar, and click [System Settings].
2) Click the [Application] tree, and click [Proxy].
The [Proxy] screen appears.
3) Set each item.
|
[Proxy Size] |
Proxy size can be selected from three types: [Large], [Medium], and [Small]. [Large] The proxy size is 1920x1080. [Medium] The proxy size is 960x540. [Small] The proxy size is 352x240. |
The default proxy size is [Medium].
Proxy files created in Version 8.22 or older will be loaded as [Small].
|
|
|---|
|
Set playback operations.
1) Click [Settings] on the menu bar, and click [System Settings].
2) Click the [Application] tree, and click [Playback].
3) Set each item.
|
[Stop Playback at Frame Drop] |
Stop the playback when playback processing cannot keep up with the playback speed. |
|
[Playback Buffer Size] |
Specify the size of the buffer used for realtime playback. |
|
[Buffered Frames Before Playback] |
Set the number of frames buffered when starting playback. When playback stops because it cannot keep up with the speed just after playback is started, the situation may be improved by increasing the number of frames. |
4) Click [OK].
You can continue to set other items by clicking [Apply].
Set EDIUS capture operations, processing at automatic detection of events, and other operations.
1) Click [Settings] on the menu bar, and click [System Settings].
2) Click the [Application] tree, and click [Capture].
3) Set each item.
|
[Margin] |
Set the length of the margin added at In and Out points at capture operation. |
|
[Confirm Reel Name Setting after Setting Device Preset] |
After a device preset is selected in the [Select Input Device] dialog box at a capture operation, the dialog box for setting the reel name appears. |
|
[Confirm File Name at Capture] |
Check and set the file name at a capture operation. If you select [Before Capture], you can set the destination and file name before performing capture. If you select [After Capture], you can set the destination and file name after capture is finished. |
|
[Load to Player after Capture] |
Play back the file created after capture automatically. |
|
[Correct Audio Errors Automatically] |
Correct audio errors automatically at a capture operation. |
|
[Set file names for 2 file Capture] |
If you create 2 files for the L side (for left eye) and the R side (for right eye) with 2 streams at stereoscopic source capture, set the suffix for the file name for L and R sides. |
|
[Automatic Detection of Capture Events] |
Select the conditions for automatically inserting cuts in files at capture operation. Cut insertion conditions are as follows:
[When an Event is Detected] Select how cut positions are processed. If you select [Divide Files], files are divided at the cut position. If you check [Group Divided Files as Sequence], multiple divided files are registered to the bin as a single sequence clip. If you select [Add Marker], a clip marker is set at the cut position. |
|
[Deck Control after Capture] |
Select the deck state after capture operation from the list. |

Set voice over margins at [Margin] under [Capture].
4) Click [OK].
You can continue to set other items by clicking [Apply].
Set the reference of rendering options or the timing to delete rendering files.
1) Click [Settings] on the menu bar, and click [System Settings].
2) Click the [Application] tree, and click [Render].
3) Set each item.
|
[Render Options] |
Set the conditions of a rendering option (load area). For example, if you check [Filters] and a rendering option is set, when a filter is applied to a clip placed on the timeline, the area of that clip changes color to orange. By unchecking [Filters], the area will not change color to orange. By default, all items below are checked. [Filters] Select video filters as the rendering target. [Transition/CrossFades] Select transitions and title mixers as the rendering target. [Key/Transparency] Select key effect and transparency (when changed from the default) as the rendering target. [Speed Change] Select clips that feature any speed adjustments from the default value of 100% as the rendering target. [Contents that are not in the Project Format] Select clips matching any of the following formats as the rendering target:
|
|
[Render Decisions] |
A loaded area is determined when the buffer becomes less than the set value in [Buffer Left: Fewer than] while playback. [Buffer Left: Fewer than] Set the left of buffer value to be referenced for rendering decisions. |
|
[Delete Invalid Rendered Files] |
Select the timing to delete rendering files. |
4) Click [OK].
You can continue to set other items by clicking [Apply].
Register editing environments as profiles and manage these profiles.
Editing Environment Management
Create new project presets and manage project presets or project templates.
Project Preset/Project Template
Set the transfer destination used when importing a file from the source browser.
1) Click [Settings] on the menu bar, and click [System Settings].
2) Click the [Application] tree, and click [Source Browser].
3) Set each item.
|
[File transfer folder] |
Specify the transfer destination of the file. If [Custom folder] is selected, click [Browse] and specify a transfer destination. |
|
[Create folder with date] |
Check this item to create the date folder in the folder set in [File transfer folder]. |
|
[File transfer folder path] |
Display the path of the transfer destination. “%MediaType%” is the name of the source media to be transferred by the source browser. |
4) Click [OK].
You can continue to set other items by clicking [Apply].
Make a setting to delete the last frame when exporting a file in 720/60p or 720/50p so that the number of the frames will be even. This setting is applied to export and batch export operations.
1) Click [Settings] on the menu bar, and click [System Settings].
2) Click the [Application] tree, and click [File export].
3) Set each item.
|
[Round off to even frame when exporting 60p/50p.] |
Check this item to delete the last frame when exporting a file in 60p/50p so that the number of the frames will be even. |
4) Click [OK].
You can continue to set other items by clicking [Apply].
If the updated EDIUS is released, the update information is automatically notified at the startup of EDIUS.
1) Click [Settings] on the menu bar, and click [System Settings].
2) Click the [Application] tree, and click [Check for updates].
3) Set each item.
|
[Check for online EDIUS updates.] |
Check this item to automatically notify of the release of the updated EDIUS at the startup. |
4) Click [OK].
You can continue to set other items by clicking [Apply].
|
[To update, click here.] |
Click this item to download the updater. |
|
[Do not show this message for 30 days.] |
Check this item not to automatically notify of the release of the updated EDIUS for the next 30 days. |
 Alternative
When an updated EDIUS has been released, the [Update Notification] dialog box can be displayed by starting up EDIUS, and then clicking [Help] → [Check for updates] on the menu bar.
If the [Update Notification] dialog box is not displayed, you are using the updated EDIUS.

 : Indicated for system preset color spaces preinstalled on EDIUS. Editing is only allowed for preset names, and the presets cannot be deleted.
 : Indicated for user preset color spaces added by the user.
 that allows editing of the preset name.
