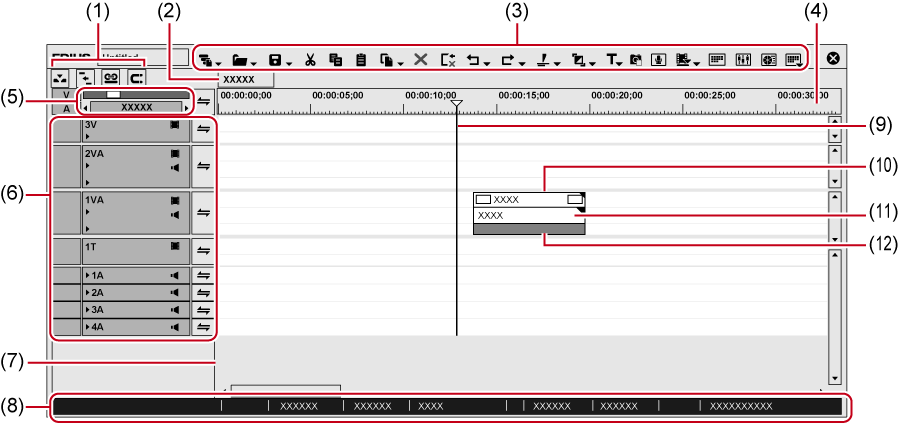
This window is used to place the clips on the track or apply effects.
Clips are placed from left to right of the timeline in time series.
|
(1) |
Mode bar |
These buttons are used to switch the editing modes. The button types and sort order can be customized. |
|
(2) |
Sequence tab |
Tab for using clips on the timeline as a set |
|
(3) |
Operation buttons |
These buttons are used for editing operations. The button types and sort order can be customized. |
|
(4) |
Time scale |
Indicate the scale for the time on the timeline. |
|
(5) |
Time scale settings |
Change the display unit for time scale. |
|
(6) |
Track header |
Configure various settings including muting and locking each track, mapping channels, synchronizing channels. It can be used to add and delete tracks. |
|
(7) |
Timeline |
Place clips in this area. It can also be used to add and delete tracks. |
|
(8) |
Status bar |
Display the number of imported files when a project is opened/number of all files, the number of offline clips, clip playback status, editing mode, and background job status, etc. Move the cursor over the mode bar or timeline operation buttons to display the button names on lower left. |
|
(9) |
Timeline cursor |
Indicate the playback position or edit position of the timeline. |
|
(10) |
Video part |
Indicate the presence of video in the clip. |
|
(11) |
Audio part |
Indicate the presence of audio in the clip. Expand it to display a rubber band to adjust the volume or pan. |
|
(12) |
Mixer area |
Configure keying and other settings. |
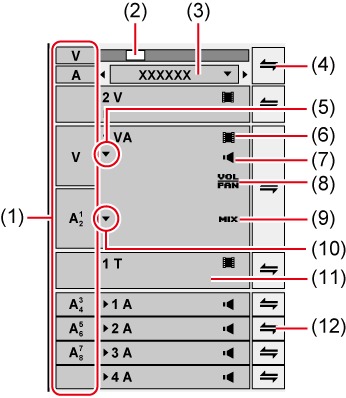
Time scale settings and track settings of timeline are performed in this area.
|
(1) |
Track patch |
When a clip is displayed on the Player or a clip is selected in the bin, the channels that the clip has (source channels) are displayed on the track patch. |
|
(2) |
Time scale slider |
Change the display unit by dragging the slider. Move the slider to the left to reduce the display unit, or to the right to increase it. |
|
(3) |
Time scale settings |
Change the display unit for time scale. Click the center area to toggle the specified display unit and [Fit].
|
|
(4) |
Batch lock panel |
Click this to set sync-lock for all tracks on/off. |
|
(5) |
Audio expand button |
Click this button to display the rubber band for the audio. [Alt] + [S] |
|
(6) |
[Video Mute] |
When mute is set, the video part of the track is not played back. The video part and mixer area of the clip on a muted track is displayed in gray. [Shift] + [W] |
|
(7) |
[Audio Mute] |
When mute is set, the audio part of that track is muted. The audio part and volume/pan part of the clip on a muted track is displayed in gray. [Shift] + [S] |
|
(8) |
[Volume/Pan] |
Switch between the volume adjustment mode and the pan adjustment mode. |
|
(9) |
[Mixer] |
Switch the transparency adjustment mode on/off. |
|
(10) |
Mixer expand button |
Click this button to display the rubber band for the transparency. |
|
(11) |
Track panel |
Click this to switch the select/deselect setting for the track. |
|
(12) |
Lock panel |
Click this to set sync-lock on/off for a specified track. Right-click on the lock panel, and click [Track Lock] to lock the track. |
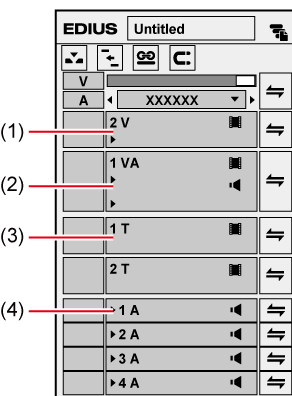
For details on adding, deleting, or moving tracks, see Tracks .
|
(1) |
V track |
Place video, still image, or title clips on this image-only track. If a video clip with audio is placed, the audio part will be cut. |
|
(2) |
VA track |
Video and audio are kept together on this track. Place video, audio, still image, and title clips. |
|
(3) |
T track |
This track is for title clips. Place video, still image, and title clips. Create and place a title clip on this track to overlay the title on the video. |
|
(4) |
A track |
Place audio clips on this audio-only track. If a video clip with audio is placed, the video part will be cut. |
