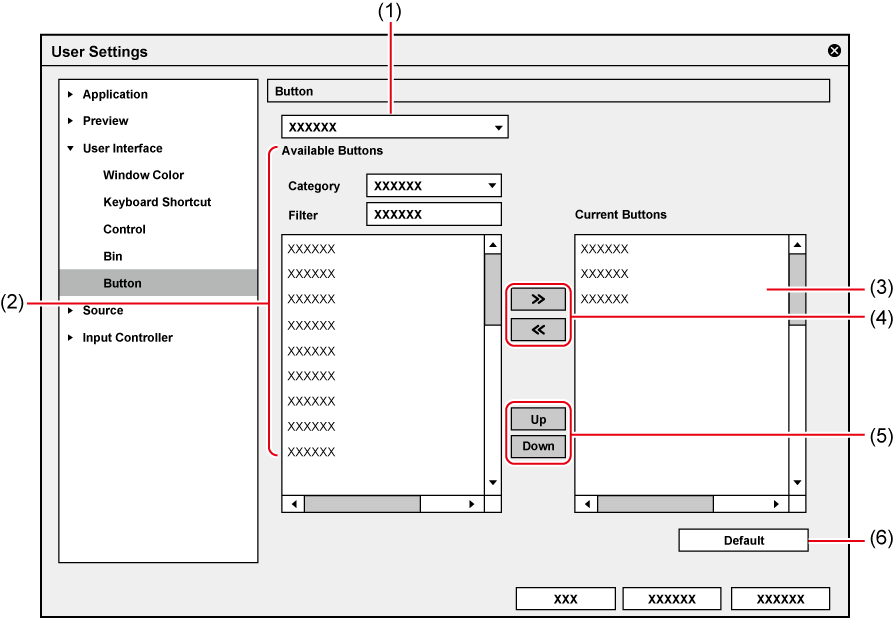
Add, delete and change the placement order of operation buttons that are displayed on screens.
1) Click [Settings] on the menu bar, and click [User Settings].
2) Click the [User Interface] tree, and click [Button].
The [Button] screen appears.
3) Select the area to customize from the list.
4) From the [Current Buttons] list, select the button one position below the insert position.
5) Select the button to add from the [Available Buttons] list, and click [>>].
The selected button is added to the [Current Buttons] list. When [Space] has been added, a space is added between the two buttons.
To delete a button, select the button to delete from the [Current Buttons] list and click [<<]. When [Space] has been deleted, the space between the two buttons is deleted.
To change the position of a button, select the button to move from the [Current Buttons] list and click [Up] or [Down]. Each click of these buttons moves the selected button one place up or down.
6) Click [OK].
You can continue to set other items by clicking [Apply].
 Alternative
To add a button, select the button one place under the insertion position in the [Current Buttons] list, and double-click the button to add from the [Available Buttons] list.
To add a button, drag and drop the button to add from the [Available Buttons] list onto the [Current Buttons] list.
To delete a button, double-click the button to delete from the [Current Buttons] list.
To delete a button, drag and drop the button to delete from the [Current Buttons] list onto the [Available Buttons] list.
To change the position of a button, drag and drop the button in the [Current Buttons] list.
|
|
|---|
|

|
(1) |
Area |
 A: [Player - File (Left)] B: [Player - File (Center - Left)] C: [Player - File (Center - Right)] D: [Player - File (Right)]
[Bin]: Bin window operation buttons [Timeline]: Timeline window operation buttons [Effect]: [Effect] palette operation buttons [Source Browser]: Source browser window operation buttons [Mode Bar]: Mode bar operation buttons [Marker]: [Marker] palette operation buttons |
|
(2) |
[Available Buttons] |
[Category] Select a category to narrow down [Available Buttons]. [Filter] Enter a keyword to narrow down [Available Buttons]. |
|
(3) |
[Current Buttons] |
Displays the buttons to display. |
|
(4) |
[>>]/[<<] |
Add/delete buttons to be displayed. |
|
(5) |
[Up]/[Down] |
Change the position of buttons. |
|
(6) |
[Default] |
Return settings to their defaults. |