You can select a sync point as the reference point to be used when multiple clips are placed, and then place clips on the timeline.
A sync point can be selected from [Timecode], [Audio], [Clip Marker] , [Clip In], etc.
When a synchronized clip is to be placed, you can select either to create a new sequence or to use the currently active sequence.
To place a clip in the bin to the currently active sequence, click on the sequence tab of the sequence to be synchronized to activate it in advance.
To execute [Audio (around the Marker)] or [Clip Marker] for [Sync Point], set a clip marker on each clip in advance. To place a clip in the bin to the currently active sequence, set a sequence marker on the sequence to be synchronized in advance.
1) Select and right-click the multiple clips in the bin, and click [Multicam Sync].
The [Multicam Sync] dialog box appears.
When you place a clip in the bin to the currently active sequence, you can select only one clip in this step.
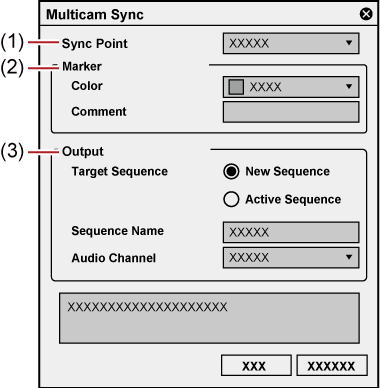
2) Select a reference sync point from the [Sync Point] list.
When you select [Audio (around the Marker)] or [Clip Marker], set [Marker].
3) Select [New Sequence] or [Active Sequence] for [Target Sequence] of [Output].
Select a sequence on which the synchronized clips are to be placed.
Selecting [New Sequence] will create a new sequence in accordance with the current project settings.
Selecting [Active Sequence] will synchronize the currently active sequence with the clip selected in the bin. Clips will be added to the currently active sequence.
When you select [New Sequence], set [Sequence Name] and [Audio Channel].
4) Click [OK].
The clip will be placed on the timeline.
If [Audio] or [Audio (around the Marker)] has been selected for [Sync Point], clicking [OK] will start analysis of audio data. The progress of the analysis process will be displayed, and clips will be placed after completion of the analysis.
The sequence on which the clips are placed differs depending on the setting of [Target Sequence].
When [New Sequence] has been selected for [Target Sequence], multicam mode is set to the sequence.
Clips placed on the timeline are displayed in the multi-camera screen on the Recorder.
The number of the multi-camera screens on the Recorder is determined automatically according to the number of clips selected in the bin.
The camera switch point is automatically set to the In and Out points of each clip. To change the camera switch point, overwrite it.

The currently active sequence and the sequence clip selected in the bin can be synchronized.
Note that the following sequence clips cannot be synchronized with the currently active sequence.
A sequence clip which is identical to the currently active sequence
A sequence clip which includes the currently active sequence
|
|
|---|
|
|
(1) |
[Sync Point] |
Select a sync point as the reference point for clips to be placed. [Timecode] Places clips on the timeline according to the start timecode of each clip. If a clip has no start timecode, the start timecode is assumed to be “00:00:00;00”. [Rec Time] Places clips on the timeline according to the recording time of each clip. If a clip has no start time, the recording time is assumed to be “00:00:00”. (Regardless of the recording date, the recording time will be the reference point.) [Audio] Analyzes audio data of every entire clip, and determines an optimal sync point automatically. Clips are placed on the timeline according to those sync points. [Audio (around the Marker)] Analyzes audio data of each clip in the range of 10 seconds before and after the clip marker set on each clip, and determines an optimal sync point automatically. Clips are placed on the timeline according to those sync points. By limiting the analysis area to the range around the marker, the time for analysis will be shortened significantly. A marker to be the reference point can be set by [Marker].
[Clip Marker] Places clips on the timeline according to the clip marker position of each clip. A marker to be the reference point can be set by [Marker].
[Clip In] Places clips on the timeline according to the In point timecode of the clip. If a clip has no start In point timecode, the top of the clip will be the reference point. [Clip Out] Places clips on the timeline according to the Out point timecode of the clip. If a clip has no start Out point timecode, the end of the clip will be the reference point. |
|
(2) |
[Marker] |
Sets [Color] and [Comment] of the clip marker or sequence marker to be the reference point for synchronization.
[Color] Select the color of the marker to be the reference point for synchronization. [Comment] Enter the text string which exactly matches that of [Comments] for the marker to be the reference point for synchronization. |
|
(3) |
[Output] |
Makes settings of the sequence on which the synchronized clips are to be placed. [Target Sequence]
[Sequence Name] Enter the name of the sequence. [Audio Channel] Select the audio channel from [Monaural] and [Stereo]. |
The audio sync function analyzes audio data such as video clip and audio clip, and automatically determines an optimal sync point to synchronize them.
There are two major methods of audio sync, [Audio] and [Audio (around the Marker)].
[Audio] analyzes audio data of every entire clip.
[Audio (around the Marker)] analyzes audio data of each clip in the range of 10 seconds before and after the clip marker set on each clip. By limiting the analysis area to the range around the marker, the time for analysis will be shortened significantly.
To execute [Audio (around the Marker)] in [Sync Point], set a clip marker on each clip in advance. The marker position functions as a reference point for the range of audio data analysis. An analysis is performed in the range of 10 seconds before and after the marker.
If a clip in the bin is placed onto the currently active sequence, the clip marker of the clip selected in the bin and the sequence marker set on the sequence will be the reference points for analysis.
To set a clip marker to be the reference point for analysis
1) Set a clip marker on a clip to be used for multicam editing.
Set a clip marker on a position of a characteristic sound that is commonly included in all the clips, such as the start of music.
2) Set [Color] and [Comments] for the clip marker of each clip.
Set [Color] and [Comments] of the clip marker to be the reference point of analysis.
The clip marker with the exact same setting as that for [Marker] in the [Multicam Sync] dialog box will be analyzed.
Even if [Comments] is not entered, synchronization will be performed.
To place a clip in the bin onto the currently active sequence, set a sequence marker on the sequence to be synchronized in advance, and then set [Color] and [Comments].
This section describes how to synchronize clips using the audio sync function.
To place a clip in the bin to the currently active sequence, click on the sequence tab of the sequence to be synchronized to activate it in advance.
To execute [Audio (around the Marker)] in [Sync Point], set a clip marker on each clip in advance. To place a clip in the bin to the currently active sequence, set a sequence marker on the sequence to be synchronized in advance.
1) Select and right-click the multiple clips in the bin, and click [Multicam Sync].
The [Multicam Sync] dialog box appears.
When you place a clip in the bin to the currently active sequence, you can select only one clip in this step.
2) Select [Audio] or [Audio (around the Marker)] from the [Sync Point] list.
If [Audio] is to be executed, proceed to step 4) .
3) For [Marker], set [Color] and [Comment] of the marker to be the reference point for analysis.
Set [Color] and [Comment] which exactly match those of the marker set for each clip in advance.
4) Select [New Sequence] or [Active Sequence] for [Target Sequence] of [Output].
Select a sequence on which the synchronized clips are to be placed.
Selecting [New Sequence] will create a new sequence in accordance with the current project settings when the audio data analysis is completed.
Selecting [Active Sequence] will synchronize the output audio in the currently active sequence with the clips selected in the bin. Clips will be added to the currently active sequence.
When you select [New Sequence], set [Sequence Name] and [Audio Channel].
5) Click [OK].
The analysis of audio data will start. The progress of the analysis process will be displayed, and clips will be placed on the sequence when the analysis is completed.
After [Audio (around the Marker)] has been selected for [Sync Point], if a clip or sequence has no marker to be subject to synchronization, the entire clip or sequence will be analyzed.
If the number of audio channels exceeds the maximum limit of output channels in the project settings, the excess of the audio channels will not be placed in the sequence.
If the number of audio channels in a clip exceeds the maximum limit that can be placed, a message will appear before the analysis of audio data starts. Click [Continue] to delete the audio channels that exceed the maximum limit for output, and then place the clip in the sequence.
If [Audio] or [Audio (around the Marker)] has been selected for [Sync Point], multiple sequences may be created, in such a case when multiple groups with different sync points are detected in audio data analysis.
For example, if a performance by a band is recorded in multi-camera recording by three cameras, in which four songs are performed and recording is stopped on each camera every time a song is finished.
When the recorded data is imported to EDIUS, 12 clips will be registered to the bin. If you select all the 12 clips in the bin and execute audio sync, automatic distinction of scenes will be performed based on the sync point information obtained from analysis.
After the analysis is completed, four sequences, each including three clips, will be created.
Clips that have an identical reel name will not be analyzed for each other. Clips with an identical reel name are placed on the same track on the sequence.
In case multiple sequences are created, the sequence names are given as follows.
The following are examples of three sequences created when [Sequence Name] of [Output] is set to “Multicam1” in the [Multicam Sync] dialog box.
The name of the first sequence: “Multicam1”
The name of the second sequence: “Multicam1(2)”
The name of the third sequence: “Multicam1(3)”
You can switch the mode of the currently active sequence to the multicam mode.
1) Click [Mode] on the menu bar, and click [Multicam Mode].
The preview window switches from the standard mode to the multicam mode.
When the preview window is displayed in the dual mode, the left side is the divided screen corresponding to the number of cameras, and the right side is the master (selected camera).
When the preview window is displayed in the single mode, the screen is the divided screen corresponding to the number of cameras. The screen can also be set to display only the master.
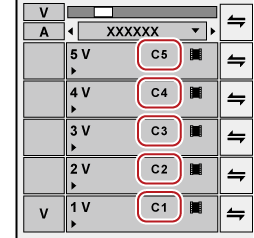
[Camera mapping] is displayed on the track panel of the timeline window.
 Alternative
Switching to the multicam mode: [F8]
When the mode is switched to the multicam mode with clips placed on the timeline, the camera switch point is automatically set to the In and Out points of each clip. To change the camera switch point, overwrite it.
When the preview window is displayed in the single mode, the display can be switched between the selected camera only display and the divided screen. Click [Mode] on the menu bar, and click [View Multicam] → [Show Only the Selected Camera in Single Monitor Mode].
The multicam mode can be switched to the standard mode by the following operation.
Click [Mode] on the menu bar, and click [Normal Mode] or [Multicam Mode].
Press [F8] on the keyboard again.
Switching to standard mode: [F5]
Operations on clips or tracks in the multicam mode are the same as in the standard mode, however, shortcut keys differ from those in the standard mode.
|
|
|---|
|
You can switch the number of multicamera screens on the Recorder.
1) Click [Mode] on the menu bar, and click [Number of Cameras] → an item.
You can change the camera assigned to each track.
When clips have been placed on the timeline in the multicam mode, cameras are assigned in the track number order of V/A tracks containing clips.
1) Click [Camera mapping] on the track panel of the V/A track.
2) Click the camera to assign to the selected track.
Click [Unmap] to release the assignment set to the selected track.
Click [Default] to initialize all camera assignments set to the tracks. Cameras will be reassigned in order of track numbers of the V track. Camera assignment to the A track will be released.
[Camera mapping] is displayed only in the multicam mode.
Tracks not assigned a camera are not displayed in the multicam mode.
You can change camera assignments during editing.
You can switch the display/hide setting for the track name at the upper left of each screen of the multicam mode. Click [Mode] on the menu bar, and click [View Multicam] → [Display Track Name] to uncheck the item.
Set the preview display during editing in the multicam mode.
1) Click [Mode] on the menu bar, and click [View Multicam] → an item.
On items are checked.
|
[Skipped Frames] |
Increase the skipped frames to reduce the load on the system during playback. |
|
[Apply Video Filter] |
Batch-switch the disabled (on)/enabled (off) setting of the video filter applied to clips. Temporarily disabling the video filter can reduce the load on the system during playback. |
|
[Display Track Name] |
Switch the show/hide setting for track names assigned to the divided screen. |
|
[Display Only the Selected Camera on Full Screen Preview (Auto)] |
When this item is on, only the video of the selected camera (master) is displayed in displays whose full screen view setting is set to [Auto]. When this item is off, the divided screen is displayed. |
|
[Output the Selected Camera to External Monitor] |
When this item is on, only the video of the selected camera (master) is displayed on the external monitor. When this item is off, the divided screen is displayed. |
|
[Show Only the Selected Camera in Single Monitor Mode] |
This item is enabled when the preview window is in the single mode. When this item is on, only the video of the selected camera (master) is displayed. |

