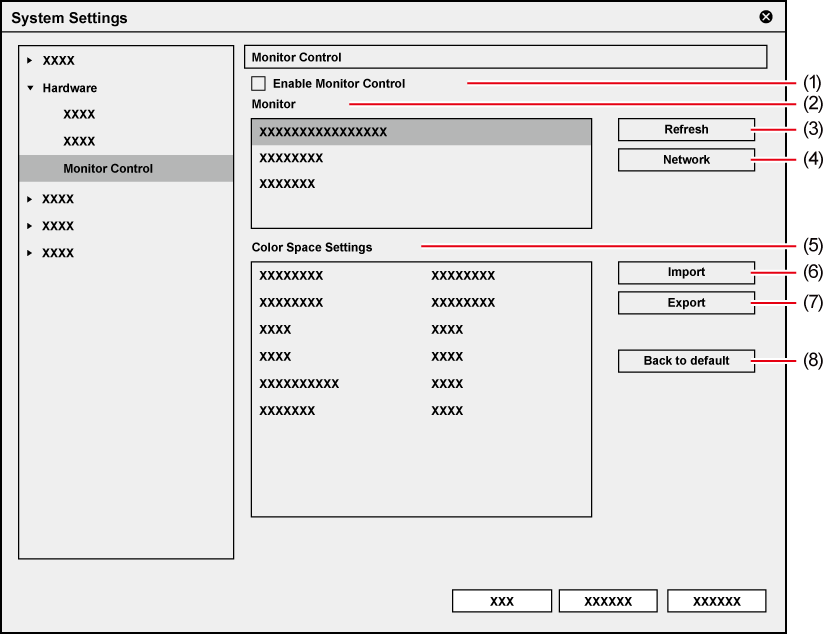
Register external devices used for capture or tape output, or set external devices that are used for preview during editing.
It links the color mode of the monitor connected with the PC where EDIUS is installed to the setting of [Color Space] in [Project Settings].
If multiple monitors are connected, all the monitors are controlled collectively.
The monitors that support monitor control can be confirmed in [Monitor] in the [Monitor Control] screen.
Monitors that satisfy the following conditions can be controlled.
Those connected to the PC via USB or LAN.
Those compatible with monitor control.
1) Click [Settings] on the menu bar, and click [System Settings].
2) Click the [Hardware] tree, and click [Monitor Control].
The [Monitor Control] screen appears.
3) Set each item.

|
(1) |
[Enable Monitor Control] |
Check this item to enable monitor control. |
|
(2) |
[Monitor] |
Display supported monitors in a list. Connected monitors are displayed in white characters, and monitors that are not connected are displayed in gray characters. |
|
(3) |
[Refresh] |
Update the information of monitors connected. |
|
(4) |
[Network] |
Click this item to display the [Network] dialog box to add a monitor to connect. |
|
(5) |
[Color Space Settings] |
Set monitor operation to link with the settings in [Color Space] of [Project Settings]. [Color Space] settings are displayed on the left, and the color modes of the monitor are displayed on the right.
Select a monitor to make settings in [Monitor], and select the color mode of the monitor for each [Color Space] in [Color Space Settings]. The color mode of the monitor can be changed by clicking
|
|
(6) |
[Import] |
Import the setting file (XML format) of [Color Space Settings]. |
|
(7) |
[Export] |
Export [Color Space Settings] of the monitor selected in [Monitor] to a setting file (XML format). |
|
(8) |
[Back to default] |
Restore the the settings for [Color Space Settings] of the monitor selected in [Monitor] to the default. |
|
[Server List] |
Display a list of addresses of monitors to output. |
|
[Add] |
Click this item to display the [Monitor setting] dialog box to add a monitor to connect. |
|
[Delete] |
Delete monitors from [Server List]. |
|
[Modify] |
Change the monitor settings. |
|
[Move Up]/[Move Down] |
Sort the monitors.
|
|
[Settings] |
Display the settings of the monitor selected in [Server List]. |
|
[Name] |
Enter the name set for the monitor. |
|
[Address] |
Enter the IP address or server name of the monitor. |
|
[Connection Test] |
Click to start a connection test. |