EDIUS 7 Online Help
Reference ManualHardware Setup Guide
Installation Manual
User Guide
Convert the edited clip to a format to be exported to an HDV device (MPEG-TS format), and export the converted file to the HDV device.
 Note
NoteBefore exporting, make sure to save your project.
Exporting Files with an Exporter
The [HDV] dialog box appears.
|
[Segment Encode]
|
Check this item to export a clip of a raw source without re-encoding. This increases the output speed. If the frame rate of the export format is 23.98p, segment encode is not available. [Quality/Speed]
Select the quality of the part to be re-encoded from the list. The higher the quality, the more time it takes to be encoded. |
|
[Gop Type]
|
Only displayed when the export format frame rate is 23.98p. Select the format from [HDV24p Record (Canon XL-H1, Sony HVR-Z7 etc.)] or [HDV24p Scan (Sony HVR-V1, HDV1080i devices)]. |
|
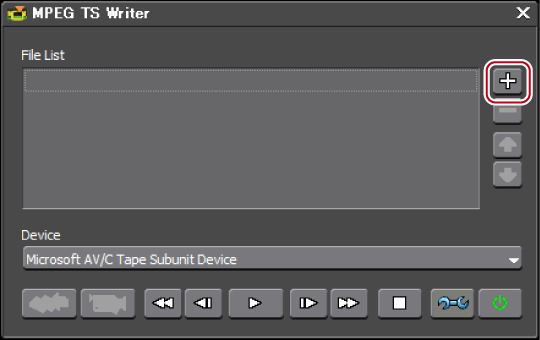
[Launch MPEG TS Writer after export]
|
Check this item to start up MPEG TS Writer automatically after export to file. |
|
[Tape out after export]
|
Becomes enabled when [Launch MPEG TS Writer after export] is checked. If checked, the data in the generated file is printed to tape with MPEG TS Writer. |
A file is produced and registered in the bin.
Set the HDV device to video mode (PLAY/EDIT, etc.).

If your HDV device supports the HDV mode, set the device to the HDV mode. For more information on settings, see the instruction manual for your HDV device.
 Alternative
Click [Tool] in the bin, and click [MPEG TS Writer].
NoteIf the HDV camera is not recognized, check the items in [Sound, video and game controller] on the Device Manager. The camera is recognized correctly on Windows if the device name is displayed. If it is not recognized, check that Windows is updated, and that the HDV camera is set to the HDV fixed mode (HDV-DV conversion is off).
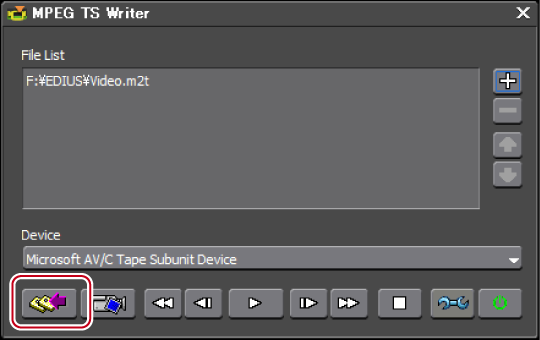
Printing starts.

If you click [Preview], the video will be output from the component output of the HDV camera. (not recorded to tape.)

You can output data to DV devices.
NoteYou need to register the export destination DV device as a device preset in advance.
Output cannot be performed if the output format in the registered device preset for the DV device differs from the current project settings.
Set the DV device to video mode (PLAY/EDIT, etc.).
 Alternative
Click [File] on the menu bar, and click [Export] → [Print to Tape] or [Print to Tape (Display Timecode)].
Exporting to tape: [F12]
If the message [There is no output preset to match the project settings.] is displayed, configure the project settings and device preset format again.
The device presets that can be output with the current project settings are displayed.
To specify the start position to print to tape, check [Rec In] and enter the timecode. If you click [Cue Up], the tape will cueup to the position of the entered timecode.
Starts timeline playback and export.
The [Print To Tape] dialog box disappears when the export finishes.
Click [Cancel] to abort the export.
If In and Out points have been set on the timeline, that range will be exported.
To export projects created in the stereoscopic edit mode to tape, you must first register the corresponding device preset. Set the export method in the [Output H/W, Format Settings] screen for device presets.
Registration of Device Presets
Combine and export the video of the L and R sides of the project to tape.
Select the following items in the [Settings - Stereoscopic Setting] screen for device presets:
[L Only]
[R Only]
[Side by Side]
[Top and Bottom]
[Line Interleave]
[Blend]
[Anaglyph]
[Difference]
[Split Grid]
The operation procedure is the same as regular export to tape.
Exporting to a DV Device (Generic OHCI)
Export the video of the L and R sides of the project to separate tape.
Select [Yes] in [Stereoscopic Separate L/R Clips] for device presets.
Exporting to a DV Device (Generic OHCI)
The message [Insert L tape] is displayed after step 7.
Export of L side data is started.
When export ends, the message [Insert R tape] is displayed.
Export of R side data is started.
The [Print To Tape] dialog box disappears when the export finishes.
Click [Cancel] to abort the export.
If In and Out points have been set on the timeline, that range will be exported.
You can output data to analog devices, etc.

Export of the data starts.

Export of the data stops.
You can export clips edited with EDIUS to an AJ-HD1400 or AJ-HD1200A connected to the PC via an IEEE1394 cable.
NoteYou need to register the export destination VARICAM device as a device preset in advance.
Export cannot be performed if the output format of the device preset for the VARICAM device differs from the current project settings.
The audio sampling rates will differ for frame frequencies of 59.94 Hz and 60.00 Hz.
If the frame rate is changed in 1 shot, the lip sync will be out of sync. If necessary, sync the lip sync with waveform editing software then export.
AlternativeClick [File] on the menu bar, and click [Export] → [Print to Tape] or [Print to Tape (Display Timecode)].
Exporting to tape: [F12]
If the message [There is no output preset to match the project settings.] is displayed, match the device preset format to the project settings.
The device presets that can be export with the current project settings are displayed.
To specify the start position to print to tape, check [Rec In] and enter the timecode. If you click [Read TC from VCR], you can import the current timecode from the tape.
Timeline playback and export start.
The [Print To Tape] dialog box disappears when the export finishes.
Click [Cancel] to abort the export.
If In and Out points have been set on the timeline, that range will be exported.
