EDIUS 7 Online Help
Reference ManualHardware Setup Guide
Installation Manual
User Guide
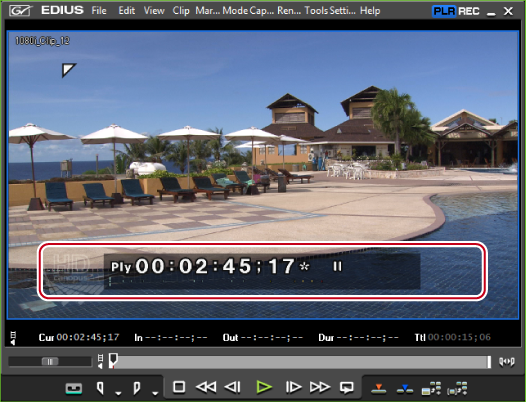
The following explains how to change the display of the preview window.
You can switch the preview window between the single mode or dual mode.
The display of the preview window switches to single or dual mode.

To switch between the Player and Recorder in the single mode, click [Change to Player] or [Change to Recorder].
You can switch between the Player and Recorder by the following shortcut keys:
Switching to the Player: [Ctrl] + [Alt] + [P]
Switching to the Recorder: [Ctrl] + [Alt] + [R]
Switching to the Player/Recorder: [Tab]
Video displayed in the preview window can be displayed in full screen view.
Assign in advance which video, such as Player or Recorder video, or video from a selected camera in the multicam mode, is to be displayed in full screen view on each monitor connected to your PC.
 Note
NoteThe occurrence of combing (vertical comb-like stripes) is normal when interlaced images are previewed in full screen view.
When previewing on a PC, the same quality as in hardware preview out cannot be assured. Since there is a difference between refresh rate of a PC monitor and the internal frame refresh rate of EDIUS, the same field may be displayed multiple times in the preview window and fields that should be displayed may not be displayed. Also, the same phenomenon may sometimes occur at a non-uniform display frequency depending on the performance of the CPU or GPU.
When [All] is clicked, all monitors that have been set to full screen view at [Preview] in [User Settings] → [Monitor] can be displayed as full screen view.
 Alternative
Double-click the preview window.
Perform the following to cancel full screen view:
Click [View] on the menu bar, and click [Full Screen Preview] → monitor number.
Double-click the monitor set to full screen view.
The preview window can be displayed rotated by 90 degrees.
When [All] is clicked, all monitors that have been set to full screen view at [Preview] in [User Settings] → [Monitor] can be displayed in full screen view.
Click [View] on the menu bar, and click [Rotate Preview] → [Standard] to return the window to its original state.
Rotation of the preview can be set to each individual sequence. To maintain rotation of the preview when a project is next opened, set rotation of the preview as desired to each sequence, and then save the project.
When a new project or sequence is created, the orientation of the preview window will be standard (i.e. rotation off).
Switch the show/hide setting for the safe area, center, and zebra preview.
You can change the information display settings from [Preview] in [User Settings] → [Overlay].
The selected information is displayed in the preview window.
Player
 Alternative
Showing/hiding safe area: [Ctrl] + [H]
Showing/hiding center: [Shift] + [H]
When [Marker] is selected as a display item, the clip marker comment is displayed on the Player only when the slider is directly above the clip marker. Also, on the Recorder, the sequence marker list is displayed only when the timeline cursor is directly above the sequence marker. Note, however, that these are not displayed during playback.
Switch the show/hide setting for the status area.
You can change the settings of items displayed in the status area from [Preview] in [User Settings] → [On Screen Display].
Select whether to display on not just the PC screen but also the external monitor. Click [PC Monitor/External Output] or [PC Monitor].
Player
When the status bar is displayed, a white triangle indicating the start or end frame is also displayed at the upper left or upper right corner of the safe area.
 Alternative
Showing/hiding status area: [Ctrl] + [G]
You can set the display item or the size of the timecode/shuttle/slider/buttons.
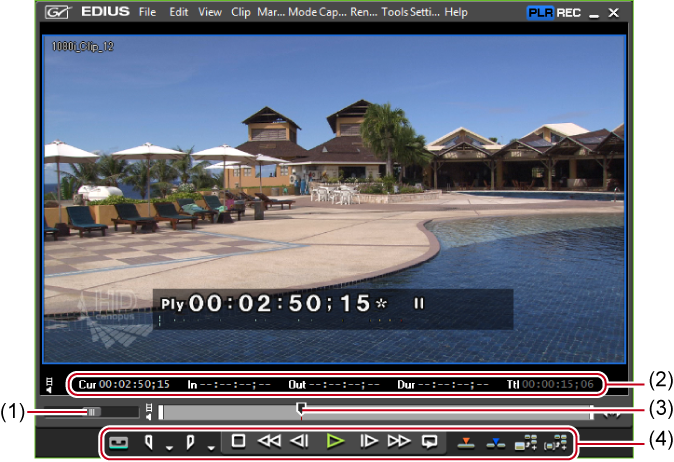
The [User Settings] dialog box appears.
|
[Show Timecode]
|
Check the timecode items to display in the preview window, and set their size. |
|
[Shuttle/Slider]
|
Set the show/hide setting for the shuttle and slider in the preview window. |
|
[Button]
|
Set the show/hide setting and the size of the operation buttons on the preview window. |
You can continue to set other items by clicking [Apply].
You can switch the display of the preview window to each field when playback is stopped.
Turn the video with alpha channel to gray scale and display in the preview window.
You can switch the preview window display in the stereoscopic edit mode.
The following types of stereoscopic processing that displays stereoscopic video in a single frame are available.
|
[L Only]
|
Display only the L side video (for left eye). |
|
[R Only]
|
Display only the R side video (for right eye). |
|
[Difference]
|
Display the color converted to the difference value between the L side and the R side video. |
|
[Blend]
|
Display video with the L side and the R side blended with 1:1 ratio. |
|
[Top and Bottom]
|
Display the L side video on the upper half of the frame and the R side video on the lower half. |
|
[Anaglyph]
|
Display the L side video in red and the R side video in blue. |
|
[Line Interleave]
|
Display the L side video on the upper line of the scanning line and the R side video on the lower line of the scanning line. Use this setting when displaying video on the 3D monitor with the polarization system. |
|
[Side by Side]
|
Display the L side video on the left half of the frame and the R side video on the right half. |
|
[L/R Dual Stream]
|
Display the stereoscopic video using NVIDIA 3D VISION or Intel Intru 3D. This item can be used when your system supports NVIDIA 3D VISION or Intel Intru 3D. Check [Using NVIDIA 3D VISION/Intel InTru 3D] from [Preview] → [Monitor] in [User Settings]. |
|
[Split Grid]
|
Display the L side video and the R side video in the white and black area on the checkerboard respectively. Use this setting when displaying video on the DPL-based 3D monitor. |
