You can register exporters and ranges to be exported as a batch list, to export multiple ranges together that have been registered as a batch list.
You can specify exporters and ranges to be exported and register them in a batch list.
1) Set the In and Out points of a range to be exported.
2) Select an exporter in the [Print to File] dialog box, and click [Add to Batch List].
|
|
|---|
|
 Alternative
After setting the In and Out points of a range to be exported, click [Export] on the Recorder, and click [Add to Batch Export].
After setting the In and Out points of a range to be exported, right-click the time scale and click [Add to Batch Export].
After setting the In and Out points of a range to be exported, click [File] on the menu bar, and click [Export] → [Add to Batch Export].
After setting the In and Out points of a range to be exported, right-click in the export list of the [Batch Export] dialog box and click [New].
3) After setting the export details, specify a file name and export destination and click [Save] or [OK].
Click [Save] or [OK] to register in the batch list.
The export contents differ depending on the exporter.
If you want to add multiple ranges from within a single project to the batch list, repeat the operations to set In and Out points and add to the batch list.

After setting the In and Out points of a range to be exported, you can right-click the time scale and select [Add to Batch Export (Default Exporter)] → a default exporter to use. After setting the In and Out points of a range to be exported, you can also click [Export] on the Recorder and select [Add to Batch Export (Default Exporter)] → a default exporter to use.
The file name and save destination are automatically set as follows. (When no default exporter is set or when [Export] is disabled, [Add to Batch Export (Default Exporter)] cannot be selected.)
File name: Exp MonthDay_000 (3-digit sequential number) + extension
Save destination: Project folder
After setting the In and Out points of a range to be exported, if you right-click the time scale and click [Add to Batch Export (Project format)], the specified range is added to the batch list with the format specified in [Render format] of the [Project Settings] (Detailed Settings) dialog box. In this case, the file name and destination are set automatically as shown below: [Add to Batch Export (Project format)] cannot be selected when [Export] is disabled.
File name: Exp MonthDay_000 (3-digit sequential number) + extension
Save destination: Project folder
The content of the batch list can be changed in the [Batch Export] dialog box.
You can export multiple ranges registered in the batch list together.
1) Click [Export] on the Recorder.

2) Click [Batch Export].
The [Batch Export] dialog box appears.
Alternative
Click [File] on the menu bar, and click [Export] → [Batch Export].
3) Check the item to be exported, and click [Export].
The rendering job will be registered to the Render Service. When registration to the Render Service has been completed, the checkbox in the [Batch Export] dialog box will be unchecked. An indication appears on the PC screen to notify that rendering will be started.
Registered rendering jobs are processed in the background in a sequential order of the predetermined priority. The progress of the rendering process can be checked on GV Job Monitor.
If [Add to Bin] has been checked in the [Batch Export] dialog box, the rendering clip will be registered to the bin. The color and indication of a rendering clip changes according to the rendering process status.
The color of the GV Job Monitor icon on the status bar turns to purple while a batch export rendering job is being processed.
When the rendering process has been finished, an indication appears on the PC screen to notify that rendering has been finished. The color of the icon on the status bar returns to its original state.
Even if the project file is closed before the rendering process is completed, the process of the rendering job will be continued.
After setting the In and Out points of a range to be exported, you can register a new range for export by right-clicking on the export list and clicking [New].
If you right-click the export list and click [Select All], you can select all ranges registered for export. Check one of multiple selected items to check all the selected items.
If you right-click an item on the export list and click [Change Exporter], you can change the exporter. You can change the exporter for multiple selected items. However, if those items include an exporter for which the file name cannot be set, such as the P2 exporter, changes will be applied to all selected exporters excluding that exporter.
Clicking [OK] on the notification of start/finish of file export will display GV Job Monitor ([Job] palette). Clicking [Close] will close the notification.
The notification for start/finish of file export will be indicated in accordance with the setting of the [Notification] check box in GV Job Monitor, as well as the Windows configuration.
|
|
|---|
|
|
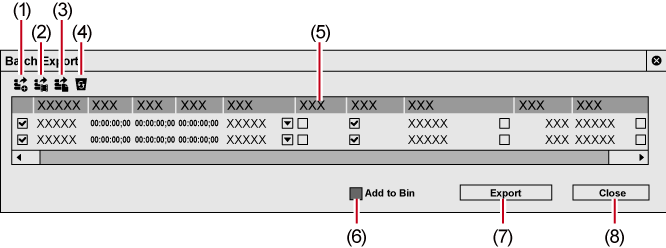
(1) |
[Add to Batch Export] |
When this button is clicked while a range to be exported is selected, the [Print to File] dialog box appears. An item is added to the batch list when you configure export settings. |
|
(2) |
[Add to Batch Export (Default Exporter)] |
When this button is clicked while a range to be exported is selected, an item is added to the batch list. The exporter will be set to [1] in [Current default]. |
|
(3) |
[Add to Batch Export (Project format)] |
When this button is clicked while a range to be exported is selected, an item is added to the batch list. The rendering format will be set to [Render format] in the project settings. |
|
(4) |
[Delete Batch Export item] |
When this button is clicked while an item is selected on the list, the item is deleted from the batch list. |
|
(5) |
Export list |
Displays the batch list to which items have been added, where you can check and change the export content. Check the items to be exported. [Sequence] Displays sequence names. [In]/[Out]/[Duration] Click the values to edit them. If the Out point is set before the In point or the In point exceeds the clip range, it is displayed in red and export cannot be performed. [Stereoscopics processing]
Click
[Show TC] Check this item to export sequences with their timecodes displayed. [Waveform Cache] Check this item to create waveform cache (waveform representation of audio). This setting may not be available depending on the selected exporter. [Exporter] Click on the icon to the right of the exporter name column to display the [Print to File] dialog box. [File Size] Displays the file size. If the total size of the file to be exported exceeds the free space in the export destination, a warning dialog box may appear and the export cannot be performed. The displayed file size is only a guide. The size of the file to be exported will change dependent on the video content and the selected exporter. [File Name] Click on the icon to the right of the file name column to change the file name, export destination and export content. |
|
(6) |
[Add to Bin] |
Check this item to register the exported files to the bin. When the batch export rendering job is registered to the Render Service, a rendering clip will be registered to the bin. The color and indication of a rendering clip changes according to the rendering process status. |
|
(7) |
[Export]/[Cancel] |
Start an export. The button changes to [Cancel] during export, and click it to cancel the export. |
|
(8) |
[Close] |
Close the [Batch Export] dialog box. |
You can delete ranges registered in the batch list.
1) Click [Export] on the Recorder.
2) Click [Batch Export].
The [Batch Export] dialog box appears.
3) Select an item to delete and click [Delete Batch Export item].
If you remove the check from export range items in the [Batch Export] dialog box, you can exclude those items from the export without deleting the items.


 to change the format of stereoscopic processing. Selectable items differ depending on the selected exporter.