
Click a transition in the [Effect] palette and select an animation to display the animation and confirm its movement.
Planar movement transitions. You can also call upon and apply a preset from the settings dialog box of each transition.
Transitions the video with a movement like the hands on a clock.
Transitions the video with an expanding circle.
Transitions the video in striped parts.
Transitions while expanding video B.
Transitions by inserting video B from a specified direction.
Gradually transitions from video A to video B. This is set as the default transition in the initial settings.
Transitions by inserting video B in stripes from the left and right sides (top and bottom sides).
Video B is revealed in stripes that slide in from left and right sides (top and bottom sides).
Video B is revealed in blocks that snake around video A.
Video A is slid out and video B slides into the screen in stripes that move towards the left and right sides.
Transitions in a way where video B appears to push video A off the screen.
Transitions the video with an expanding rectangle.
Transitions by sliding video B in from a specific direction.
Three-dimensional movement transitions. You can also call upon and apply a preset from the settings dialog box of each transition.
In addition to a normal dissolve, you can set the light, shadow, movement, etc.
A cube with video A and video B displayed on its sides rotates to transition from video A to video B.
Transitions the video with a door opening movement.
Video A becomes a sphere and flies away.
Transitions the video as if a double door opens.
Transitions to video B by peeling away video A as if on 2 sheets of paper.
Peels away video A as if on 1 sheet of paper.
Transitions to video B by peeling away video A as if on 1 sheet of paper with video B on its reverse.
Transitions to video B by peeling away video A as if on 4 sheets of paper.
Video A flies away to reveal video B.
Transitions the video by flipping it over.
Turns over video A in stripes as if a set of blinds to reveal video B on the reverse.
Transitions by peeling over the video.
High quality and complex transitions that use the GPU (Graphics Processing Unit) can be set. A large number of presets are included in the [GPU] effect folder. If you want to set parameters to create a new transition, they can be set and applied from the [Advanced] folder.
The settings dialog box of each transition contains [Design] settings to adjust the direction of movement, angle of incidence of light and the like, and [Time] settings to specify a key frame and adjust movement along the time axis. These settings can be used to apply complex movement and effects.
You can set the antialiasing and image quality when GPUfx is applied, from [Effect] in [System Settings] → [GPUfx].
If [GPU] is not displayed in the [Effect] palette, or if the transitions do not move, confirm the system environment and the error information from [Effect] in [System Settings] → [GPUfx].
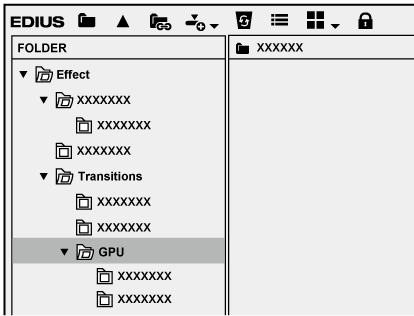
To display GPUfx transition, click the [Transitions] tree in the folder view of the [Effect] palette, and click the [GPU] tree.
|
|
|---|
|
If you have applied an effect in the [Advanced] folder, you may not be able to check the results of an effect with default settings. Either adjust the applied effect or apply a preset.
The following procedure explains how to adjust [Explosion] in the [Advanced] folder as an example. For how to apply GPUfx transition, see Transition .
1) Click the transition to which GPUfx has been applied.
2) Select [Explosion] in the [Information] palette, and click [Open Setup Dialog].
The [Explosion] dialog box appears.
3) Set each item.
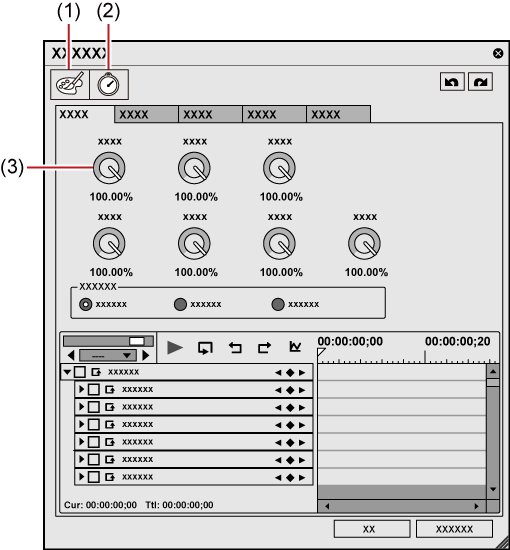
|
(1) |
[Design] |
Display a setting screen to adjust the motion or lighting. Use [Divide] to change the fragment size, use [Spread] to change the spread of fragments, and perform other operations. Also set key frames to change the motion of video along the time axis. |
|
(2) |
[Time] |
Display the setting screen to set the key frame and apply changes to the motion along the time axis. |
|
(3) |
Controller |
Drag up and down to adjust. |
4) Click [OK].
Transitions by folding the video like an accordion.
Transitions the video as if folding over a stiff page in a book.
Transitions the video by stretching it.
Transitions by applying an effect where it looks as if the video has exploded.
Transitions the video by rotating it on a three-dimensional cube.
The effect cannot be checked with default settings. Make sure to change the parameters after applying the effect.
Transitions the video with a movement like a clapper board.
Transitions the video while turning the video into a sphere.
Transitions the video while turning the video into a pipe shape.
Transitions the video by twisting it.
Transitions by peeling the video in 2 directions.
Transitions the video with a variety of freeform transformations.
The effect cannot be checked with default settings. Make sure to change the parameters after applying the effect.
Transitions the video with a door opening movement.
Transitions the video by peeling it.
Transitions the video by folding it.
Transitions by peeling the video in 4 directions.
Transitions the video by flying it away.
Transitions the video by flying it in.
Transitions the video by flipping it over.
Transitions the video by splitting it into tiles/stripes and turning it over.
Transitions the video while applying a wave-like effect.
Transitions the video while rotating it.
Applies a basic movement and configure the settings as you wish.
Applies SMPTE standard transitions.
A transition that is like dissolve, except you can apply unevenness to the dissolve or change the direction, rotation, speed, etc.
To Top
