Preparing for GV I/O installation of IP option
- Verify that the Mellanox ConnectX-5 card is installed.
- Procure the GVIO-Prerequisites-4.5.zip file that includes all GV I/O prerequisite files. This .zip file contains software components that will be used later in the procedure.
- Verify that Windows Server 2016 Base Image version 20190822-340-2016w or later has been installed. The base image should contain McAfee Solidifier 8.2.1.143 and GV Embedded Security Manager 1.0.0.26 or later versions of these software components.
This procedure is not required if you received your GV I/O server from the factory. Otherwise, proceed with the steps below:
- Enter the Update mode in the Embedded Security Manager, and install this Mellanox driver manually: MLNX_WinOF2_All_AllOS_x64_release_x_xxx_xxxxx_xx.exe
-
After the installation is done, select the Solidify button in the
Embedded Security Manager.
Note: The Solidifying step is optional on a new system and not needed if McAfee was never in Disabled Mode.
- Reboot the system.
- In the system setting, rename those two network ports associated with Mellanox network interface cards as HBR Media Port 1 and HBR Media Port 2.
-
Run the WeightNetworkAdapters PowerShell script after reviewing its associated
README.txt file and enter the names of your adapters as follows:
- Control Connection
- FTP Connection (for internal storage) OR Media Connection (for shared storage)
- HBR Media Port 1
- HBR Media Port 2
- Unused 1
- Unused 2
- Install the Mellanox Firmware Tools file manually: WinMFT_x64_x_xx_x_x.exe
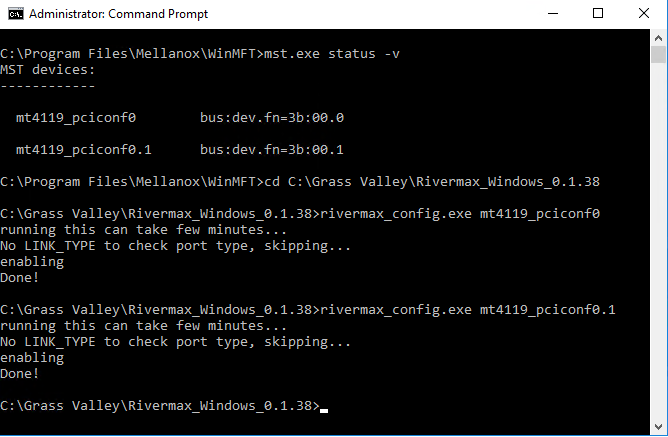
- Open a Command Prompt and run mst status -v to identify Mellanox board as below:
-
Then at the command prompt, enter mlxburn –vpd –dev
<adaptername> to get the information about the adapters
including the serial number needed for the license.
Note: A Mellanox Rivermax license file should be provided and installed at: c:\License\rivermax.lic
- Run rivermax_config-<version>.exe with correct identifiers to configure each Mellanox card.
- Reboot GV I/O after the configuration is done.
-
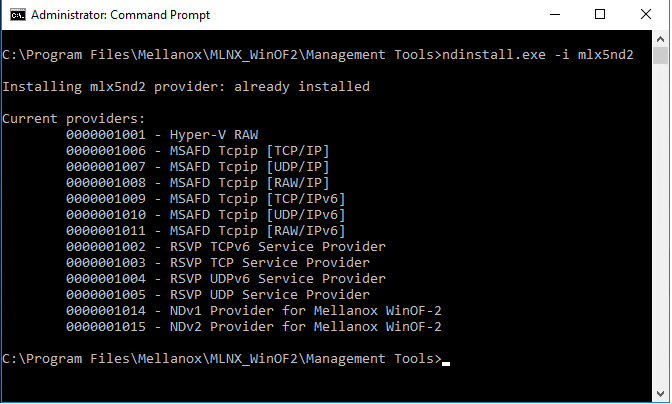
Using the Command Prompt, go to C:\Program
Files\Mellanox\MLNX_WinOF2\Management Tools and run the
ndinstall.exe file.
This will list all the current providers.
If the required provider "NDv2 Provider for Mellanox WinOF-2" is not in the list, run ndinstall.exe -i mlx5nd2 to add it.
- Run ndinstall.exe again at the Command Prompt, and make sure you see the required provider: NDv2 Provider for Mellanox WinOF-2
-
Run the NetAdapterConfig_VersionX.ps1 file for NIC
configuration.
Note: Reinstalling or updating the Mellanox driver will reset the NIC configuration settings, so this script must be executed again after any future driver updates.
- Install the S2059 client manually: S2059ClientInstaller-x.x.x.xx.exe
- Install the VyDriver manually: VyDriver-x.x.x.xx.exe
- Open Network and Sharing Center in the Control Panel, then right-click and select Properties on the first Mellanox ConnectX network port.
-
Disable all protocol and services except Vy and
Internet Protocol Version 4 (TCP/IPv4).
Note: VyDriver's configuration for CPU core selection can be left at the default automatic setting.
- Go to the second Mellanox ConnectX network port, then disable all protocol and services except Vy and Internet Protocol Version 4 (TCP/IPv4).
- For all non-Mellanox network ports, right-click on Properties and uncheck Vy for each network port.
- Set up and assign IP addresses for the Mellanox network interface controller (NIC).
- In the Embedded Security Manager, leave the Update mode and set it to Enabled mode.
- Reboot the GV I/O unit.