Assign keys to controller buttons when using the option fader controller and jog controller.
|
|
|---|
|
1) Click [Settings] on the menu bar, and click [User Settings].
2) Click the [Input Controller] tree, and click the fader controller or jog controller to be used.
3) Set each item.
For [MKB-88 for EDIUS]
|
Controller display |
[Control] tab Displays an overview of the controller. Buttons assigned an operation are displayed in yellow. If you click a button to assign an operation to, the [Select Operation] dialog box appears. [List] tab Displays the buttons, assigned operations, and repeat enable/disable setting in a list. Click the list and [Assign] to open the [Select Operation] dialog box. Click [Not Assign] to cancel operation assignments. |
|
[Import]/[Export] |
Import and export controller settings. |
|
[Default] |
Return settings to their defaults. |
4) Click [OK].
You can continue to set other items by clicking [Apply].
|
[Category] |
Select operation categories from the list to narrow down the items. |
|
[Filter] |
Enter a keyword to narrow down the items. |
|
Operation list |
Displays operations available for assignment. You can also assign operations by dragging operations and dropping onto the buttons in the [Control] tab or the list in the [List] tab. |
|
[Use Key Repeat] |
Check this item to repeatedly perform an operation when a key is held down. |
|
[Find Short Cut] |
Click this item and press any key on the keyboard to select the shortcut operation assigned to the key. |

|
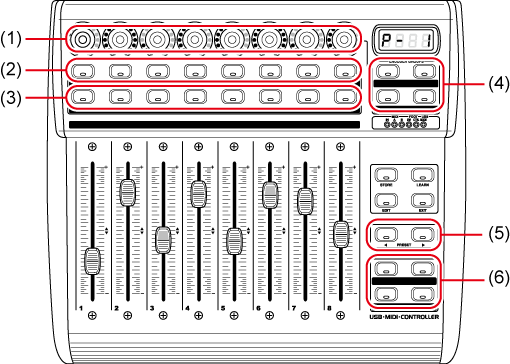
(1) |
Encoder knobs |
Encoder knobs can be used as buttons. Select the operation that is performed when a button is pressed by the encode selection buttons. No functions are assigned to the rotation direction of the encoder knobs. |
|
(2) |
Upper buttons |
These buttons function as the SELECT button for selecting the learning mode. |
|
(3) |
Lower buttons |
These buttons are used for emulating touch operations. The touch sensor part for the fader is emulated. Press a button to set a break state, and release the button to set a release state. |
|
(4) |
Encode selection buttons |
Upper left: SELECT Upper right: AUX Lower left: SOLO Lower right: MUTE |
|
(5) |
Preset selection buttons |
Select a preset No. To use this function from EDIUS, presets must be installed. |
|
(6) |
Function buttons |
These buttons can be customized with key assignments. |