1) Right-click a clip on the timeline, and click [Time Effect] → [Speed].
The [Speed] dialog box appears.
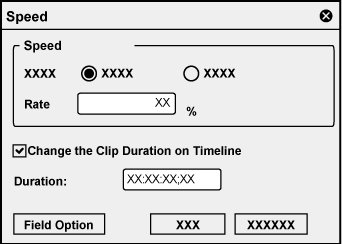
2) Set each item.
To decrease the playback speed, change [Rate] in [Speed] to lower than 100%.
Check [Change the Clip Duration on Timeline] to change the duration of clips on the timeline according to the speed (value of [Rate]) of the clip.
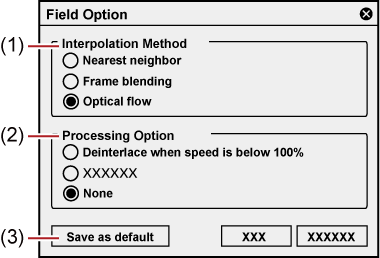
3) Click [Field Option].
The [Field Option] dialog box appears.
4) Select [Optical flow] in [Interpolation Method].


If [Optical flow] has been selected for [Interpolation Method], selecting [None] for [Processing Option] will make the playback smoother.
5) Click [OK].
6) Click [OK].
An orange line is displayed on a clip whose speed has been changed.
[Optical flow] can also be used for progressive/interlace (P/I) conversion or frame rate conversion.
If a progressive source is placed on an interlace timeline with the same frame rate (for example, 29.97p source is placed on the 59.94i timeline), the video can be played back smoothly due to P/I conversion in [Optical flow].
|
(1) |
[Interpolation Method] |
[Nearest neighbor] The length of the clip is adjusted by skipping frames or continuously displaying the same frame. [Frame blending] Adjacent frames are composed and a new frame is automatically generated to interpolate between the frames. [Optical flow] The motion in adjacent frames are analyzed by pixels and a new frame is automatically generated so that the motion of the subject is played back smoothly. |
|
(2) |
[Processing Option] |
Set the processing option to reduce flicker during slow motion. Select [Deinterlace when speed is below 100%] if video is affected by the scanning line and flickers when a slower playback speed has been set. |
|
(3) |
[Save as default] |
Click this item to save the current settings as defaults. When a clip is placed on the timeline, the default [Field Option] is always applied. |
