Set EDIUS operations.
Set operation or display on timeline.
1) Click [Settings] on the menu bar, and click [User Settings].
2) Click the [Application] tree, and click [Timeline].
3) Set each item.
|
[Extend Clips when Applying Transition/Cross Fade] |
When a clip transition/audio cross fade has been set to the clip on the timeline, right and left clips extend and overlap with each other. The total length remains unchanged. |
|
[Insert Default Crossfade in Transition] |
When a transition has been set to a video clip on a VA track, the default audio cross fade of the same length is simultaneously added to the audio clip at the same position. |
|
[Insert Default Transition in Crossfade] |
When a cross fade has been set to an audio clip on a VA track, the default transition of the same length is simultaneously added to the video clip at the same position. |
|
[Set the Cut Point of Transition/Cross Fade to Front when at Middle of a Frame] |
Set the cut points of clip transitions or audio cross fades to forward. For example, when the transition for 7 frames has been set, the cut points are set between the third and fourth frames. 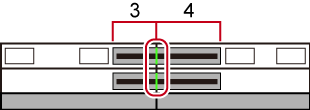 |
|
[Hold the Next Clip when Trimming a Clip (except at ripple trim)] |
Disable extension of clips across the edge of the clips on the left and right when trimming a clip with ripple mode off. |
|
[Show Tool Tip During the Trim] |
Display timecode information on the tooltip while dragging to trim the cut point of clips. |
|
[Reset Pan Settings when Audio Clips are Moved to Other Tracks] |
When an audio clip has been moved or copied to another track, the pan setting is reset aligned with the destination track. For example, when a clip on the 1A track has been moved to the 2A track, the pan that was set on the 1A track is reset on the 2A track with the L and R sides inverted. |
|
[Select the Left Clip when Cutting a Clip] |
Set which one of the previous and next clips will be selected when clip cutting has been performed. |
|
[Snap Event] |
Enable the snap function. Check the event to be used as the snap point. When [Snap to Events Inside the Selected Area] is checked, all edit points of the clip in the selection area are snapped to. |
|
[Default] |
Change the default setting for the editing mode when creating a new project file. |
|
[Waveform] |
Set the display method for the waveform of the timeline to either [Log (dB)] or [Linear (%)]. |
|
[Clip Timecode] |
Display the checked timecode on the clip. |
|
[Clip Thumbnail] |
Display the thumbnails of In/Out points at the clip edge on the timeline. Select [All] to display thumbnails in succession. To hide thumbnails, uncheck this item. [Alt] + [H] |
4) Click [OK].
You can continue to set other items by clicking [Apply].
Set the search direction or track.
1) Click [Settings] on the menu bar, and click [User Settings].
2) Click the [Application] tree, and click [Match Frame].
3) Set each item.
|
[Search Direction] |
Select the direction for searching clips when [Match Frame (Player to Recorder)] is clicked. On the end of the search, it restarts the search from the beginning. |
|
[Target Tracks] |
Specify the track to be searched. Each track can be specified by selecting [Choose Tracks] or [Selected Tracks]. |
|
[Transition] |
When you execute a match frame at the point where a transition is set, set whether to use a front side clip or back side clip. |
4) Click [OK].
You can continue to set other items by clicking [Apply].
Set background processing during playback.
1) Click [Settings] on the menu bar, and click [User Settings].
2) Click the [Application] tree, and click [Background Job].
3) Set each item.
|
[Default Settings for Background Job] |
[Pause Background Jobs During Playback] Check this item to pause the execution of the job when the Player or timeline is played back during execution of a background job. |
|
|
|---|
|
4) Click [OK].
You can continue to set other items by clicking [Apply].
Set operations in the proxy mode.
1) Click [Settings] on the menu bar, and click [User Settings].
2) Click the [Application] tree, and click [Proxy Mode].
3) Set each item.
|
[Proxy Mode] |
[When there is No Proxy, Use HiRes] Check this item to use high-resolution when there are no proxies in the clip. [Automatically Generate Proxy] Check this item to generate a proxy automatically in the background when no proxies are found when the proxy mode is set. |
4) Click [OK].
You can continue to set other items by clicking [Apply].
|
|
|---|
|
Set project file save destinations, backup/auto save, and other settings.
1) Click [Settings] on the menu bar, and click [User Settings].
2) Click the [Application] tree, and click [Project file].
3) Set each item.
|
[Project File] |
[Project File Folder] Change the folder currently selected as the save destination for project files. Select the folder from the [Browse For Folder] dialog box displayed by clicking [Browse]. [File Name] Change the default project file name that is given when a new project is created. To rename the file, enter a new name in the text box. |
|
[Recent Project] |
[Show the MRU List] Display the list of history files from the [Recent Project] list in the [Start Project] dialog box, or by clicking the [Open Project] list button, or by clicking [File] on the menu bar → [Recent Project]. Set the number of history files to display by [Number of Files]. |
|
[Backup] |
[Destination] Check this item to automatically create a backup file. When [Project Folder] is checked, a backup file is saved in “Project” → “Backup” in the project folder. When [Select a Folder] is checked and [Browse] is clicked, another save destination can also be specified. In this case, the backup file will be saved in “specified save destination” → “project name” → “Backup”. [Number of Files] Set the maximum number of backup files that are created. |
|
[Auto Save] |
[Destination] Check this item to automatically save project files. Check [Project Folder] to save an auto save file in “Project” → “AutoSave” in the project folder. When [Select a Folder] is checked and [Browse] is clicked, another save destination can also be specified. In this case, the backup file will be saved in “specified save destination” → “project name” → “AutoSave”. [Number of Files] Set the maximum number of auto save files that are created. [Interval] Specify the time interval for executing auto-save. [Delete All Auto Save Files when the Project File is Saved.] Check this item to delete the auto save file after the project file is saved. |
4) Click [OK].
You can continue to set other items by clicking [Apply].
Set how to display the history file or set existing titlers.
1) Click [Settings] on the menu bar, and click [User Settings].
2) Click the [Application] tree, and click [Other].
3) Set each item.
|
[Recent clip] |
[Show the Recently Used List] Click [File] on the menu bar → [Recent clip] to display the list of history clips. Set the number of history clips to display by [Number of Files]. [Show Thumbnail in the MRU List] Click [File] on the menu bar → [Recent clip] to display thumbnails. To display thumbnails, select the size from [Large] or [Small]. |
|
[Save Window Positions] |
Reproduce the last window and palette positions at the next start-up. |
|
[Show Tooltip] |
Displays the tooltip when the mouse cursor is moved over effect names. |
|
[Create Waveform cache when registering clip] |
Check this item to create waveform cache (waveform representation of audio) when registering a clip. |
|
[Create waveform cache files in Project folder (for files in removable or network drives)] |
Check this item to copy wave form cache (waveform representation of audio) on the removable drive or network drive to the project folder. |
|
[Set anchor setting to ON when adding a new sequence marker.] |
Check this item to enable the anchor setting when adding sequence markers. |
|
[Player Format] |
Select the format ([Source Format]/[Timeline Format]) for the Player to be used in file playback. On HD video monitors, SD signals may not be displayed. |
|
[Default Titler] |
Select the titler (software for creating titles) that is started up when [Create Title] for the bin or timeline is clicked. |
4) Click [OK].
You can continue to set other items by clicking [Apply].

