PREV NEXT INDEX


Troubleshooting problems


If you think there is something wrong (broken) with your iDDR, go through the following preliminary steps:

Then use the following topics to troubleshoot specific problem areas:


Step 1: Check configurations

Many times what appears to be an iDDR fault is actually an easy-to-fix configuration problem. Refer to the Turbo Quick Start Guide for operator tips that help you verify basic configuration and correct common record/play problems.


Step 2: Check connections and external equipment

Loose or improperly connected cables are the most likely source of problems for the system, monitor, or other external equipment. A quick check of all the cable connections can easily solve these problems. Refer to the Turbo Quick Start Guide for help with making connections. Refer to the troubleshooting topic "Checking external equipment" if you suspect a failure in a device connected to the Turbo iDDR.


Step 3: Check system status messages

While the iDDR is in operation, some problems are detected and reported in system status messages. To view system status messages, do one of the following:

Also refer to "Viewing system status messages".


Step 4: Identify problems using the startup sequence

The startup sequence is your primary tool for identifying a Turbo iDDR fault. As the different levels of the Turbo iDDR system become operational in the startup process, the primary components of the system are checked. You can identify most problems by evaluating the messages, lights, and beep sounds that occur during the startup sequence.

NOTE: This procedure assumes that the iDDR is in the normal mode, not the storage maintenance mode. Refer to "Opening and closing the Storage Utility".

To identify problems using the startup sequence, do the following:

  1. Connect mouse, keyboard, and monitor. Refer to the Turbo Quick Start Guide. You must observe the VGA screen and in some cases be able to interact with the system via keyboard and mouse to fully identify problems during the startup sequence.
  2. Restart the iDDR. If you have problems, refer to "Shutdown/restart problems".
  3. Once the startup sequence begins, observe the progression of behaviors as listed in the following table. These are the behaviors you should expect to see and/or hear for a normally operating Turbo iDDR. If you observe behaviors other than those listed, refer to the indicated troubleshooting topics to identify problems.

    At about this time…
    On the iDDR front panel or chassis, the following should occur…
    On the VGA monitor or other connected device, the following should occur…
    If not, refer to the following:
    Pressing the standby button starts the iDDR

    0 seconds
    Keyboard lights flash
    Power on LED goes on and stays on.

    Chassis fan and processor fan start.
    DVD LED flashes intermittently. This lasts for 5 - 10 seconds.
    Drive busy LED flashes intermittently. As long as the iDDR is on, this occurs whenever the iDDR is active.
    Touch screen back light goes on.
    3 seconds
    GV screen appears.
    If there is a LAN connection, the green LED on the NIC adapter (rear panel) goes on and stays on.
    5 seconds
    Keyboard lights flash
    Black startup screen appears. System information is displayed.
    14 seconds
    A single beep is emitted from the iDDR motherboard.
    18 seconds
    GV screen appears.
    25 seconds
    All buttons flash on then off.

    26 seconds
    Panel Control System screen appears with messages:
    30 seconds
    Solid blue screen appears.
    33 seconds
    Windows starting up screen appears.
    34 seconds
    Windows desktop appears
    43 seconds
    System Startup messages appear.
    52 seconds
    Receiving components…
    56 seconds
    Receiving application…
    59 seconds
    Connection established…
    65 seconds
    All system components check out as OK and the front panel application opens.
    All system components check out as OK and AppCenter workstation opens.


Shutdown/restart problems

If the iDDR is inoperable due to a software error it can effect the operation of the standby button. If pressing the standby button does not shut down the iDDR, press and hold the button for five seconds. This forces the iDDR to execute a hard power down. If that doesn’t work, disconnect the power cable. When the iDDR is shutdown by disconnecting the power cable, when the power cable is connected the iDDR immediately begins the startup process.


Checking external equipment

This section provide troubleshooting procedures for external devices that connect to the Turbo iDDR. Before using these procedures, first check connections, as in "Step 2: Check connections and external equipment".

VGA display problems

Problem
Possible Causes
Corrective Actions
Screen turns on, but nothing from iDDR is displayed
VGA connector or cable is faulty.
Replace VGA monitor.
iDDR system settings have been tampered with.
Restore default settings using the system installer process.

Keyboard problems

The keyboard is detected during BIOS startup. After the RAM check completes, there should be a very brief message displayed indicating detection of input devices connected to USB or PS2 ports.

Problem
Possible Causes
Corrective Actions
The iDDR does not respond correctly when one or more of the keys on the keyboard are pressed.
The keyboard is faulty.
Replace the keyboard.
iDDR system settings have been tampered with.
Restore default settings using the system installer process.

Mouse problems

The mouse is detected during BIOS startup. After the RAM check completes, there should be a very brief message displayed indicating detection of input devices connected to USB or PS2 ports.

Problem
Possible Causes
Corrective Actions
The iDDR does not respond correctly when one or more of the buttons on the mouse are clicked.
The mouse is faulty.
Replace the mouse.
iDDR system settings have been tampered with.
Restore default settings using the system installer process.


Power connection sequence

The following table lists the sequence of behaviors you should expect to see and/or hear as you connect the power cable to a normally operating Turbo iDDR. If you observe behaviors other than those listed, refer to other sections of this manual to investigate potential problems.

In this time…
On the iDDR front panel or chassis, look/listen for the following…
If not, refer to the following.
0 seconds
The DVD light flashes on and off quickly.
Power on LED goes on and stays on.
Drive busy LED goes on then off.
Touch screen back light goes on, then off.
3 seconds
If there is a LAN connection, the green LED on the NIC adapter (rear panel) goes on and stays on.

This power connection sequence assumes that before the power cord was removed, the iDDR was properly shut down from AppCenter, from the Windows operating system, or from the standby button. If the power cord was removed without a proper shutdown, when the power cord is connected the iDDR might go directly to the startup sequence. Refer to "Shutdown/restart problems".


Motherboard/BIOS startup

A few seconds after startup, on the VGA monitor a black screen is displayed with system information messages. This is the BIOS Power On Self Test (POST). Press Delete on the keyboard during this time to enter the BIOS settings pages. When the BIOS POST completes, a single beep emitted from the motherboard indicates success. At that point the Windows operating system begins to load.

If during the BIOS POST time a message appears that requires your input or if the iDDR does not progress to Windows startup, it indicates a problem at the motherboard level. To correct problems of this nature, contact Grass Valley Support.


Windows startup

After the motherboard startup processes complete the Windows operating system starts up. Normally the Windows operating system completes its processes automatically without the need to press keys or respond to messages. The iDDR is set to automatically log on (username: administrator; password: triton) without any input. When the Windows startup is complete the Windows desktop is momentarily displayed.

If the Windows startup screen does not proceed automatically or if a message appears that requires your input, it indicates a problem at the operating system level. If the problem cannot be corrected with a supported procedure (such as networking), the Windows operating system is not operating as it should. To correct problems of this nature, restore your system software. Refer to "Restoring the default system".


Front panel software startup

Once power is applied, the front panel touch screen runs as a self-contained system, similar to a PDA-type device. The first application to load is the Panel Control System. Its purpose is to manage the front panel applications and their connection with AppCenter workstation. The Panel Control System idles until the Windows XP operating system is fully loaded, at which time an application on the iDDR host system (Windows XP) begins delivering to the front panel system the necessary software components. This is indicated by the following messages displayed on the front panel:

After all the messages complete successfully the Panel Control System runs in the background and the primary front panel applications open.

Front panel applications require that AppCenter workstation be up and running. There is constant communication between AppCenter workstation and the front panel so that the front panel knows that AppCenter is running. When AppCenter workstation is closed or is otherwise not functioning, the Panel Control System closes the front panel control applications.


iDDR system startup

After the Windows operating system startup processes complete, iDDR system startup processes begin. The iDDR determines that system health is adequate by checking critical subsystems and supporting subsystems as follows:

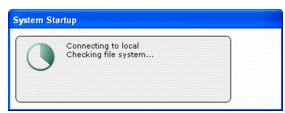
When all critical subsystem checks are successful, AppCenter workstation opens. If one of the system checks fails, a message appears and the iDDR is rendered inoperable. Refer to "Critical system startup messages" for a list of the messages that can appear.

To correct problems revealed at system startup, use the indicated troubleshooting information from the following sections.


Thermal problems

Problem
Possible Causes
Corrective Actions
The fans are noisy or otherwise run erratically. The iDDR overheats. This can be accompanied by a Status Pane message indicating a temperature or fan problem.
Airflow is blocked.

The fan module is not operating correctly.
Ensure adequate airflow around the iDDR.

Inspect the fan module and its connections for proper operation. The fan gets its power from the motherboard, so make sure the motherboard is not faulty as well. If the fans are not operating correctly, replace the fan module as explained in "Fan module removal".


Codec board problems

To test the codec board, do the following:

  1. Set the iDDR to front panel control mode. Do all configuration and channel control in this procedure from the front panel.
  2. Configure an output (P1 or P2) and input (R1) to the same video and audio type.
  3. Set the output to test mode (colorbars).
  4. Connect (loop) the configured output directly to the configured input. So this for both video and audio. This provides a verified good signal to the inputs.
  5. Record a short clip.
  6. Verify the codec board’s recording functionality as follows:
    • Check the thumbnail of the recording clip. It should display colorbars.
    • Listen to the clip’s audio with headphones from the front panel headphone output. You should hear a test tone.
  7. Using the other play channel, play back the clip.
  8. Verify the codec board’s play out functionality as follows
    • Check the video on a verified good output device. It should display colorbars.
    • Listen to the audio output. You should hear a test tone.
  9. Repeat this procedure for each video and audio type.

If you get the expected results, the codec board is good and any problems you are experiencing are due to some other cause.

If you get faulty results it indicates a problem with the codec board. Investigate the problem further as described in the following table. If the problem persists, contact Grass Valley Support.

Problem
Possible Causes
Corrective Actions
The front panel startup sequence stalls at “Establishing Connection”.

A system status message indicates a problem with the codec board.
The codec board and/or riser board are not connected properly or are faulty.
Visually inspect the riser board and codec board. Make sure they are connected properly and there is no sign of physical damage. Restart the iDDR. If the problem persists, replace the codec board. Refer to "Codec board removal".


Power supply problems


Problem
Possible Causes
Corrective Actions
The iDDR will not power on or power fails while the iDDR is in operation. This can be accompanied by a Status Pane message indicating a power supply problem prior to the failure.
The power source is faulty.
Make sure your power source is reliable.
The power cord is faulty.
Try another power cord.
The iDDR is too hot. The built-in overtemperature protection can shut down the power supply.i
Check for thermal problems. Cool the iDDR.
The power supply is faulty. This is indicated if the front panel power indicator does not come on.
Replace the power supply

If the power source and the power cord are OK, replace the power supply. Refer to "Power supply removal".


Front panel problems

On the Windows desktop open My Computer for a quick check of the front panel. If you see the front panel icon, it means the Windows CE operating system is working. If you do not see the front panel icon, investigate the problem further as described in the following table. Also refer to "Front panel software startup".

Touch screen and buttons problems

Problem
Possible Causes
Corrective Actions
Pressing the Record button does not start a recording.
Record button functionality is set to Play + Record, meaning both buttons must be pressed to start a recording.
Press both buttons or change the Panel Setup Record buttons setting.
The touch screen is image is faulty.

The front panel startup sequence stalls at Panel Control System.

AppCenter workstation does not allow you to select View | Front Panel.
- A display setting is mis-configured

- There is a connection failure between the front panel and the iDDR motherboard.

- The software or operating system on the iDDR has a fault

- The touch screen itself is faulty
1. Make sure AppCenter workstation is up and running.

2. Remove the top of the iDDR and check the front panel cable connections. If the front panel connector or cable is bad, replace the front panel. If you find no problems, continue with the next step.

2. Press the reset button on the back of the front panel.

3. Connect a mouse, keyboard, and VGA monitor to the iDDR and test functionality. Compare this functionality to that of the front panel. If everything works fine with the VGA monitor but not the front panel, there could be a software problem on the front panel. Refer to "Restoring the default system".

4. If after system install the front panel still does not operate, replace the front panel.
The front panel knob operates poorly or not at all.
The knob is bent or broken.
Inspect the knob to confirm that there is a mechanical problem with the knob. If so, replace the rotary encoder.

Front connector board problems

Problem
Possible Causes
Corrective Actions
The front IEEE 1394A port does not connect properly.
The cable to the IEEE 1394A board is disconnected or faulty.
Inspect the cable and connections.
The standby button and/or power indicator LED are not functioning.

The front USB port does not connect properly.

The front audio output connector or volume control does not operate properly.
The cable to the motherboard is disconnected or faulty.
Inspect the cable and connections.
The cable to the codec board is disconnected or faulty.
Inspect the cable and connections.
The power supply is faulty
Investigate power supply problems.
The motherboard is faulty.
Investigate motherboard problems
The front connector board is faulty.
Replace the front connector board.


DVD drive problems

Problem
Possible Causes
Corrective Actions
There is no access to a disk in the DVD drive. This can be accompanied by an error message from the Windows operating system.
There is a problem with the disk currently inserted in the drive, the Windows operating system is not recognizing the drive, or the drive itself is dirty or faulty.
1. Make sure a correctly formatted disk is inserted correctly. Try another disk if necessary. If the problem persists with a correctly formatted and inserted disk, proceed with the next step.

2. Watch the disk drive access lights while you attempt access to the disk. If the lights do not flash correctly, restart the iDDR and try disk access again. If the problem persists, proceed with the next step.

3. Clean the drive with a cleaning kit (available in computer stores) and try disk access again. If this does not fix the problem, replace the drive as explained in "Removable media drive removal".


Video problems

For the corrective actions in this section, refer to the Turbo User Manual for detailed instructions.

Problem
Possible Causes
Corrective Actions
A channel displays black at the end of the clip.
The channel is in E to E mode and there is no video signal present at the input.
Verify that you have a valid input signal.
Play channels have a dissimilar video display when no clip is playing.
One channel is in E to E and the other channel is not.
If similar display is required, configure both channels the same.
The picture level modulates at a particular frequency.
There is excessive hum riding on the video input signal. The automatic gain control (AGC) circuits will tend to modulate the picture level at that frequency in an attempt to compensate for the problem.
Check the video input signal for excessive hum.
In stop mode the still-play video shows some motion jitter.
Two fields are displayed in still play mode.
Switch the still-play mode setting to Field.
Periodic vertical shift artifacts are observed on the play channel output in E to E mode.
An asynchronous signal is routed through the iDDR.
Connect an external reference signal which is synchronous to the video input.


Audio problems

For the corrective actions in this section, refer to the Turbo User Manual for detailed instructions

Problem
Possible Causes
Corrective Actions
No audio
Wrong audio input selected
Select the correct audio input.
No embedded audio

Wrong embedded audio input group selected.

Wrong embedded audio output group selected.
Ensure the correct embedded audio input group is selected.

Ensure the correct embedded audio output group is selected.
Both E to E and playback audio output are distorted.
Audio input signal clipping caused by excessive audio input level.
Check for input audio clipping. Adjust the audio input trim. Adjust the Player audio level. Reduce the source audio input level.
Analog audio level is too low.
Audio level needs to be adjusted.
Adjust the audio input trim. Adjust the Player or Recorder audio level. Increase the source audio input level.
Audio level is too low.
Audio level needs to be adjusted.
Adjust the Player or Recorder audio level. Increase the source audio input level.
The audio level is not correct only when playing a particular clip.
The clip’s audio level is out of adjustment.
Load the clip in Player and adjust its playback audio level.
Audio level meters do not display the correct reference level used in my system.
Incorrect audio reference level
Select the correct audio reference level.
Audio meters do not appear in the AppCenter workstation Monitor Pane.
The Monitor Pane configured to not display audio meters.
Configure the Channel Monitoring setting to display audio meters.
.


Timecode problems

For the corrective actions in this section, refer to the Turbo User Manual for detailed instructions

Problem
Possible Causes
Corrective Actions
Recorded timecode reads xx.xx.xx.xx.
No timecode source for the channel.
Set the timecode source.
A clip shows no mark-in/mark-out timecode, the current timecode display shows XX:XX:XX:XX, or the last valid timecode is displayed.
The selected timecode source was missing or intermittent during recording.
Check that you have the right record channel timecode source selected, verify that timecode is present in the source, and record the clip again. You can also stripe the timecode on an existing clip.


Operational problems

For the corrective actions in this section, refer to the Turbo User Manual for detailed instructions.

Problem
Possible Causes
Corrective Actions
The iDDR is not operating as expected in relation to a setting displayed in Configuration Manager.
The setting was changed in Configuration Manager but not saved to the database.
Verify the setting you want in Configuration Manager and then select OK. When prompted to change the system settings, select Yes.
AppCenter displays different buttons than those expected.
Assignable buttons have been changed.
Assign buttons to the interface as desired.
A clip does not play, even though similar clips play on the same channel.
The clip does not match current iDDR settings or the clip is corrupt.
If the clip appears grayed-out it means it doesn’t match current settings. Check the clip’s properties and verify they are correct for the video standard, compression, and other current settings. Compare properties with those of a clip that plays correctly. If properties are correct the clip is corrupt. Delete and re-record the clip.
A clip can not be edited.
The clip is locked.
Unlock the clip.
Can’t rename a clip or modify mark-in/mark-out points
The clip loaded or playing is still being recorded. In this case, “Read-Only” is displayed in the StatusBar.
Wait until recording is complete.
Cannot load and play a list.
The application currently selected for the channel is not Playlist.
Select Playlist as the channel application. Lists load and play in the Playlist application only.
On setting mark-out, the subclip is automatically generated and ejected, and a new subclip name is loaded in the subclip pane.
Auto Subclip mode is enabled.
Disable Auto Subclip mode.
Can’t change what information is displayed in the Monitor Pane for Playlist.
You are attempting to use Configuration Manager to change what information is displayed in Monitor Pane for Playlist.
Use the Playlist Options dialog instead.
Can’t eject a list.
There is no eject operation in Playlist, as a list must always be loaded.
Remove the list from the Playlist application by creating a new list or by opening an existing list.
Can’t control a channel from the local iDDR. Controls are disabled.
A protocol application is selected for the channel and the channel’s control mode is set to Status.
Set the control mode for limited local control.


System problems

For the corrective actions in this section, refer to the Turbo User Manual for detailed instructions.

Problem
Possible Causes
Corrective Actions
One of the record channels does not record or video is jumpy.
The iDDR is configured for PAL, yet the video input is NTSC
Check the current setting for video standard. Verify that the video input signal is the correct standard.
A scheduled event, such as an automatic play or record event, does not occur at the proper time.
The time-of-day source for event scheduling is not accurate.
Verify the time-of-day source. Verify the source’s time accuracy.
Audio level from rear panel outputs cannot be adjusted.
The iDDR is configured to disable the adjustment.
On Configuration Manager’s Panel page, set the front panel volume knob to control front & rear monitor.


Storage problems

Use the following sections if you suspect problems with your iDDR’s storage system.

Media File System problems

Problem
Possible Causes
Corrective Actions
One or more clips do not play or record correctly. This can be accompanied by a Status Pane message indicating a fault in the media file system.
The media database is out of sync with the media files or there is a corrupt media file. Also see "Checking the storage system" for causes related to certain usage patterns.
1. If the problem is only associated with a specific clip or clips, delete the problem clips. If the problem persists, proceed with the next step.

2. Work through "Checking and repairing media". If the file system fails the check process you must replace the default system with the system installer process. When you do so you lose all media. Refer to "Restoring the default system".
During iDDR startup a “…no file system running…” message appears.
The file system is corrupt or disks are faulty/missing such that they are not part of a stripe group.
Work through "Checking and repairing media". If the file system fails the check process you must replace the default system with the system installer process. When you do so you lose all media. Refer to "Restoring the default system".

Media disk problems

On the Windows desktop open My Computer for a quick check of the SATA drives. You should see C:, D; and V: drives. The C: drive is SATA 0 (under the DVD drive) and the D: drive is SATA 1 (behind the touch screen). The V: drive is striped across both SATA 0 and SATA 1.

Problem
Possible Causes
Corrective Actions
No clips appear in the Clips pane. This may be accompanied by a startup message or a Status Pane message regarding media disks being unavailable.
A media disk is bad or there has been a hardware failure.
Open My Computer and view drives.

- If the C: drive only is displayed, you have a problem with SATA 1. Check SATA drive connections. Refer to "SATA drive removal".
- If connections are OK and a disk is still not displayed, the drive is faulty. When a drive fails all stored media is lost. Replace the faulty drive with a new drive.
On startup the front panel startup sequence stalls at “Connection Established”.
There is a problem with SATA 1.
On startup the VGA startup sequence stalls at the black screen with a “…select proper boot device…” message.
There is a problem with SATA 0. This is the system boot disk.
Check drive connections. Refer to "SATA drive removal".
- If connections are OK, the drive is faulty. When a drive fails all stored media is lost. Replace the faulty drive with a new drive.
The Status Pane message “Media disks getting full…” appears or a “FSS ‘default(0)’” message appears.
The media disks are reaching maximum capacity.
In Recorder, select the Time Dome and choose Available Storage. If the Time Dome is filled it confirms that your iDDR is out of space. Make space on the media drives by doing one or both of the following:
- Delete unused clips and empty the Recycled Bin.
- Work through "Clearing media".
When streaming to another iDDR the operation fails. In Transfer Monitor the streaming operation shows “Status:Error”.
There is a network connection error or the media disks on the destination iDDR are reaching maximum capacity.
Check network connections and configuration. Check available storage on the destination iDDR. In Recorder, select the Time Dome and choose Available Storage. If the Time Dome is filled it confirms that the destination iDDR is out of space. Make space on the media drives by deleting unused clips and emptying the Recycle Bin.
Playback flashes. After this occurs for several seconds a decoder error occurs and the play channel hangs.
One of the disks is not part of the stripe group because there is a disk error or because disks have been re-arranged.
If you have recently removed and replaced SATA drives, make sure that you have returned them to their correct position and the cabling is correct. If this solves the problem, work through "Checking and repairing media" to solve related faults.
System status message “File system…is fragmented”.
Extended record/play activity has fragmented the disks.
Defragment disks as explained in "Defragmenting the media disk volume".
Continual and noticeable black frames or freeze frames in video.
Drives are aging.
Look in the Windows system log. Aging drives are indicated if you see a large quantity of the following types of errors:

dmio: Harddisk0 write error at block…

Replace aging drives.

Checking the storage system

The following section provides guideline for investigating problem areas related to the storage system. Use this section if you have problems with media input and/or output that are intermittent or seem to be related to certain usage patterns.

Problem
Possible Causes
Corrective Actions
Symptoms can include black video recorded or at playout, frozen video, slow performance, or inconsistent media access. These symptoms can be accompanied by Status Pane messages regarding disk problems or overrun/underrun conditions for encoders, decoders, or timecode.
The following causes can occur on their own or in combination to produce the problem:
Disk oversubscription — This occurs when requests to the media disk exceed the disk’s bandwidth capabilities. This generally occur in extreme cases when a combination of high-bandwidth operations are taking place, such as jog/shuttle, record/play on multiple channels, or streaming multiple clips.
High CPU activity in Windows — This occurs when activities on the Windows operating system over-tax the capabilities of the motherboard processor. This commonly happens when unsupported software has been installed that competes with iDDR applications. Virus scanners and screen savers can cause this type of problem, since they can start automatically and consume system resources.
Encoder overrun — This occurs when an encoder is flooded with more data than it can process within its real-time requirements for recording.
Decoder underrun — This occurs when a decoder is starved for data and cannot deliver enough to satisfy real-time requirements for playout.
Disk faults — This occurs when a media disk is severely fragmented or has a bad blocks that interfere with some, but not all, media operations. For example, a particular clip can be written on a bad block, so the problem occurs only on that clip.
Try to re-create the problem. Identify all the interactions that affected the system and run all the same operations as when the error occurred. Record/play/stream the same clips. Investigate the functions that seem to push the system into the error state. If you determine that certain simultaneous operations cause the problem, re-order your workflow to avoid those situations. If you determine that the problem is only on certain clips, investigate disk faults.


Network, transfer, and streaming problems

Problem
Possible Causes
Corrective Actions
When importing or exporting (sending) between iDDRs over the low-speed network (not Gigabit Ethernet) a “…failed to connect…” message appears and the operation fails.
There is a problem with Windows networking or there is a mis-spelling with the host name as entered in Configuration Manager.
Check networking as follows:
- Check basic Windows networking. Use Windows Explorer to test a basic copy operation to the machine to which you are trying to connect. If basic networking fails, use standard Windows procedures to troubleshoot and correct your network.
- If the Windows network is working properly, in AppCenter select System | Configuration | Remote and verify that the name of the machine to which you are trying to connect is spelled correctly and has no extra spaces or characters.
When streaming between iDDRs over the high speed (Gigabit Ethernet) network, a “…failed to connect…” message appears and the operation fails.
The iDDR to which you are trying to connect is not operating or the high speed network is mis-configured.
Verify that the iDDR to which you are trying to connect is operational and that the network is configured according to the requirements for a high speed network, including static IP addresses and hosts files. Verify that the name of the iDDR is entered correctly in the Configuration Manager Hosts page. Refer to networking procedures in the Turbo User Manual.
A networked device does not appear in the “Import” and “Send to” dialog boxes, even though it is present on the Windows network.
The device is not entered as a host.
In AppCenter select System | Configuration | Remote | Add and enter the name of the machine to which you are trying to connect. Make sure it is spelled correctly and has no extra spaces or characters. Refer to networking procedures in the Turbo User Manual.
In the Send To or Import user interface, cannot browse media on a Profile XP Media Platform.
The iDDR user interface does not support browsing a Profile XP Media Platform.
You must select the Profile XP Media Platform, then specify the target manually by entering the disk volume and bin name, e.g. EXT:\default.
Files do not appear in Send To or Export dialogs.
File names do not have proper extensions.
Rename files with proper extensions.


PREV NEXT INDEX


Copyright Thomson Broadcast and Media Solutions, Inc.
http://www.thomsongrassvalley.com