EDIUS 7 Online Help
Reference ManualHardware Setup Guide
Installation Manual
User Guide
You can place source clips on the timeline.
Clip operations at placement and placement results are dependent on the editing mode.

The clip is placed on the track with the position of the timeline cursor set as the In point.
 Alternative
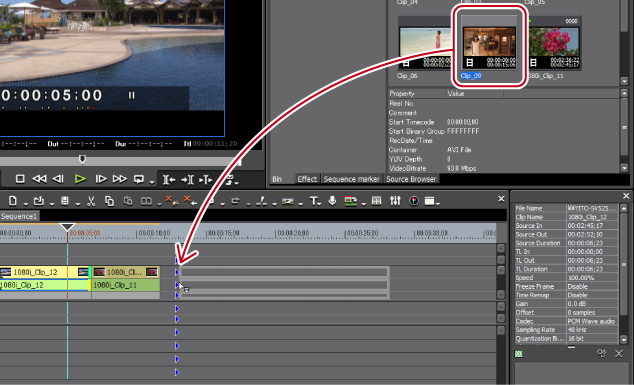
Drag and drop a clip in the bin onto the timeline. Channels can be mapped to any desired track and clips can be placed according to the drop point regardless of the track patch setting.
Right-click a clip in the bin, and click [Add to Timeline].
Play back a clip on the Player, and drag and drop the clip onto the timeline from the Player. Channels can be mapped to any desired track according to the drop point regardless of source channel mapping.
Play back a clip on the Player, and click [Insert to Timeline] or [Overwrite to Timeline].
Placing a clip displayed on the Player on the timeline: [E]
Set the source channel mapping, move the timeline cursor to the clip place point, and drag and drop the clip onto the Recorder.
Placing clips: [Shift] + [Enter]

You can place sources on the timeline without registering them to the bin.
Move the timeline cursor to the clip place point, right-click a track, and click [Add Clip]. Select the source from the [Open] dialog box, and click [Open].
You can confirm that a filter or transition is set from the display of the clip placed on the track.
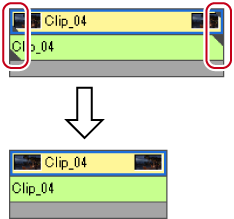
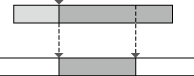
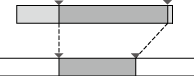
Triangular marks at both ends of the clip mean the start and end of the clip. Triangular marks are displayed when the clip has no margin.
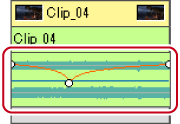
A green line is displayed at the top of the clip when rendering has been performed. An orange line is displayed when filter, time effect, layouter, normalize, etc. has been set.
When effect has been set

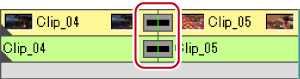
A frame is displayed as follows when a transition or audio cross fades is set between clips.
A triangle is displayed as shown below in the mixer area when a track transition is set at the start point of a clip.

Clicking the audio expand button displays a rubber band and waveform for the volume, and clicking the mixer expand button displays a rubber band for the transparency.
Adjusting the Volume and Pan of a Clip
You can set In and Out points to clips, and place only the required part on a track.

The same operations can also be performed in the source browser.

The clip is placed on the track with the position of the timeline cursor set as the In point.
When [Overwrite to Timeline] is clicked, the clip is placed in the overwrite mode.
AlternativeAfter setting the In and Out points to the clip, drag and drop the clip from the Player to place it on the timeline.
Placing the clip displayed on the Player on the timeline: [E]
Divided and placed video and audio clips are set in groups.
Place clips between In and Out points on the timeline. Clips are placed by the length between In and Out points on the timeline.
The same operations can also be performed in the source browser.
Check the video on the Player, and set the In and Out points, if necessary.
Setting the In and Out Points on the Timeline
The clip is placed trimmed to the length between In and Out points on the timeline. When the In point has been set, it is placed referenced to the In point.
The playback speed of the placed clip remains unchanged.
When [Overwrite to Timeline] is clicked, the clip is placed in the overwrite mode.
Set the In and Out points to the clip, and place it between In and Out points on the timeline. The speed between In and Out points of the clip is adjusted automatically according to the length between In and Out points on the timeline.
The same operations can also be performed in the source browser.
 Note
NoteEven if a margin is not assigned to a source, set the In and Out points to the start and end of the source. The editing mode becomes 3-point editing when In and Out points are not set.
Setting the In and Out Points on the Timeline
The In and Out points of a clip are placed between In and Out points on the timeline.
When [Overwrite to Timeline] is clicked, the clip is placed in the overwrite mode.
NoteWhen the duration between In and Out points on the timeline differs from that between In and Out points of the clip, the playback speed of the clip is adjusted automatically to stay between In and Out points on the timeline, with the range between In and Out points maintained.
Before placing clips, you can preview where cuts are switched.
Before operation, set to the overwrite mode.
Using the gang mode before preroll editing is useful in deciding the position where clips are placed on the timeline.
The same operations can also be performed in the source browser.
Check the video on the Player, and set the In point (Out point), if necessary.
If the In point is not set, the slider cursor position on the Player is set as the In point.
Setting the In and Out Points on the Timeline
If the In point is not set, the current timeline cursor position is set as the In point.
Set the Out point, if necessary.

The [Pre-roll Edit (Preview)] dialog box appears, and playback near the In point on the timeline starts.
To preview again where the cut is switched, click [Retry].
To end the preview, click [All Stop].
By default, [Pre-roll Edit (Preview)] is not displayed. Before performing the operation, set to display the buttons on the Player.
You can set the preliminary operation time (preroll/postroll) at [Preview] in [User Settings] → [Pre-Roll Editing].
You can place clips on the timeline while checking where cuts are switched.
Before operation, set to the overwrite mode.
The same operations can also be performed in the source browser.
Check the video on the Player, and set the In point (Out point), if necessary.
If the In point is not set, the slider cursor position on the Player is set as the In point.
Setting the In and Out Points on the Timeline
If the In point is not set, the current timeline cursor position is set as the In point.
Set the Out point, if necessary.

The [Pre-roll Edit (Rec)] dialog box appears, and playback near the In point on the timeline starts.
Clips are overwritten and placed on the timeline, setting the position where [Rec Out] or [All Stop] is clicked as the Out point.
When [Rec Out] is clicked, the In point set in step 1 or 3 is updated to the position where [Rec Out] is clicked.
When [All Stop] is clicked, the information of the In point (Out point) set in step 1 or 3 remains as it is.
By default, [Pre-roll Edit (Rec)] is not displayed. Before performing the operation, set to display the buttons on the Player.
You can set the preliminary operation time (preroll/postroll) at [Preview] in [User Settings] → [Pre-Roll Editing].
You can create color bar clips, color matte clips, and title clips on the timeline.

When the In and Out points have not been set on the timeline, the clip is created at the position of the timeline cursor. The duration of the created clip can be set by [Source] in [User Settings] → [Duration].
When the In and Out points have been set on the timeline, the clip is created between In and Out points. You can set whether to create clips between In and Out points or at the cursor position by [Source] in [User Settings] → [Duration].
NoteWhen all source channels have been released (track patch all set to off), color bar clips, color matte clips and title clips cannot be created. Also, title clips cannot be created when the video source channel is released.
AlternativeRight-click the track to create the clip on, and click [New Clip] → clip to create. The clip is placed at the right-clicked track regardless of the channel mapping settings.
Click [Clip] on the menu bar, and click [Create Clip] → clip to create.
Color matte bars, color mattes and title clips placed on the timeline can be edited by the following operation.
Select the clip to edit, and click [Clip] on the menu bar → [Edit].
Double-click the clip to edit.
Editing selected clip: [Shift] + [Ctrl] + [E]
