Configuring DIVA
Before you begin, verify the following:
- The DIVA server must have sufficient storage for archived clips.
- The DIVA server must be connected to the Control and streaming/FTP networks.
- The K2 system must be assigned with the role of FTP Server.
- Verify that K2 systems, GV STRATUS Core server, and the archive device can all communicate with each other on the streaming/FTP network. Use the ping command at the MS-DOS command prompt to test each device's streaming/FTP network name, which includes the _he0 suffix.
- Log on to the DIVA server.
- Launch the Configuration Utility on the DIVA server.
-
Click the Open connection button
 on the
toolbar to connect to the DIVA database.
The log on dialog box opens.
- Enter your user name and password, and click OK.
-
Click the Add source button
 to
add K2 server to the DIVA system configuration.
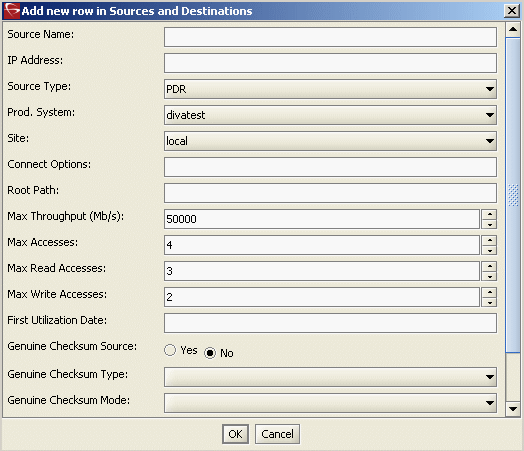
The configuration dialog opens.
-
Fill in the following information:
-
Source name – Name of the K2 server that the DIVA server
connects to. If applicable, enter the server name including the _he0 and _mxf suffixes. For MXF
archive, the _mxf
suffix must be at the end of the server name.
Note: To archive both GXF and MXF formats from a K2 server, make 2 entries of the K2 server name with _he0 suffix for GXF and _he0_mxf suffix for MXF.
- IP Address – IP address of the K2 server.
- Source Type – Select PDR.
- Production System – Select the production system in your operation.
- Site – Select the site in your operation.
-
Connect Options – Enter one of the
following:
- For GXF archive, enter -k2 -login movie.
- For MXF archive, enter -k2 -login mxfmovie.
- Root Path – You can leave this blank.
- Max Throughput (Mb/s) – Enter 50000 for the maximum throughput.
- Max Accesses – Enter 4 for the total number of maximum access.
- Max Read Accesses – Enter 3 for the total number of maximum read access.
- Max Write Accesses – Enter 2 for the total number of maximum write access.
-
Source name – Name of the K2 server that the DIVA server
connects to. If applicable, enter the server name including the _he0 and _mxf suffixes. For MXF
archive, the _mxf
suffix must be at the end of the server name.
- If you're configuring DIVA version 7, go to C:\Diva70\Program\conf\actor\partial_restore.conf and set the following setting:
- Restart the DIVArchive Actor Service, DIVArchive Manager Service, and DIVArchive Robot Manager Service on the DIVA server to enable the new settings.
- Verify that you can FTP from the DIVA server to the K2 server using the movie or mxfmovie user account.
Note: DIVA file names are case sensitive, therefore make
sure you selected the correct file name in lowercase or uppercase letters before
archiving.


