Adding an export rule
- Log in to the GV STRATUS Control Panel application with administrator privileges.
- In the GV STRATUS Control Panel application, click General | Rules.
- Click Add. Rules Editor settings open.
- In the Rule Type drop-down list select Export.
- In the Name field type in a name for the rule you are configuring.
- In the Description field type in a description for the rule you are configuring.
-
In Rule
Options settings, specify the rule behavior.
- Select whether the rule copies or moves the asset. If you select move, after the rule exports the asset, it removes the source asset from the GV STRATUS system.
-
Select when the rule is applied each
asset.
- Execute rule only once per asset: The rule is applied once per asset. The Rules Engine uses data stored in the asset's ExecutedByRules metadata field to determine if the rule has been applied to the asset. If it has been applied, the Rules Engine does not apply it again, even if the rule criteria still match for the asset.
- Execute every time rule conditions apply: The rule can be applied multiple times per asset, if the asset matches rule conditions multiple times.
-
Select the priority that the Rules
Engine processes the rule, with the transfers and transcodes the
rule controls, when there are multiple rules in a queue waiting to
be processed.
- Priority: High: Put this rule in a queue with other high priority rules and process through the high priority rule queue before any normal priority or low priority rules.
- Priority: Normal: Put this rule in a queue with other normal priority rules and process through the normal priority rule queue after any high priority but before any low priority rules.
- Priority: Low: Put this rule in a queue with other low priority rules and process through the low priority rule queue after any high priority or medium priority rules.
- In Rule Notification settings, specify the notification behavior, if desired. In order to send emails, the email server must be configured in Workflow Engine settings.
-
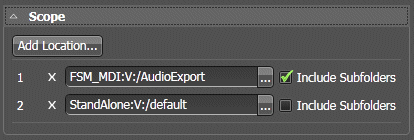
In Scope settings, specify the
location or locations in which the rule operates.
- Click Add location. The Location Selection dialog box opens.
- Navigate to and select the desired location. This is the location that contains the files on which the rule operates. Every time the rule runs, it looks in this location to determine if there are any assets that match the rule conditions and then operates on the assets that match.
- Click OK. The location is added to the Scope list.
- For a location in the list, if you want the rule to operate on sub-folders as well, select Include Subfolders. When this is selected, if there are multiple directories under the selected location, the rule operates in each of the sub-directories.
- Repeat these steps to add additional locations as desired.
-
To change a location in the list,
click the
Browse button

- To remove a location from the list, click X.
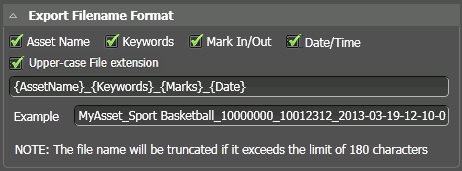
- In Export Filename Format settings, set the convention for the name of the exported file. Asset Name is set by default, as the exported file or files must have a name.
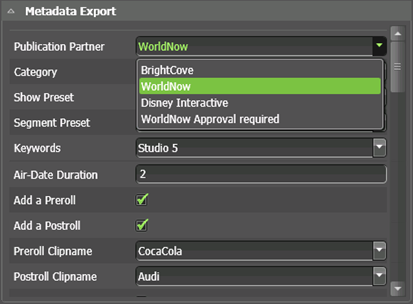
- In Metadata Export settings, set the custom metadata to be included with the export. In the exported content, custom metadata values entered here replace any current values. So if you previously entered values for these same custom metadata fields elsewhere in the GV STRATUS system, those values are overwritten in the exported content by the values you enter here. The custom metadata fields available are configured in Core | Metadata | Custom Metadata.
-
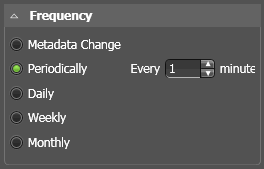
In Frequency settings, specify how often the Rules Engine
triggers the rule.
-
Select one of the following
options:
- Metadata Change: The rule is constantly monitoring assets in the "Scope" location.
- Periodically: Sets the number of minutes.
- Daily: Sets the number of days.
- Weekly: Sets the number of weeks.
- Monthly: Sets the day of each month.
-
Select one of the following
options:
-
In Export Options settings,
configure the format of the exported files.
You can select either a Native Format or a Transcode Format, but not
both.
- For Native Format, select the interchange standard in which to export. When a Native Format is selected, Transcode Format is automatically set to None and disabled.
-
For Transcode Format,
configure as follows:
- Select None: The exported file is the same format as the source on the K2 storage system.
- Select one or more transcode formats as
follows:
- To use multiple transcoders, select a single format for each transcoder.
- To use multiple formats from a single transcoder, select the formats for that transcoder.
-
For Metadata Format,
select as follows to additionally export an XML metadata file:
- None: No additional XML metadata file is exported.
- Final Cut Pro: Metadata is exported to a Final Cut Pro project XML file. Set all other Export Options to None to export metadata only.
- GV STRATUS Simple: Metadata is exported to a GV STRATUS schema XML file.
-
For Metadata-Destination
Path, configure as follows:
- If you are exporting the metadata file to the same destination as the asset file, leave this field blank. The file goes to the path configured in Destination settings.
- If you are exporting the metadata file to a different destination than the asset file, enter the metadata file's destination path. For an FTP path, use a ftp://server/path convention. For a UNC path, use a \\server\share\path convention.
- If you entered a Metadata-Destination Path, configure User Credentials for that destination.
-
For Thumbnails - Marker,
select as follows:
- None: The export does not contain thumbnails.
- Quality - High: High: The export contains a full-resolution JPG thumbnail with no compression (100%).
- Quality - Medium: The export contains a full-resolution JPG thumbnail compressed 85%.
- Quality - Low: Low: The export contains a half-resolution JPG thumbnail compressed 70%.
-
For Closed Caption
Format, select as follows:
- None: No additional Close Caption file is exported.
- K2-SCC: Workflow Engine extracts CEA-608 information stored in Ancillary data (CEA-708) from the asset on the K2 system and exports to a file in SCC format.
- K2-TTML: Workflow Engine extracts CEA-608 information stored in Ancillary data (CEA-708) from the asset on the K2 system and exports to a file in TTML format.
-
For CC-Destination Path,
configure as follows:
- If you are exporting the Closed Caption file to the same destination as the asset file, leave this field blank. The file goes to the path configured in Destination settings.
- If you are exporting the Closed Caption file to a different destination than the asset file, enter the Closed Caption file's destination path. For an FTP path, use a ftp://server/path convention. For a UNC path, use a \\server\share\path convention.
- If you entered a CC-Destination Path, configure User Credentials for that destination.
-
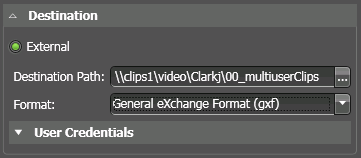
In Destination settings, define the destination location on
which the rule operates.
For Export rules, the destination must be a location that is external to the GV STRATUS system and not managed by the GV STRATUS system. An external location is not visible in the GV STRATUS application Navigator panel.
You can set any destinations for exports. For an FTP path, use a ftp://server/path convention. For a UNC path, use a \\server\share\path convention.
If the destination is a network share accessible from the machine hosting the GV STRATUS Control Panel application, you can click the Browse button to
configure Destination Path.
-
Configure User
Credentials as required.
If a UNC path destination, requirements for user
credentials are as follows:
- If both the K2 system and the export location are on the same domain, you can use domain credentials.
- If the K2 system and the export location are on different domains and the domains have a trust relationship, you can use domain credentials.
- If the K2 system and the export location both have a local user with the same name and password, you can use the local user credentials.
-
Configure Format settings to select the
export container format as follows:
- If in Export Options settings you selected a Transcode Format, you cannot configure Format settings. The selected transcode profile specifies the export container format.
- If in Export Options settings
you set Transcode
Format to None, you can configure Format settings as
follows:
- None: No video/audio assets are exported, but metadata, CC, or thumbnails are exported, as configured in Export Options.
- General eXchange Format (gxf)
- Material eXchange Format (mxf)
- QuickTime Movie (mov)
- QuickTime Reference Movie (mov)
-
Configure User Credentials as
required.
If a UNC path destination,
requirements for user credentials are as follows:
- If both the K2 system and the export location are on the same domain, you can use domain credentials.
- If the K2 system and the export location are on different domains and the domains have a trust relationship, you can use domain credentials.
- If the K2 system and the export location both have a local user with the same name and password, you can use the local user credentials.
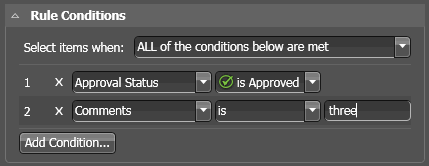
- In Rule Conditions settings, specify the conditions the Rules Engine looks for to qualify an asset.
-
In the Select items
when drop down list, select one of the following:
- ALL of the conditions below are met: Assets that match all conditions.
- ANY of the conditions below are met: Assets that match any condition.
- Custom: A Custom Expression field opens in which you can enter a custom expression.
-
Configure conditions as
follows:
- For each condition (1, 2, 3, 4, etc) click the Add Condition button and select from lists to define the condition.
- Click the X button to remove a condition from the list.
If the rule applies to newly created assets, such as those created by a scheduled record, configure Duration | is greater than | 00:00:00.00. This ensures the asset is ready to transfer.
If a newly created custom metadata field is not available in the Add Condition dialog, restart the GV STRATUS Control Panel application.
- Click Save.


