Example rules: Export segments, assets
You can create a rule that exports one of the
following:
- Approved standard segments that are part of a live segmentation
- Approved assets
- Log in to the GV STRATUS Control Panel application with administrator privileges.
- In the GV STRATUS Control Panel application, click General | Rules.
- Click Add. Rules Editor settings open.
- In the Rule Type drop-down list select Export.
- In the Name field type in a name for the rule you are configuring.
- In the Description field type in a description for the rule you are configuring.
-
In Rule Options settings,
specify the rule behavior.
- Select Copy.
-
Select when the rule is applied each asset. Configure as
follows:
- Execute rule only once per asset: The rule is applied once per asset. The Rules Engine uses data stored in the asset's ExecutedByRules metadata field to determine if the rule has been applied to the asset. If it has been applied, the Rules Engine does not apply it again, even if the rule criteria still match for the asset.
-
Select the priority that the Rules
Engine processes the rule, with the transfers and transcodes the
rule controls, when there are multiple rules in a queue waiting to
be processed.
- Priority: High: Put this rule in a queue with other high priority rules and process through the high priority rule queue before any normal priority or low priority rules.
- Priority: Normal: Put this rule in a queue with other normal priority rules and process through the normal priority rule queue after any high priority but before any low priority rules.
- Priority: Low: Put this rule in a queue with other low priority rules and process through the low priority rule queue after any high priority or medium priority rules.
- In Rule Notification settings, specify the notification behavior, if desired. In order to send emails, the email server must be configured in Workflow Engine settings.
-
In Scope settings, specify the
location or locations in which the rule operates.
- Click Add location. The Location Selection dialog box opens.
- Navigate to and select the desired location. This is the location that contains the files on which the rule operates. Every time the rule runs, it looks in this location to determine if there are any assets that match the rule conditions and then operates on the assets that match.
- Click OK. The location is added to the Scope list.
- Do not select Include Subfolders.
- In Export Filename Format settings, set the convention for the name of the exported file. Select Asset Name only.
- In Metadata Export settings, set the custom metadata to be included with the export. Select Brightcove. This extracts the mandatory GV STRATUS asset metadata. The custom metadata fields available are configured in Core | Metadata | Custom Metadata.
-
In Frequency settings, specify
how often the Rules Engine triggers the rule, as follows:
- Metadata Change: The rule is constantly monitoring assets in the "Scope" location.
-
In Export Options settings,
configure the format of the exported files.
-
For Transcode Format,
configure as follows:
- Configure a specific transcode format (MP4 AVC), as it exists in a currently configured Elemental transcode profile.
-
For Metadata Format,
select as follows to additionally export an XML metadata file:
- Select Brightcove.
-
For Metadata-Destination
Path, configure as follows:
- You are exporting the metadata file to the same destination as the asset file, so leave this field blank. The file goes to the path configured in Destination settings.
-
For Thumbnails - Marker,
select as follows:
- None: The export does not contain thumbnails.
-
For Closed Caption
Format, select as follows:
- K2-SCC: Workflow Engine extracts CEA-608 information stored in Ancillary data (CEA-708) from the asset on the K2 system and exports to a file in SCC format.
-
For CC-Destination Path,
configure as follows:
- You are exporting the Closed Caption file to the same destination as the asset file, so leave this field blank. The file goes to the path configured in Destination settings.
-
For Transcode Format,
configure as follows:
- In Destination settings, enter Brightcove://. That is the protocol to be used to export and register content to Brightcove.
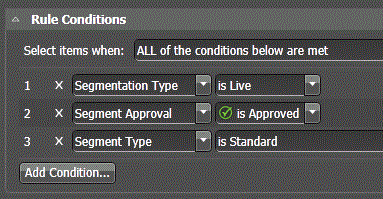
- In Rule Conditions settings, specify the conditions the Rules Engine looks for to qualify an asset.
- In the Select items when drop down list, select ALL of the conditions below are met.
-
For each condition (1, 2, 3) click the Add Condition button and
select from lists to define the condition.
- For a rule that exports segments, configure conditions as follows:
- For a rule that exports assets, configure conditions as follows:
- Click Save.


